
Pi-hole is a DNS sinkhole that protects devices from unwanted content, without installing any client-side software. I’ve run Pi-hole on a Raspberry Pi Zero for the last year or so and have found it easy to use (it’s literally set and forget) and super effective. I have a proliferation of Pi’s around my house and wanted to consolidate them by migrating the various workloads running on them to Docker containers running on a single Raspberry Pi 4 that I have.
I decided to start with migrating Pi-hole from my Pi Zero to a Docker container running on my Pi 4, I chose to do this first as there is a pre-built Pi-hole image for Docker and fantastic documentation.
The first step was to build the Pi 4, I used the Raspberry Pi Imager tool to prepare an SD card with Raspberry Pi OS (formally known as Raspbian). As I’m running this headless, I used the advanced options within the tool to configure the hostname of the device, enable SSH, set the locale and configure a password – it saved the hassle of plugging in a keyboard and monitor and doing this manually post-install.

Once my Pi 4 was running I connected over SSH (which you can do in Windows by running ssh pi@hostname) and enabled VNC via raspi-config which also gives me GUI access to the Pi.
I then needed to install Docker and Docker Compose, I previously posted about how to do this here. Here are the commands I ran on the Pi to do this:
sudo apt-get update && sudo apt-get upgrade
curl -sSL https://get.docker.com | sh
sudo usermod -aG docker ${USER}
sudo pip3 install docker-compose
sudo systemctl enable docker
Once this had completed, which took less than 5 minutes, I rebooted the Pi (sudo reboot from a terminal).
Now I had the Pi up and running along with Docker, I could create the Pi-hole container. To do this I took the example Docker Compose YAML file and edited it to meet my requirements – saving this as docker-compose.yml:
- Run in host mode – by specifying network_mode: “host”. This setting is described here, it means that the container will share an IP address with the host machine (in my case the Pi 4). I used this to keep things simple, I may regret this decision at a later date 🤦♂️.
- Configure the hostname – using container_name. I actually kept this as the default setting of pihole.
- Set the timezone – setting this to EUROPE/LONDON, using this article to determine the correct value 🌍.
- Specify a password for the web admin interface – This is configured with WEBPASSWORD, I used a password slightly more complex than “password” 🔒.
A copy of the docker-compose.yml file I created can also be found here.
version: "3"

# More info at https://github.com/pi-hole/docker-pi-hole/ and https://docs.pi-hole.net/
services:
  pihole:
    container_name: pihole
    image: pihole/pihole:latest
    # For DHCP it is recommended to remove these ports and instead add: network_mode: "host"
    network_mode: "host"
    environment:
      TZ: 'Europe/London'
      WEBPASSWORD: 'password'
    # Volumes store your data between container upgrades
    volumes:
      - './etc-pihole:/etc/pihole'
      - './etc-dnsmasq.d:/etc/dnsmasq.d'
    restart: unless-stopped
I then created a directory within /home/pi named “pihole”, copied the docker-compose.yml file into this and then ran the following command from within this directory to build and run the container:
docker-compose up -d

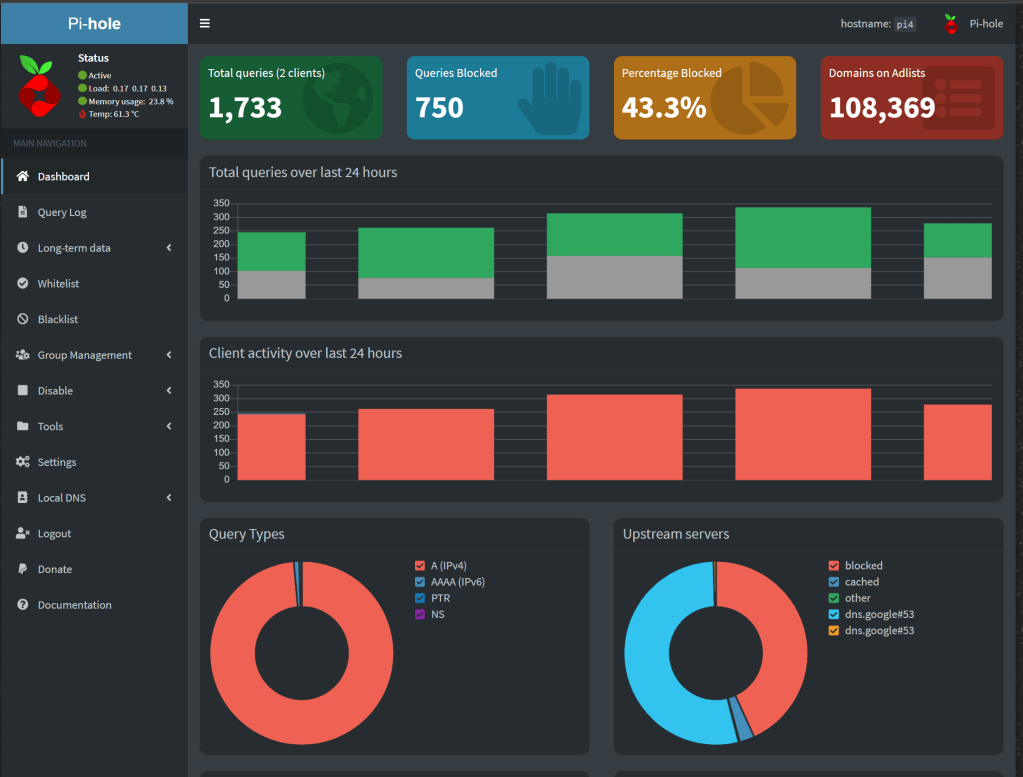
Within a few minutes I had a shiny new Pi-hole container up and running!
Next step was to update the DHCP settings on my router to use Pi-hole as the default DNS server it provides to devices on my network. I did this by specifying the IP address of the Pi 4 as the preferred DNS server for DHCP clients, I obtained the IP address of the Pi by running ifconfig from a terminal (I know I should really be using a static IP Address on the Pi 😉). I won’t cover how I updated my router, due to the multitude of different routers out there. I then ran ipconfig /release and ipconfig /renew on my Windows machine to refresh the DNS settings, my other devices will pick up the new settings when they renew their DHCP lease, which is daily.
I then browsed to the web interface using http://hostname/admin – in my case http://pi4.local/admin hit the login button and authenticated using the password I’d specified in the docker-compose.yml file.

Leave a comment