I have a Python script that I need to run every two weeks on my Raspberry Pi, I thought it would be simple enough to use a Cron job to schedule the script. It turns out that configuring a job to run ever 2 weeks isn’t as simple as I initially thought. I found some solutions to this here and planned to use the second approach (which uses a test statement).
This got me thinking that I can probably incorporate some form of test within the Python script itself, my plan was to schedule the script to run weekly, but include some logic within the Python script that means that it will only run on even numbered weeks.
I came up with this solution:
import datetime
if isinstance((datetime.datetime.now().isocalendar().week / 2),int):
    DoStuff()
This does the following
Get the current week of the year (datetime.datetime.now().isocalendar().week)
Divides the week number returned by 2
Uses isinstance to check if the value returned is an integer (which would be an even week)
If the value is an integer execute the method DoStuff()– which is the main method within my script
If the value isn’t an integer – do nothing
Note: If you replace int with float this will cause the DoStuff() method to execute on odd numbered weeks.
I have a script that I run on my Raspberry Pi every two weeks using a Cron job. Because I’m lazy, I don’t want to have to manually verify that the script has run successfully. I had a brainwave over the weekend about using IFTTT to automatically notify me the status of the script, each time it executes.
What is IFTTT you may be asking 🤔?!?
IFTTT is short for If This Then That, and is the best way to integrate apps, devices, and services. We help devices, services, and apps work together in new and powerful ways.
IFTTT was founded on the belief that every thing works better together. Tech incompatibility has become challenging for anyone trying to build a smart home or create automatic routines in their life. IFTTT makes it easy.
One of the useful features of IFTTT is the ability to host a webhook which can do something when it is called. In this specific case I had the idea to create an applet in IFTTT that hosts a webhook that when called will send a notification to my iPhone (which has the IFTTT mobile app installed).
A Webhook allows you to integrate with services that are not already on IFTTT using simple web requests. These Webhooks are unique to you using your own unique URL key, which can be found in the Documentation section of the Webhooks service page. A Webhook can act as both a trigger and an action, so the web requests are extremely flexible and customizable.
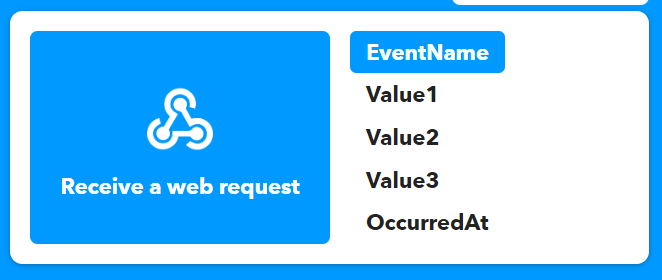
It’s possible to pass three values to a webhook via a query string (aptly named Value1, Value2 and Value3). My plan was to use these to send the name of the script (Value1) and the status of the script, such as “Successful” or “Failed” (Value2) – I won’t be using Value3. These values can then be used in the notification that IFTTT sends to my iPhone.
Here’s a short video that steps through the process of creating a webhook which sends a notification via the IFTTT mobile app.
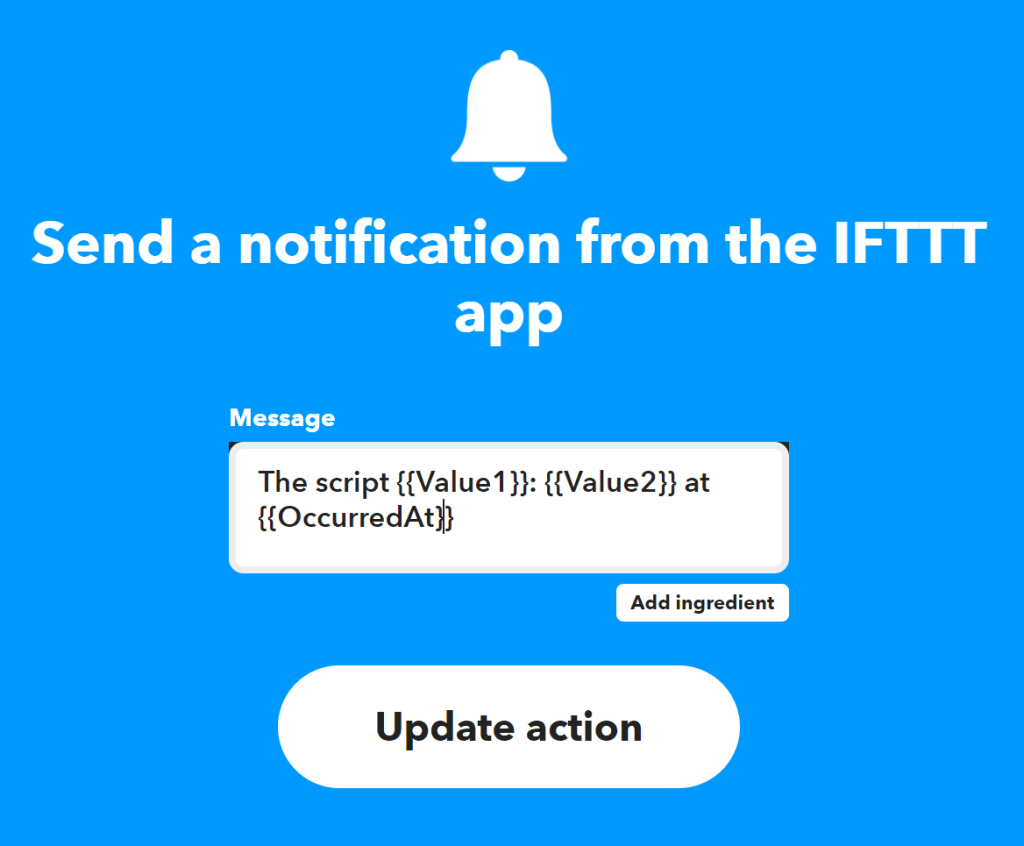
For reference, below are the settings of the notification action. This notification will send a notification with the text below, replacing Value1 with the name of the script and Value2 with the status of the script. OccurredAt will be replaced with the time that the web hook was called.
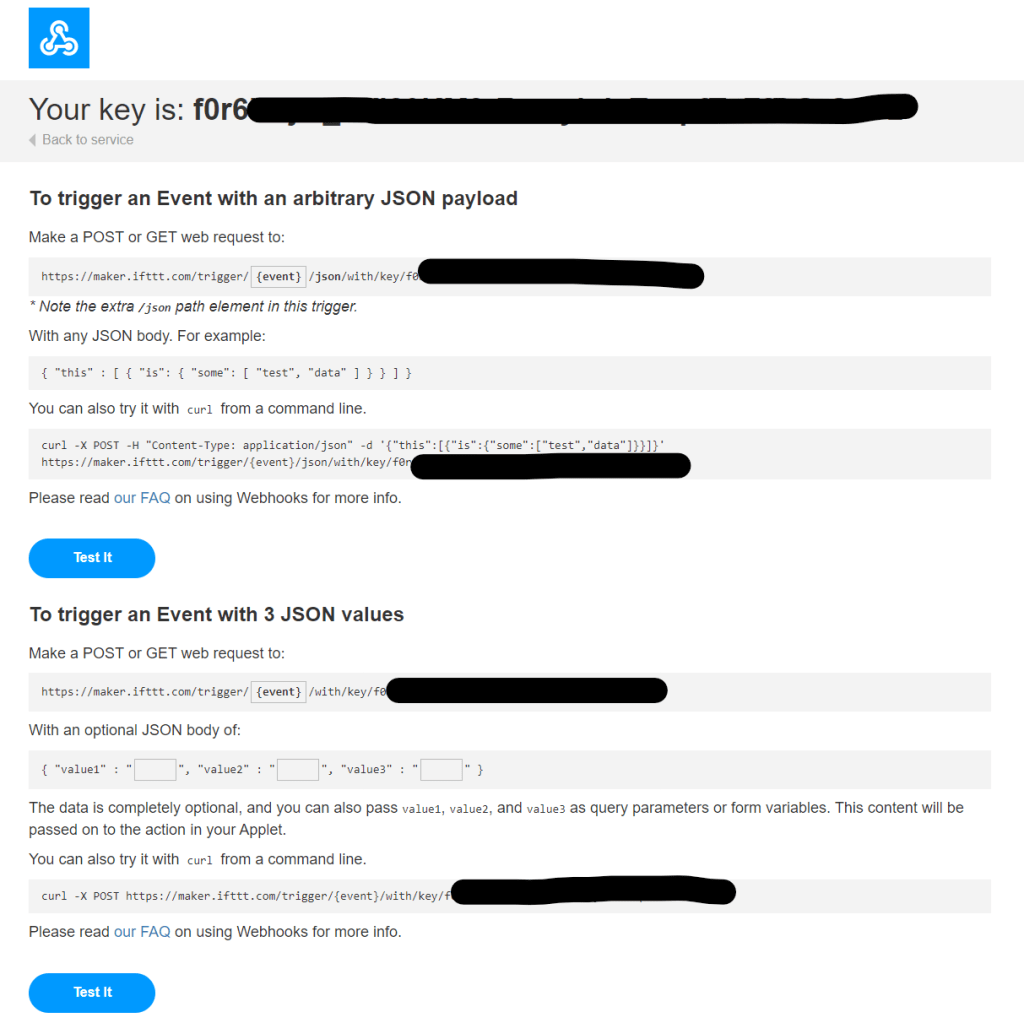
I was now ready to test this, but first I needed to obtain the URL and key for the webhook, I did this by browsing to https://ifttt.com/maker_webhooks and selecting Documentation. This presented my key and also some useful examples.
I did a quick test using Curl, a few points to note:
ScriptStatus is the Event Name configured within the “Receive a web request” trigger field (2nd screenshot below).
The key obtained in the previous steps needs to be referenced after /key/ (I blanked this out for obvious reasons 🙂).
I pass a query string containing Value1 and Value 2 (highlighted). Value1 is the name of the script (BinChecker) and Value2 is the script status (I used “failed” for testing)
curl -X POST "https://maker.ifttt.com/trigger/ScriptStatus/with/key/KEY?value1=BinChecker&value2=failed"
Here is the notification I received:
Lastly I incorporated this into my Python script using the following:
My Python script uses try/except/else blocks (documented here). The script calls a function AddEvent(), if this generates an exception, the except block is called, which calls the webhook passing the script name (BinChecker) and the status (failed). If it doesn’t generate an exception the else block is called which passes the script name (BinChecker) and the status (success).
My plan is to use this approach for all of the scheduled scripts that I have running on my Raspberry Pi.
This is probably the most boring and useless blog post that I’ve ever written – however it’s more for my future self than anybody else 😆.
A few months ago, I wrote a Python script that scraped my local council’s website for the bin🗑️ (garbage for any Americans reading this) collection schedule, I never seem to know when my bins will be collected and I’m too lazy to check this manually so thought I’d write a script to automate it. The original post can be found here and the Python script here.
I run this each week to check the schedule (as it changes often), below is the output of the script in all its glory:
I absolutely love overcomplicating things when it comes to tech, plus I’m always eager to learn new things, so the next step for me was to write a script that takes this output and creates an entry in my calendar to save me having to run the script manually, I planned to run this using a weekly Cron job on my Raspberry Pi….anyway, I’m jumping ahead of myself here!
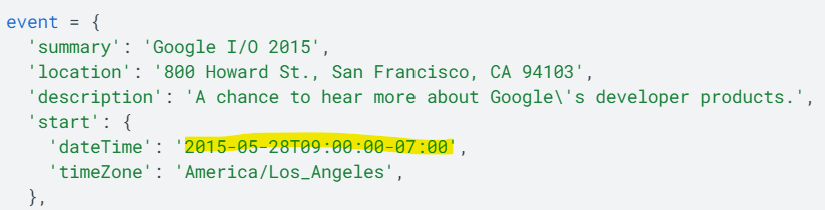
I plan to use the Google Calendar API to do this, the one challenge I have is that the dates returned from my script are in a different format to that expected by the API.
I needed a way to convert the these into the format expected by the Google Calendar API…the Python datetime library and the strptime method to the rescue!
I wrote the following, which takes the output from the variable I create for each bin type within the original BinDateChecker.py script (Black, Blue and Brown) and converts this into a datetime object.
from datetime import datetime
bluebindate = "Wednesday 16th Nov 2022" # Manually specifying the date string for testing using the format returned by the BinDateChecker.py Python script
# Remove all instances of st, nd, rd and th as datetime.strptime cannot deal with these (I'm sure there's a more elegant approach!)
bluebindate = bluebindate.replace("st","")
bluebindate = bluebindate.replace("nd","")
bluebindate = bluebindate.replace("rd","")
bluebindate = bluebindate.replace("th","")
# Call datetime.strptime passing the format I'm using day name / date / month name / year, a full reference can be found here - https://docs.python.org/3/library/datetime.html#strftime-strptime-behavior
bluebindate = datetime.strptime(bluebindate, '%A %d %b %Y')
print(bluebindate)
Here is the script, along with the date outputted in the desired format.
Now for the real fun…figuring out the Google Calendar API!
During the recent internal Microsoft Hackathon, I was part of a team that developed a prototype solution to manage EV charging stations within an office, to enable employees to book a timeslot for charging their vehicle and be assigned an available charging station at the selected time.
With the rise of EV’s it’s likely that the management of EV charging within an office will become a problem shortly (if not already!) therefore this was the perfect challenge for us to tackle!
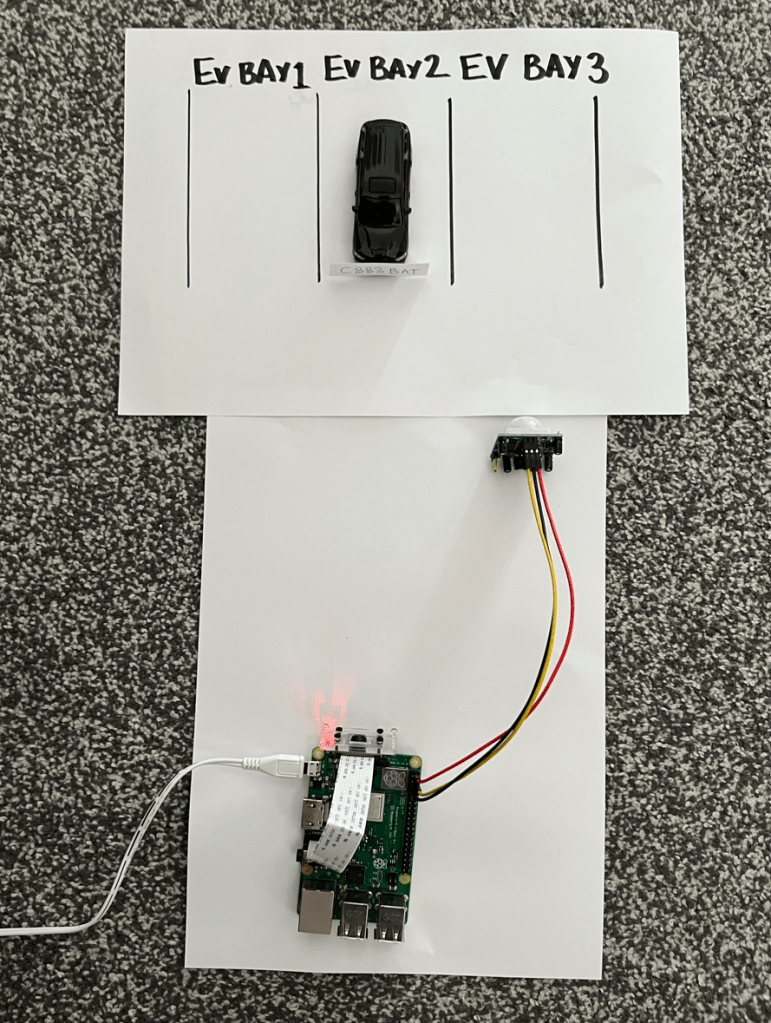
My contribution to this solution was license plate detection – we needed to be sure that employee’s pulling into an EV charging bay had a valid booking, therefore I needed to create something that would detect a car in the charging bay, read it’s license plate and then pass this to the back-end to confirm that the vehicle has a valid booking, the plan was then to enable the EV charger if the booking was confirmed (we still need to build that part!).
For my “state of the art” prototype I also created some EV bays using a piece of paper, borrowed one of my son’s toy cars (which I stuck a homemade license plate to).
The solution does the following:
Uses the PIR to detect a car entering the charging bay
Uses the Raspberry Pi Camera to take a photo of the license plate
Submits the photo to Azure Cognitive Services Computer Vision to detect the text on the license plate
Returns the detected text
In the full solution after returning the detected text, this is passed to a back end to confirm that the booking is valid, however this is out of scope for this post (although I may cover that in a future post).
Here’s a short video of it in action (ignore the mention of the Logic App, this is what we are using to connect to the back-end to validate the booking):
Here’s the Python script that I created to do this, which can also be found on GitHub
import requests
import json
import time
from io import BytesIO
from picamera import PiCamera
from gpiozero import MotionSensor

pir = MotionSensor(4)

def take_image():
    print("Taking photo of reg plate...")
    camera = PiCamera()
    camera.rotation = 180 # depending on how the camera is placed, this line may need to be removed
    camera.start_preview()
    time.sleep(3)
    camera.capture("regplate.jpg")
    camera.stop_preview()
    camera.close()
    print("Photo taken successfully!")

def analyze_image(image):
    print("Analyzing photo...")
    url = "https://RESOURCENAME.cognitiveservices.azure.com/vision/v3.0/read/analyze" # Endpoint URL for Azure Cognitive Services
    key = "KEY" # Key for Azure Cognitive Services

    image_path = image
    image_data = open(image_path, "rb").read()

    headers = {"Ocp-Apim-Subscription-Key" : key,'Content-Type': 'application/octet-stream'}
    r = requests.post(url,headers = headers, data=image_data)

    operation_url = r.headers["Operation-Location"]

    analysis = {}
    poll = True
    while (poll):
        response_final = requests.get(r.headers["Operation-Location"], headers=headers)
        analysis = response_final.json()

        time.sleep(1)
        if ("analyzeResult" in analysis):
            poll = False
        if ("status" in analysis and analysis['status'] == 'failed'):
            poll = False

    lines = []
    for line in analysis["analyzeResult"]["readResults"][0]["lines"]:
        lines.append(line["text"])

    print("-Reg plate analyzed as " + str(lines[0].replace(" ",""))) # Report the first string detected in the analysis - this may need to be tweaked

while True:
    print("Waiting for car...")
    pir.wait_for_motion()
    print("Car detected!")
    time.sleep(2)
    take_image()
    reg = analyze_image("regplate.jpg")
    pir.wait_for_no_motion()
Some points to note:
I used the legacy Buster Version of Raspberry Pi OS as I had some issues with the camera when running Bullseye, if you’d like to use this script with Bullseye, you’ll need to either enable the legacy camera stack OR update the take_image() function to use libcamera-jpeg.
The PIR was attached to GPIO4 (pin 7), VCC connected to pin 2 and GND to pin 6 – a handy reference can be found here.
You will need to update the url (replace RESOURCENAME with the name of your resource) and key (with your key) within the analyze_image function with your values from Azure Cognitive services, if you’ve never used it before, here is a guide on how to create a resource.
Microsoft recently released (in beta form) the ability to add external content to Viva Learning using the Microsoft Graph API, I was really excited to see this as I know that a lot of customers have been asking for this capability, in this post I’m going to do a walkthrough of adding content to Viva Learning from my YouTube channel (the process I’m going to demonstrate could be adapted to pull in content from any source).
For those of you who aren’t familiar with Viva Learning, here’s the sales pitch:
Viva Learning is a centralized learning hub in Microsoft Teams that lets you seamlessly integrate learning and building skills into your day. In Viva Learning, your team can discover, share, recommend, and learn from content libraries provided by both your organization and partners. They can do all of this without leaving Microsoft Teams.
When Viva Learning launched, it included the ability to integrate with several Learning Management Systems (LMS’s) and content providers out of the box, including – Cornerstone OnDemand, SAP SuccessFactors and Skillsoft. For customer that were using an LMS/content provider not supported OOTB there wasn’t a way integrate – until now!
An employee learning API has been made available through the Microsoft Graph API (Beta endpoint), the documentation for this can be found here. Here’s the standard disclaimer for using the Beta endpoint (you have been warned 😀).
In this walkthrough I will be using the Microsoft Graph PowerShell SDK to create a learning provider (which you can think of as a source) and learning content (the content surfaced from within this source).
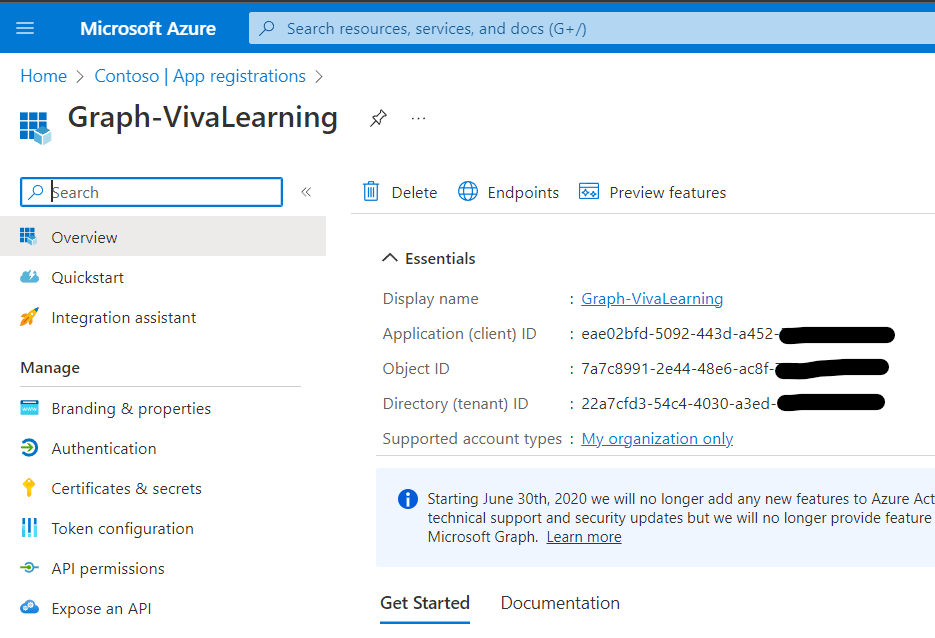
Step 1 – Register an App in Azure AD
I followed the steps in the Register the app in the portal tutorial to register an app in Azure AD named Graph-VivaLearning, this app is required for the PowerShell script to authenticate to Azure AD and obtain the necessary permissions.
Creating an app isn’t strictly necessary as the Microsoft Graph PowerShell SDK can create this automatically, however using a separate app provides greater control over permissions scopes and avoids permissions creep!
I didn’t grant any permissions to this app as I will be using dynamic consent, which is easier for a demo like this.
Step 2 – Connecting to the Microsoft Graph
As I’m using the Microsoft Graph PowerShell SDK, the first thing I needed to do was install this using the following command (I’m using PowerShell Core):
Install-Module Microsoft.Graph -Scope CurrentUser
Once this has been installed, I could then connect to the Microsoft Graph:
# Authenticate to the Microsoft Graph
$ClientId = "Client ID" # This is obtained from the app registration (screenshot above)
$AuthTenant = "Directory ID" # This is obtained from the app registration (screenshot above)
$GraphScopes = "LearningProvider.ReadWrite","LearningContent.ReadWrite.All"
Connect-MgGraph -ClientId $clientId -TenantId $authTenant -Scopes $graphScopes -UseDeviceAuthentication
The script above specifies the Client ID and Tenant ID (which are obtained from the app registration – screenshot above). I also specify the scopes (permissions that I require in $GraphScopes). For full access to read/write Learning Providers and Learning Content as per Create learningProvider and Update learningContent I requested the LearningProvider.ReadWrite and LearningContent.ReadWrite.All permission scopes.
The script then uses Connect-MgGraph to connect to the Microsoft Graph using the $ClientID and $AuthTenant requesting the scopes in $GraphScopes, it uses the device code flow for authentication, which means you need to fire up a browser and enter the code requested to authenticate:
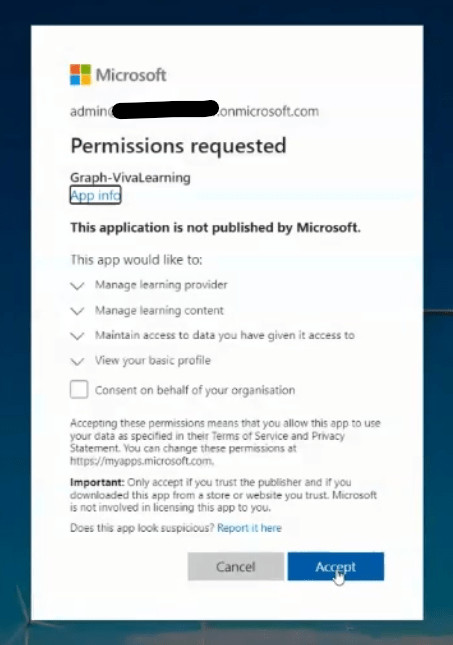
I then needed to accept the scopes (permissions) that I had requested (as a tenant admin I was able to do this directly):
Once this has been successful completed, I saw the following:
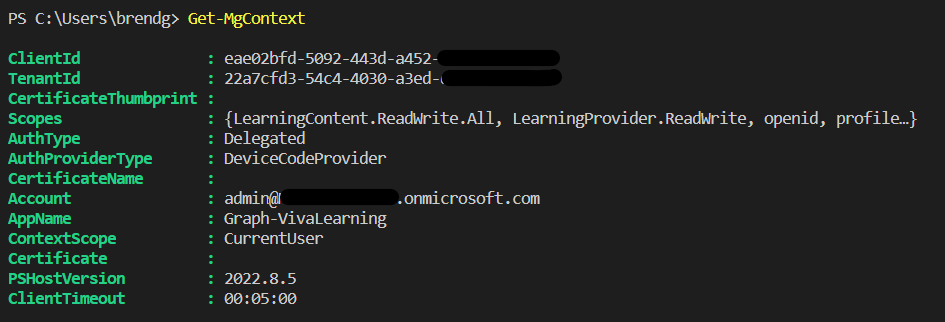
To verify I was authenticated, I ran Get-MgContext which returned:I can see the scopes that I had requested and some other useful information.
Step 3 – Adding a Learning Provider
This is where the fun begins! I can now add my Learning Provider, for this walkthrough I’m going to add a provider called Brendan’s Tech Rambling (the name of this blog and my YouTube channel).
This specifies the settings ($params) for the Learning Provider. I’ve included a display name, logo – which needs to be publicly accessible, sets it to enabled. I haven’t specified a login URL – as login isn’t required to access the content I will be adding (it’s all hosted on YouTube).
I then use Invoke-MgGraphRequest (as there isn’t a native Cmdlet for Viva Learning yet) to send a POST request to the endpoint for adding Learning Providers. Once this completes, I run the following to return all custom Learning Providers:
Success – I can see my newly added Learning Provider!
Step 4 – Adding Content
Now I have my Learning Provider registered with Viva Learning (Brendan’s Tech Ramblings) I need to add some actual content. For this I decided to add a couple of YouTube videos from my channel. I used the following to do this:
$params = @{
        "title" = "Burger Tax - using an Azure Function to Stay Healthy!"
        "description" = "Find out how I used the Starling Bank developer API and an Azure Function to tax myself whenever I buy junk food!"
        "contentWebUrl" = "https://youtu.be/z909tjuDKlY" # YouTube video URL
        "thumbnailWebUrl" = "https://brendg.co.uk/wp-content/uploads/2022/09/maxresdefault-1.jpg" # Publicly accessible URL of the content thumbnail
        "languageTag" = "en-us"
        "numberOfPages" = "1"
        "format" = "Video"
        "createdDateTime" = "2022-07-16"
}
Firstly, I specify the details of the content that I’d like to add ($params), there are additional values that can be included, I’ve used the bare minimum here.
The one thing that was a little tricky was generating the thumbnail (thumbnailWebUrl) – I ended up downloading this from YouTube and uploading to my blog. As you’ll see later it looks so much nicer with a thumbnail included.
I then needed to obtain the ID of the Learning Provider that I registered and store this within $lpid (this ID is required when we make the request to add content).
$uri = "https://graph.microsoft.com/beta/employeeExperience/learningProviders"
$lps = Invoke-MgGraphRequest -Method GET -uri $uri # Retrieve the custom Learning Provider
$lpid = $lps.value.id # Get the ID of the custom Learning Provider
Finally, I can make the request to add the content:
The one thing I needed to manually specify in this is an ID for the content (externalID), I gave this the ID “BurgerTax”. This ID is used for such things as delete operations.
Now if I browse to Viva Learning (after waiting a few hours!), I can see my Learning Provider (Brendan’s Tech Ramblings) amongst the other providers. I can also see the content that I added to this provider – including an extra video that I added, which I omitted from this walkthrough. Notice you can see my avatar (which was specified as the logo when adding the content provider) and thumbnails for each video (which was specified as thumbnailWebUrl when adding the content).
If I select the Burger Tax video the opens a new page where the video can be watched and details of other content from my Learning Provider are presented.
In the real world, you’d likely have a scheduled job that runs in the background adding/updating content taken from the Learning Management System (LMS) or learning provider. If I wanted to take this as step further, I could have something that adds any video I upload to YouTube directly to Viva Learning – I think that’s one for another day though!
The code I used in this walkthrough (and some additional goodness) can be found here.
I stumbled upon a Mouse Jiggler on Amazon and was really interested what this device did 🤔. It turns out, that it’s all in the name – it literally jiggles the mouse around randomly to prevent a computer from going into sleep and also keeps you “active” on apps, such as Teams (how naughty!).
Keeping a computer awake is one of the useful features included within the Awake utility in Microsoft PowerToys, if you run Windows this is an essential app and I highly recommend installing it….anyway, back to the mouse jiggler! I thought, what’s the point in buying a device to do this – you could in theory replicate what it does within software using Python and the PyAutoGUI library which lets Python scripts control the mouse and keyboard to automate interactions with other applications. I have used this previously to automate playing computer games, read more about my exploits here.
I created the following masterpiece, which when running will move the mouse around the screen and presses the enter key every 5 seconds, which replicates what a mouse jiggler devices does.
import pyautogui
import time
while True:
    pyautogui.click(x=100,y=100)
    pyautogui.press('enter')
    time.sleep(5)
    pyautogui.click(x=200,y=200)
    pyautogui.press('enter')
    time.sleep(5)
This is probably the strangest title that I’ve ever given a post!
I never seem to know when my bins (garbage for any Americans reading this) will be collected, I have three separate bins that are all on a slightly different collection cycle, rather than manually checking my local councils website I thought I’d write a script to scrape this data, to save me a few keystrokes and valuable seconds ⏲️. In all honesty, this was just an excuse to spend some quality time with Python 🐍.
Fortunately for me, my local council’s website requires no login, also the page that returns the collection schedule for an address is static (in that the returned URL doesn’t appear to change).
What I then needed to do, was to figure out an approach to pull the data from the returned page so that I could output this from a Python script. It turned out the Beautiful Soup (a Python library for pulling data out of HTML and XML files) could be used to do this.
Before I could use Beautiful Soup to do the parsing, I needed to grab the page itself, to do this I used the Requests library.
Firstly, I needed to install these libraries, by running “pip install requests” and then “pip install beautifulsoup4” from the command line.
I then used the requests library to request the page and create a response object (“r“) that would hold the contents of the page.
import requests
r = requests.get("https://www.hull.gov.uk/bins-and-recycling/bin-collections/bin-collection-day-checker/checker/view/10093952819")
Once I had the page, I could then use Beautiful Soup to analyze it, to do this I began by importing the module and then creating a new Beautiful Soup object using the “r” object created by Requests (specifically r.text), which contained the raw HTML output of the page.
I then created a variable to hold the collection date extracted from the page (dates), which I will print to the screen at the end of the script.
I also imported the oslibrary (which I use for extracting the collection date from the data returned).
import os
dates = ""
This is where the fun now began! I opened a web browser and navigated to the page and then viewed the source (CTRL + U on Chrome/Edge on Windows) as I needed to figure out exactly where the data I needed resided within the page, after much scrolling I found it!
I could see that the data for the black bin was contained within the class “region region-content“. I used the following to extract the data I needed from this (the date of collection).
# Use Beautiful Soup to find the class that the data is contained within "region region-content"
blackbin = soup. Find(class_="region region-content")

# Find the parent div for this class (which I need to find the div containing the black bin data)
div = blackbin.find_parent('div')

# Find all the span tags within this div, the data is contained within a span tag
span = div.find_all('span')

# The black bin date is within the second span tag, so retrieve the data from this (index 1) and split using the ">" delimiter
spantext = str(span[1]).split(">")

# Split the span tag for index 1 using "<" as a delimiter to easily remove the other text we don't need, it's messy but it works!
date = spantext[1].split("<")

# Retrieve index 0 which is the full date
blackbindate = date[0]

# Add the data returned "blackbindate" to the "dates" variable, prefixing this with the colour of the bin
dates += "Black Bin " + "- " + blackbindate + "," + "\n"
For the blue bin, I took a slightly different approach. I searched for the style tag that this was using, which was “color:blue;font-weight:800“
# Find all tags using the style color:blue;font-weight:800
blue = soup.find_all(style="color:blue;font-weight:800")

# Select the second tag returned, this one contains the actual date and then split using the ">" delimiter
bluebin = str(blue[1]).split(">")

# Split the data returned further using the delimiter "<", to easily remove the other text we don't need, it's messy but it works!
bluebincollection = bluebin[1].split("<")

# Return index 0 which is the full date
bluebindate = bluebincollection[0]

# Add the returned date "bluebindate" to the dates variable, prefixing this with the colour of the bin
dates += "Blue Bin " + "- " + bluebindate + "," + "\n"
Lastly, for my brown bin I used a slightly variation of the approach I used for the blue bin, except this time I searched for the style tag “color:#654321;font-weight:800”
As a HUGE retro gaming fan 🕹️, I absolutely adore RetroPie which turns my Raspberry Pi 4 into an emulation powerhouse 👾! Here’s some blurb from their official site that explains more:
RetroPie allows you to turn your Raspberry Pi, ODroid C1/C2, or PC into a retro-gaming machine. It builds upon Raspbian, EmulationStation, RetroArch and many other projects to enable you to play your favourite Arcade, home-console, and classic PC games with the minimum set-up. For power users it also provides a large variety of configuration tools to customise the system as you want.
RetroPie sits on top of a full OS, you can install it on an existing Raspbian, or start with the RetroPie image and add additional software later. It’s up to you.
One of the methods to copy data to RetroPie (for example ROMs and BIOS files) is to connect using SMB, RetroPie comes pre-configured with Samba which is a Linux re-implementation of SMB.
On Windows, it’s as simple as opening \\RETROPIE or \\IP Address of RetroPie to connect to RetroPie and copy files across.
One issue and slight concern I have is that in its default configuration, the shares created by RetroPie are available without authentication. I first realised this when I saw the following error on my Windows PC when trying to connect to my RetroPie:
“You can’t access this shared folder because your organization’s security policies block unauthenticated guest access”
My company block devices connecting to shares that don’t require authentication (which is good!). Therefore, to allow me to connect to the shares created by RetroPie using my Windows PC, I needed to re-configure Samba on the RetroPie to require authentication. I did this using the following steps:
SSH’d into my RetroPie, using the command ssh pi@192.168.1.206 (the IP address of my RetroPie)
Took a backup of the Samba configuration (incase it all went horribly wrong!) – sudo cp /etc/samba/smb.conf /etc/samba/smb.conf-retropie
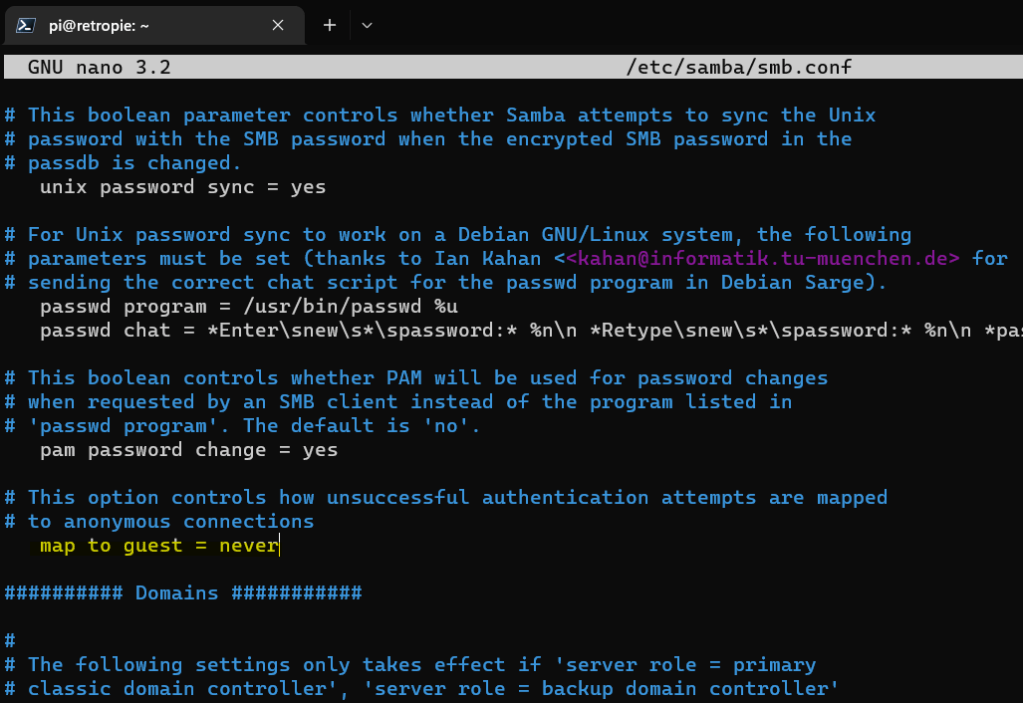
Edited the smb.conf using the Nano text editor – sudo nano /etc/samba/smb.conf
Made the following changes:
Changed map to guest from bad user to never
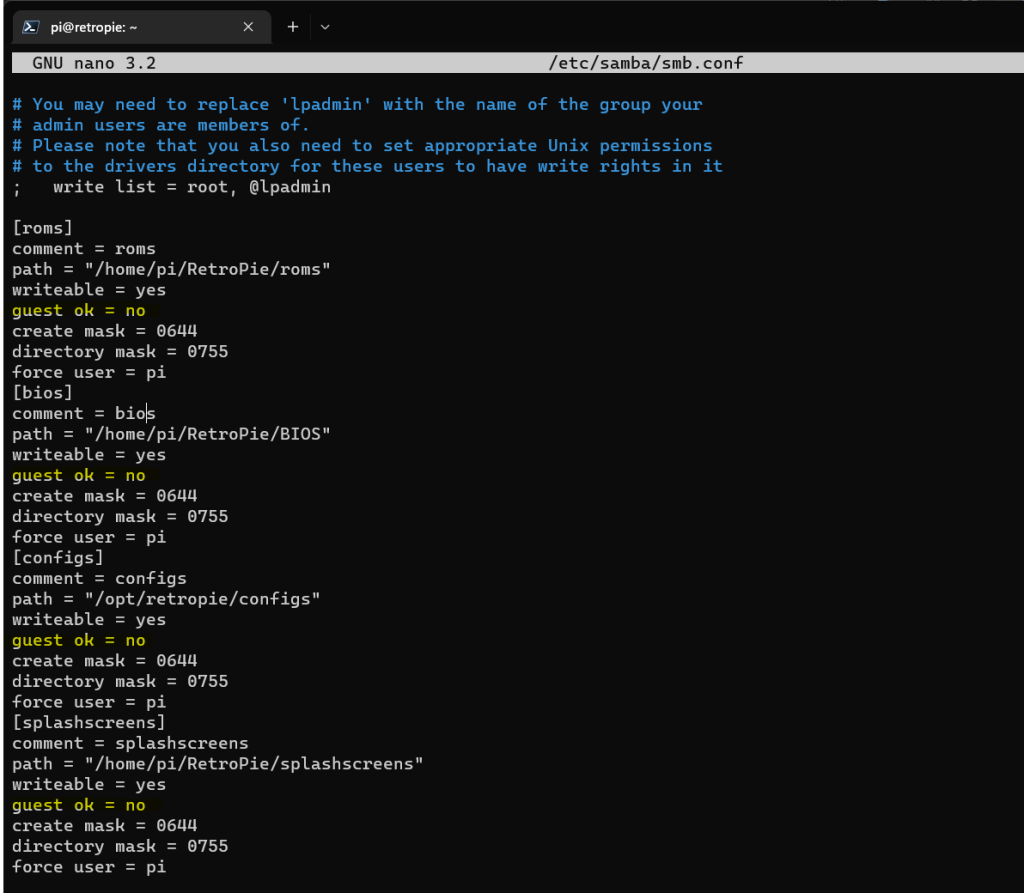
Changed guest ok from yes to no for each of the four shares created by RetroPie (roms, bios, configs and splashscreens)
Saved the file by pressing CTRL + X, then selecting Y (to confirm changes) and pressing Enter to confirm the filename (which default to it’s current name)
Ran sudo smbpasswd -a pi and to create a password for the pi user account, which I will be using to connect to the share
Restarted Samba using the command: sudo service smbd restart
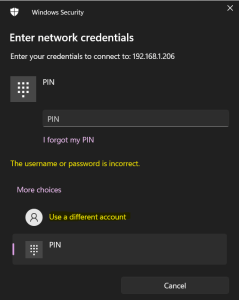
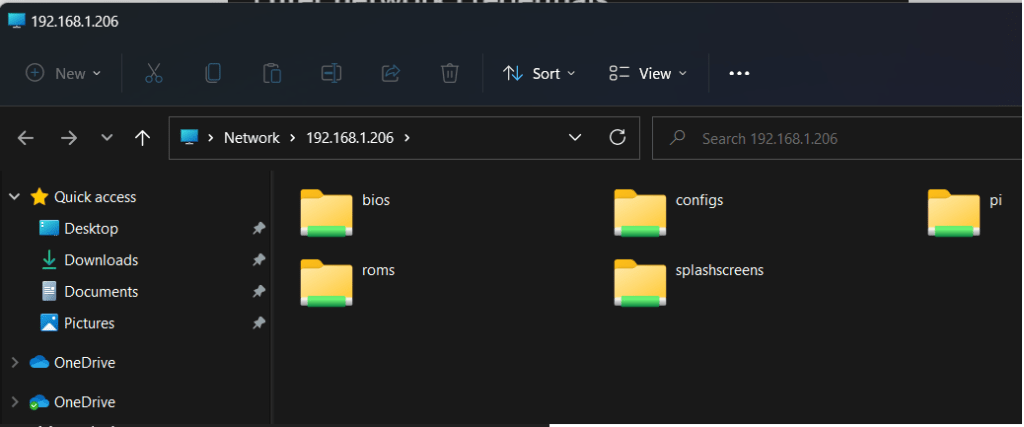
I then attempted to connect to the RetroPie using it’s IP address (192.168.1.206)
…and was presented with the following, where I selected Use a different account
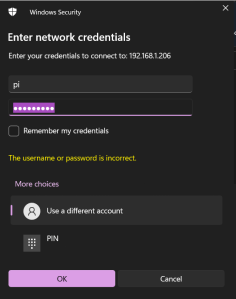
I then entered the credentials for the pi account (using the password I assigned in step 5 above) and hit OK.
Success! I now have access to the RetroPie’s shares 😀.
Now for the fun of copying 50GB of data to the RetroPie over WiFi 🤦♂️.
I’ve previously spoken about my love of retro gaming, in particular the Nintendo Gameboy. For a long time, I’ve wanted to try and automate playing a game using PyAutoGUI 🎮.
Firstly……..what is PyAutoGUI?
PyAutoGUI lets your Python scripts control the mouse and keyboard to automate interactions with other applications. The API is designed to be simple. PyAutoGUI works on Windows, macOS, and Linux, and runs on Python 2 and 3.
When I was learning Python, the book Automate the Boring Stuff with Python was an invaluable resource, it devotes a whole chapter to PyAutoGUI (which the author created). I’ve previously automated time tracking for work and some other equally exciting tasks……now was time to take this to the next level and attempt to use it to play a game 🕹️.
Super Mario Land is one of my all-time favourite games and I’ve spent hours over the years playing this game. My aim was to attempt to write a Python script that uses PyAutoGUI to complete World 1-1 without losing a life. My plan was to run the game using an emulator on my PC and use PyAutoGUI to send key presses to the emulator to replicate me playing the game.
Rather than having some fancy Artificial Intelligence solution such as this which was used to teach a computer how to play Atari 2600 games, I opted for the human touch……I would manually specify the keypresses, based on the countless hours that I’ve *invested* in this game!
I used the emulator Visual Boy Advance, I have about 7 copies of Super Mario Land I’ve acquired over the years 😆, so had no guilt in using this with a ROM I had acquired 🕵️.
I configured Visual Boy Advance use the keyboard for input, with the following configuration:
I then spent far too much time using my trial-and-error approach to completing World 1-1, below is a snippet of the Python script I created to give you an idea – time.sleep() was my friend!
Below is a video of my automated playthrough in action.
Here is the final Python script (in all its un-commented glory).
If you plan to use this, the only thing you’ll likely need to change is the values for pyautogui.click(), this selects the correct window running Visual Boy Advance using the screen coordinates (it’s all covered in the PyAutoGUI documentation here).
In the two months that I’ve had Pi-hole up and running, the Docker image has been updated twice. I put together the following script that automates the process of deleting the container and image, and then rebuilding using the latest available image, which I run every time a new image is released 🤖.
Configuration and logs are saved as Pi-hole stores these on the host system rather than directly within the container itself, therefore no need to worry about losing these between updates.
Just make sure you have secondary DNS setup within your network otherwise when the Pi-hole container is stopped DNS resolution may fail.