In my last post I shared a script that I’d written that uses the OCI Vision API (object detection) with Python to analyse a local image stored on my machine.
I wanted to take this a step further and draw a bounding box around the object detected, just as the OCI Console does (example below).

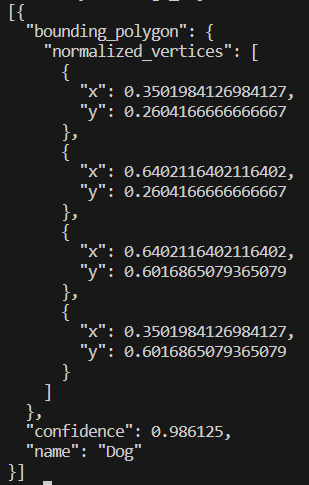
When calling the Vision API, the response includes the locations of objects detected within the normalized_vertices property, in the example below a dog is detected and the x and y coordinated denote exactly where the dog is within the image analysed 🐶.
I didn’t have a clue how I could take these and draw a bounding box on the image, however luckily for me somebody on Stack Exchange did 😂. I stumbled across the following which provided an example of how to do this using Python with OpenCV and NumPy, I tweaked this example and incorporated with my existing image analysis script, my updated script does the following:
- Converts a local image on my machine to Base64 (imagepath variable)
- Submits this to the OCI Vision (object detection) API
- Returns details of the first object detected in the image
- Uses OpenCV and NumPy to take the normalized_vertices of the image (taken from the response) and draws a bounding box on the image
- Saves the image with the bounding box (using the imagewritepath variable)
In the example below, I submitted this image (Photo.jpg):

Which created this image (PhotoBoundingBox.jpg)

As you can see this drew a bounding box around the object detected (dog).
The script is a little rough, as in it’s current form it only draws a bounding box around the first object detected, however in the future I’ll likely update this to draw bounding boxes around additional objects within the image – I’d also like to annotate the image with the name of the object too.
Here is the script, it can also be found on GitHub. To run this you’ll need to update the imagepath and imagewritepath variables, you’ll also need to include your Compartment ID within compartment_id (within the Detect object section).
import base64
import oci
import cv2
import numpy as np

imagepath = "D:\\Pictures\\Camera Roll\\Photo.jpg" # path of the image to analyse
imagewritepath = "D:\\Pictures\Camera Roll\\PhotoBoundingBox.jpg" # image to create with bounding box

def get_base64_encoded_image(image_path): # encode image to Base64
    with open(image_path, "rb") as img_file:
        return base64.b64encode(img_file.read()).decode('utf-8')

image = get_base64_encoded_image(imagepath)

config = oci.config.from_file()
ai_vision_client = oci.ai_vision.AIServiceVisionClient(config)

# Detect object
analyze_image = ai_vision_client.analyze_image(
    analyze_image_details=oci.ai_vision.models.AnalyzeImageDetails(
        features=[
            oci.ai_vision.models.ImageObjectDetectionFeature(
                max_results=10,)],
        image=oci.ai_vision.models.InlineImageDetails(
            source="INLINE",
            data = image),
        compartment_id="Compartment ID"))

analysis = analyze_image.data
print("Analysis complete, image contains: " + (analysis.image_objects[0].name))

# Read the image from the location
img = cv2.imread(imagepath)

# Define the polygon vertices using the first object detected in the image
vertices = np.array([((analysis.image_objects[0].bounding_polygon.normalized_vertices[0].x), (analysis.image_objects[0].bounding_polygon.normalized_vertices[0].y)), ((analysis.image_objects[0].bounding_polygon.normalized_vertices[1].x), (analysis.image_objects[0].bounding_polygon.normalized_vertices[1].y)),
                     ((analysis.image_objects[0].bounding_polygon.normalized_vertices[2].x), (analysis.image_objects[0].bounding_polygon.normalized_vertices[2].y)),((analysis.image_objects[0].bounding_polygon.normalized_vertices[3].x), (analysis.image_objects[0].bounding_polygon.normalized_vertices[3].y))])

# Convert the normalized vertices to pixel coordinates
height, width = img.shape[:2]
pixels = np.array([(int(vertex[0] * width), int(vertex[1] * height)) for vertex in vertices])

# Draw the polygon on the image
cv2.polylines(img, [pixels], True, (0, 255, 0), 10)

# Save the updated image
cv2.imwrite(filename=imagewritepath,img=img)