• Using OCI Language (text analytics) to detect PII πŸ€«

    OCI Language AI (text analytics) has the ability to detect PII from a string of text, this is particularly useful for the following use-cases:

    Detecting and curating private information in user feedback πŸ§‘

    Many organizations collect user feedback is collected through various channels such as product reviews, return requests, support tickets, and feedback forums. You can use Language PII detection service for automatic detection of PII entities to not only proactively warn, but also anonymize before storing posted feedback. Using the automatic detection of PII entities you can proactively warn users about sharing private data, and applications to implement measures such as storing masked data.

    Scanning object storage for presence of sensitive data πŸ’Ύ

    Cloud storage solutions such as OCI Object Storage are widely used by employees to store business documents in the locations either locally controlled or shared by many teams. Ensuring that such shared locations don’t store private information such as employee names, demographics and payroll information requires automatic scanning of all the documents for presence of PII. The OCI Language PII model provides batch API to process many text documents at scale for processing data at scale.

    Taken from – https://docs.oracle.com/en-us/iaas/language/using/pii.htm

    I created a simple Python script that uses the OCI Language API to detect PII in a string of text and replace this with a placeholder (PII type), this can be found below and on GitHub.

    It analyses the text contained within the texttoanalyse variable, if any PII is detected this is replaced with the type of data contained and the updated string is printed to the console.

    Update texttoanalyse and compartment_id before running.

    import oci
    
    config = oci.config.from_file()
    ai_language_client = oci.ai_language.AIServiceLanguageClient(config)
    texttoanalyse = "my details are brendan@brendg.co.uk, I was born in 1981" # String to analyse for PII
    
    batch_detect_language_pii_entities_response = ai_language_client.batch_detect_language_pii_entities( # Identify PII in the string
        batch_detect_language_pii_entities_details=oci.ai_language.models.BatchDetectLanguagePiiEntitiesDetails(
            documents=[
                oci.ai_language.models.TextDocument(
                    key="String1",
                    text=texttoanalyse,
                    language_code="en")],
            compartment_id="Compartment ID"))
    
    cleansedtext = texttoanalyse # Replace the PII in the string with the type of data it is, for example e-mail address
    for document in batch_detect_language_pii_entities_response.data.documents:
        for entities in document.entities:
            cleansedtext = cleansedtext.replace((entities.text),("*" + (entities.type) + "*"))
    
    print(cleansedtext)
    

    Here is the script in action:

  • OCI Vision: drawing a bounding box on analysed images πŸ“¦

    In my last post I shared a script that I’d written that uses the OCI Vision API (object detection) with Python to analyse a local image stored on my machine.

    I wanted to take this a step further and draw a bounding box around the object detected, just as the OCI Console does (example below).

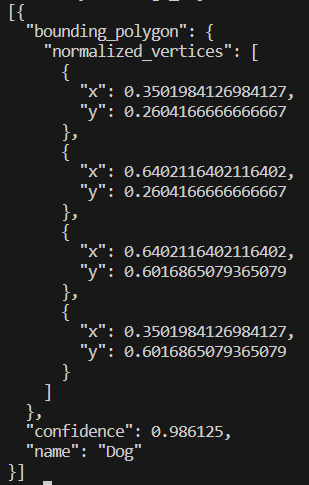
    When calling the Vision API, the response includes the locations of objects detected within the normalized_vertices property, in the example below a dog is detected and the x and y coordinated denote exactly where the dog is within the image analysed 🐢.

    I didn’t have a clue how I could take these and draw a bounding box on the image, however luckily for me somebody on Stack Exchange did πŸ˜‚. I stumbled across the following which provided an example of how to do this using Python with OpenCV and NumPy, I tweaked this example and incorporated with my existing image analysis script, my updated script does the following:

    1. Converts a local image on my machine to Base64 (imagepath variable)
    2. Submits this to the OCI Vision (object detection) API
    3. Returns details of the first object detected in the image
    4. Uses OpenCV and NumPy to take the normalized_vertices of the image (taken from the response) and draws a bounding box on the image
    5. Saves the image with the bounding box (using the imagewritepath variable)

    In the example below, I submitted this image (Photo.jpg):

    Which created this image (PhotoBoundingBox.jpg)

    As you can see this drew a bounding box around the object detected (dog).

    The script is a little rough, as in it’s current form it only draws a bounding box around the first object detected, however in the future I’ll likely update this to draw bounding boxes around additional objects within the image – I’d also like to annotate the image with the name of the object too.

    Here is the script, it can also be found on GitHub. To run this you’ll need to update the imagepath and imagewritepath variables, you’ll also need to include your Compartment ID within compartment_id (within the Detect object section).

    import base64
    import oci
    import cv2
    import numpy as np
    
    imagepath = "D:\\Pictures\\Camera Roll\\Photo.jpg" # path of the image to analyse
    imagewritepath = "D:\\Pictures\Camera Roll\\PhotoBoundingBox.jpg" # image to create with bounding box
     
    def get_base64_encoded_image(image_path): # encode image to Base64
        with open(image_path, "rb") as img_file:
            return base64.b64encode(img_file.read()).decode('utf-8')
    
    image = get_base64_encoded_image(imagepath)
    
    config = oci.config.from_file()
    ai_vision_client = oci.ai_vision.AIServiceVisionClient(config)
    
    # Detect object
    analyze_image = ai_vision_client.analyze_image(
        analyze_image_details=oci.ai_vision.models.AnalyzeImageDetails(
            features=[
                oci.ai_vision.models.ImageObjectDetectionFeature(
                    max_results=10,)],
            image=oci.ai_vision.models.InlineImageDetails(
                source="INLINE",
                data = image),
            compartment_id="Compartment ID"))
    
    analysis = analyze_image.data
    print("Analysis complete, image contains: " + (analysis.image_objects[0].name))
    
    # Read the image from the location
    img = cv2.imread(imagepath)
    
    # Define the polygon vertices using the first object detected in the image
    vertices = np.array([((analysis.image_objects[0].bounding_polygon.normalized_vertices[0].x), (analysis.image_objects[0].bounding_polygon.normalized_vertices[0].y)), ((analysis.image_objects[0].bounding_polygon.normalized_vertices[1].x), (analysis.image_objects[0].bounding_polygon.normalized_vertices[1].y)),
                         ((analysis.image_objects[0].bounding_polygon.normalized_vertices[2].x), (analysis.image_objects[0].bounding_polygon.normalized_vertices[2].y)),((analysis.image_objects[0].bounding_polygon.normalized_vertices[3].x), (analysis.image_objects[0].bounding_polygon.normalized_vertices[3].y))])
    
    # Convert the normalized vertices to pixel coordinates
    height, width = img.shape[:2]
    pixels = np.array([(int(vertex[0] * width), int(vertex[1] * height)) for vertex in vertices])
    
    # Draw the polygon on the image
    cv2.polylines(img, [pixels], True, (0, 255, 0), 10)
    
    # Save the updated image
    cv2.imwrite(filename=imagewritepath,img=img)
    
  • Using the OCI Vision API with a local image πŸ”

    I’ve been playing around with the OCI Vision API recently and have been really impressed at it’s ease of use and performance 🏎️.

    One thing I wanted to figure out, is how to use the OCI Vision API to analyse a local image on my machine, rather than having to first upload to OCI Object Storage, I couldn’t find any examples of how to do this (possibly due to my Google-Fu skills!) so I spent some time putting together the example below using Python, which does the following:

    1. Converts an image on my PC to Base64 format, this is a pre-req for using the OCI Vision API when submitting a local image for analysis, rather than one stored within OCI Object Storage.
    2. Submits the image to the OCI Vision API (object detection).
    3. Returns a list of the objects detected and the confidence level of each

    Step 1 – Convert image to Base64

    import base64
    
    path = "C:\\Users\\brend\\OneDrive\\Pictures\\Camera Roll\\Photo.jpg" # path to image file
     
    def get_base64_encoded_image(image_path): # function that converts image file to Base64
        with open(image_path, "rb") as img_file:
            return base64.b64encode(img_file.read()).decode('utf-8')
    
    image = get_base64_encoded_image(path) # call the function, passing the path of the image
    

    Step 2 – Submit image to the OCI Vision API for analysis

    import oci
    
    config = oci.config.from_file() # auth to OCI using the default config file and file
    
    ai_vision_client = oci.ai_vision.AIServiceVisionClient(config) # create the Vision API client
    
    analyze_image = ai_vision_client.analyze_image( #pass the image for analysis
        analyze_image_details=oci.ai_vision.models.AnalyzeImageDetails(
            features=[
                oci.ai_vision.models.ImageObjectDetectionFeature(
                    max_results=130,)],
            image=oci.ai_vision.models.InlineImageDetails(
                source="INLINE",
                data = image),
     compartment_id="Compartment ID")) # update with the OCID of the compartment whose Vision API you'd like to use
    

    Step 3 – Return a list of objects detected and the confidence level of each

    analysis = analyze_image.data # put the JSON response returned into a variable
    
    # for each object within the JSON response print it's name and the confidence levels
    for object in analysis.image_objects:
        print(str(object.name) + " : " + str(object.confidence))
    

    Here is the script in action 🎬

    Input image (Photo.jpg):

    Here is a slightly more complex image:

    The script demo’d above can be found on GitHub.

  • Events in OCI not created for Object Storage “Object – Create” type πŸ—„️

    I setup a rule in OCI Events to send me an e-mail when a file is created within OCI Object Storage using the Rule Condition and Rule Action below:

    Rule Condition

    Rule Action

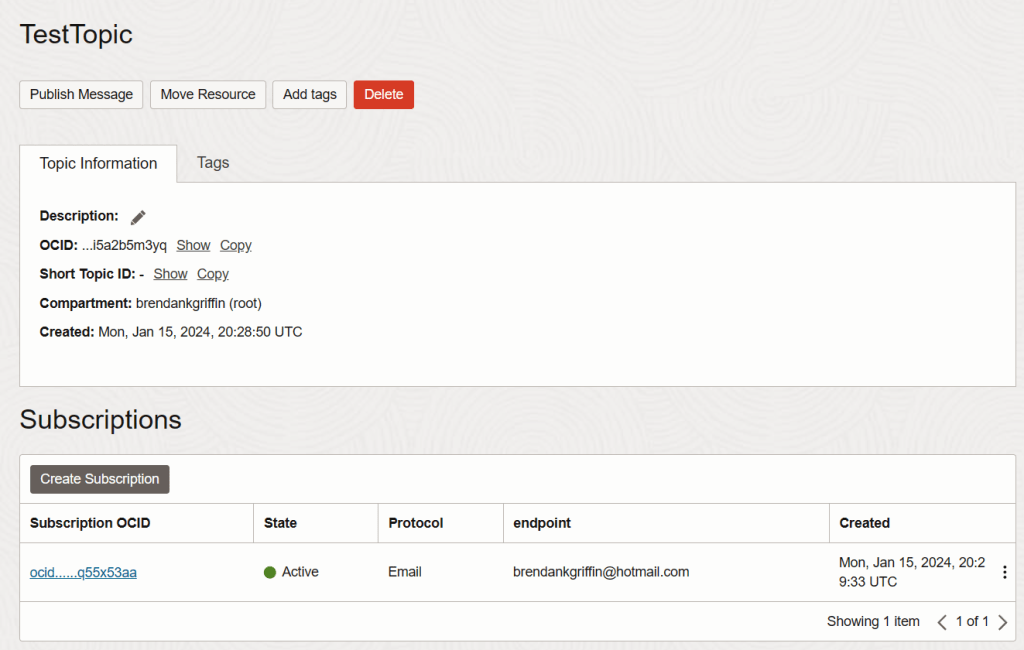
    The topic TestTopic referenced above was configured like this:

    For some reason this did not fire when I uploaded a file to object storage, I verified that the topic worked (TestTopic) by manually sending a message using Publish Message, this worked and I received an e-mail notification within a minute.

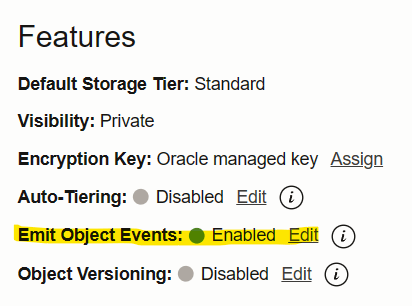
    After much head scratching and frustration it turned out that I needed to enable Emit Object Events on the storage bucket – once I’d enabled this it worked as expected.

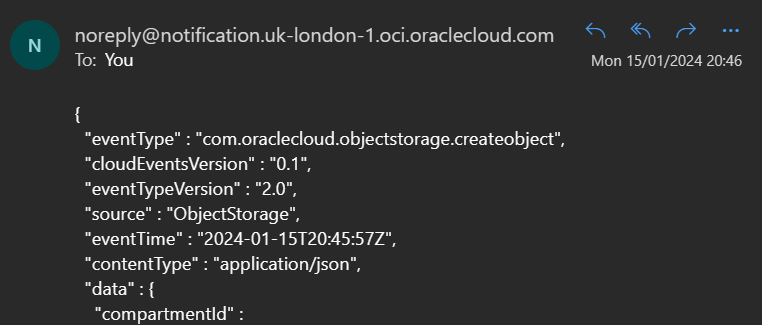
    Notification e-mail

  • Retrieve a secret from an OCI Vault using Python πŸ€

    I’ve recently created a Vault in OCI to store secrets, I have some Python scripts that I’m going to convert into OCI Functions and I wanted to avoid storing any credentials/keys directly within the script, one way to do this is to use OCI vault to store the secrets (credentials/keys) which the script can retrieve at runtime directly from the vault using resource principal authentication.

    I created a vault and a master encryption key (which is used to encrypt secrets within the vault). Once I’d got these pre-req’s out of the way I added my first secret to the vault:

    The secret is named MySecret and uses the master encryption key named BrendgMasterKey, the contents of the secret is the string SuperSecret1.

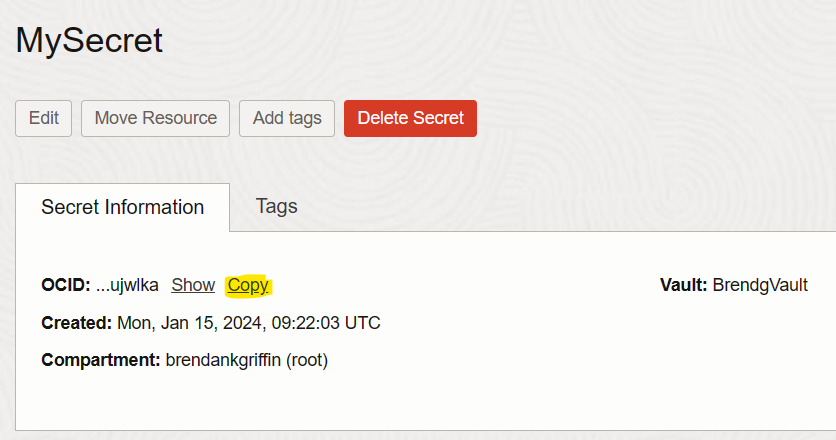
    Once the secret had been created I needed to grab the OCID of the secret from it’s properties page (which I’ll use in the Python script to retrieve the secret).

    Here’s the script I wrote, all I needed to do was to update keyOCID with the OCID of the secret. This does the following:

    • Authenticates to OCI
    • Get’s the secret using the OCID
    • Decodes the secret from Base64 and print’s (secrets are returned from the vault in Base64 format)
    import oci
    import base64
    
    # Specify the OCID of the secret to retrieve
    keyOCID = "OCID"
    
    # Create vaultsclient using the default config file (\.oci\config) for auth to the API
    config = oci.config.from_file()
    vaultclient = oci.vault.VaultsClient(config)
    
    # Get the secret
    secretclient = oci.secrets.SecretsClient(config)
    secretcontents = secretclient.get_secret_bundle(secret_id=keyOCID)
    
    # Decode the secret from base64 and print
    keybase64 = secretcontents.data.secret_bundle_content.content
    keybase64bytes = keybase64.encode("ascii")
    keybytes = base64.b64decode(keybase64bytes)
    key = keybytes.decode("ascii")
    print(key)
    

    Above you can see that the script retrieves the secret and prints this within the terminal. The script can be found on GitHub too – https://github.com/brendankarl/Blog-Samples/blob/main/OCI/GetSecretfromVault.py

  • Configure JIT (Just-in-Time) Provisioning of User Accounts between Azure AD / Entra ID and OCI IAM βž‘️

    I recently configured identity federation between Azure AD / Entra ID and OCI IAM, this provided me the ability to login to my OCI tenancy using an Azure AD account, I wrote about it here – Configuring OCI Identity Federation with Azure AD / EntraΒ ID πŸ”’

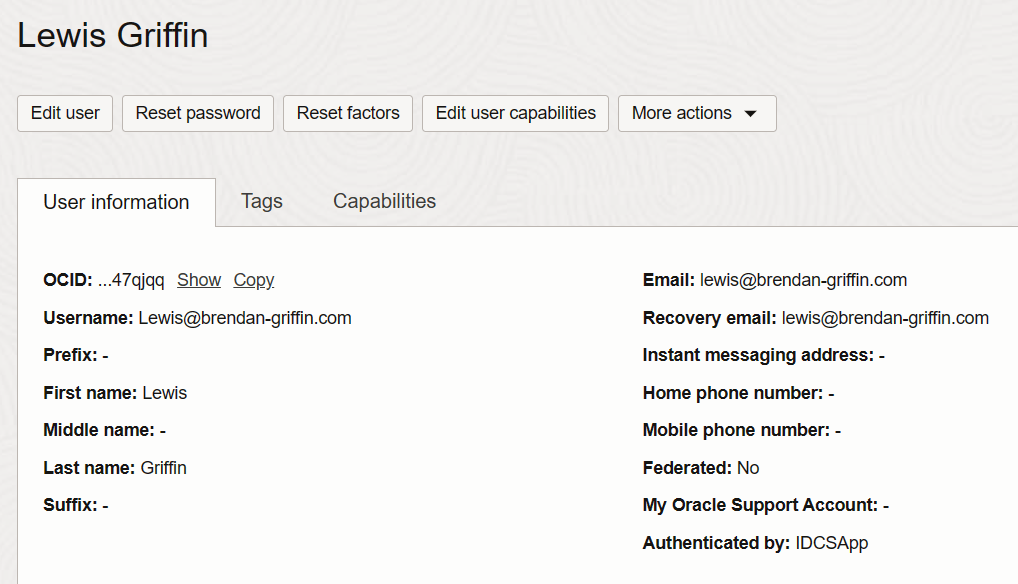
    The one drawback of the approach I used is that it required me to create a matching account in OCI, for example in Azure AD I have a user account lewis@brendan-griffin.com, to get SSO working between Azure AD and OCI IAM I also needed to create this account in OCI IAM.

    User in Azure AD / Entra ID:

    User in OCI:

    As I’m lazy I wanted to avoid this, one approach is to configure JIT (Just-in-Time) provisioning, essentially what this does is automatically create the user account in OCI IAM at first SSO login, which removes the need to create the account manually – result!

    Oracle have detailed guidance on how to do this – JIT Provisioning from Azure AD to OCI IAM, I ran through this process however ran into some issues, which I’ll detail the solutions for below.

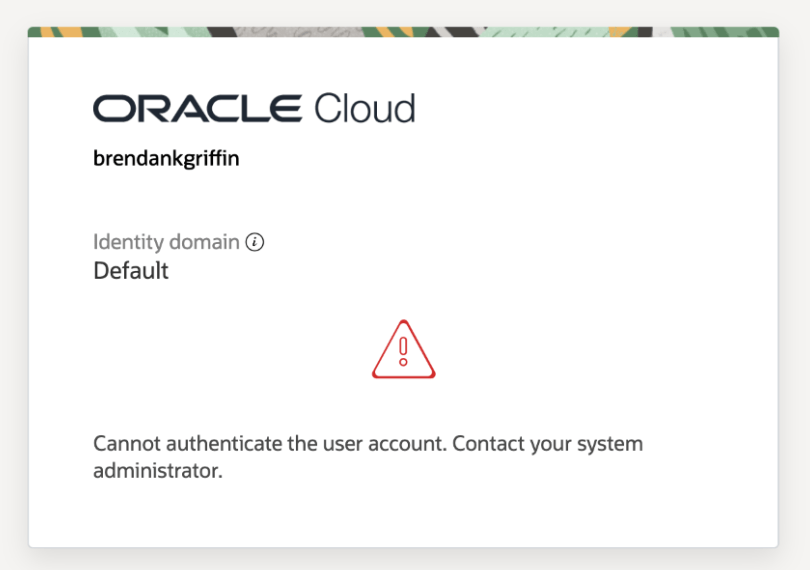
    After following the steps to setup JIT (detailed in the link above), I received the following error when attempting to login to the OCI Console using a new account – an account that exists in Azure AD, but not in OCI IAM:

    Cannot authenticate the user account. Contact your system administrator

    In my particular case the two issues were:

    1 – Issue with the OCI documentation πŸ“„

    The documentation for configuring JIT has a typo (JIT Provisioning from Azure AD to OCI). Within Step 12 of the Configure JIT Attributes in OCI IAM section, the URL for givenname is invalid and the highlighted text needs to be removed.

    2 – Issue with me πŸ€¦β€β™‚οΈ

    When I created the account I used to test JIT in Azure AD (harrison@brendan-griffin.com), I hadn’t populated all of the required fields – surname, emailaddress and givenname. To fix this, I updated the user account in Azure AD (highlighted fields) with the appropriate values:

    Once I’d done this I was able to successfully login into the OCI console using harrison@brendan-griffin.com, JIT had kicked in, worked it’s magic and created his user account in OCI as part of the login process, configuring this as a federated account.

  • Configuring OCI Identity Federation with Azure AD / Entra ID

    One thing on my backlog that I’ve finally got round to is configuring identity federation between OCI and Azure AD / Entra ID, my reason for doing this is to provide the ability to login to the OCI console and administer OCI using an Azure AD / Entra ID account πŸ”’

    This process is well documented – both Microsoft and Oracle provide detailed guidance on how to do this:

    I ran into a couple of small issues so thought I’d put together a short video that steps through the end-to-end process for configuring this.

    Points to Note:

    • I configured a single user account (Lewis) with the ability to authenticate to the OCI console using his Azure AD / Entra ID account, for this to work I also needed to create an account in OCI IAM with a matching username (lewis@brendan-griffin.com) πŸ§‘
    • I couldn’t complete Step 1 of the Oracle documentation as the federation metadata wasn’t available in the location specified, I was able to obtain this via Identity & Security > Domains > Default (replace with the domain you’d like to configure) > Security > Identity providers > Export SAML metadata πŸ“„
    • In Step 3 of the Oracle documentation, you need to enter a sign-on URL, as these are region specific, you’ll need to update to match your region. In my specific case, this URL was https://console.uk-london-1.oraclecloud.com a full list of regions can be found in Regions and Availability Domainsβ€‚πŸŒ
    • As I was testing with a single user account, I didn’t bother with Group Mappings (step 8) β¬…οΈβž‘οΈ

    Here is the video πŸ“Ό:

  • Automate stopping compute instances in OCI πŸ›‘

    I currently have a few VMs (compute instances) running in OCI and it’s getting annoying having to manually use the console to stop these when I no longer need them, I put together the Python script below which uses the OCI Python SDK to stop all running instances within a specific compartment.

    If you haven’t used the OCI Python SDK before, I put together a quick guide on getting started here.

    import oci
    import json
    
    # Read the config
    config = oci.config.from_file()
    
    # Create client with the default config file (\.oci\config)
    computeclient = oci.core.ComputeClient(config)
    
    # List all of the compute instances within the compartment
    list_instances_response = computeclient.list_instances(
       compartment_id="SPECIFY THE COMPARTMENT ID")
    
    # Convert to JSON
    instances = json.loads(str(list_instances_response.data))
    
    # Print the state of each VM and stop any that are running
    for instance in instances:
     print(instance["display_name"] + " - status: " + instance["lifecycle_state"])
     if instance["lifecycle_state"] == "RUNNING":
       print("Stopping :" + instance["display_name"])
       computeclient.instance_action(instance["id"],"SOFTSTOP")
    

    This uses the SOFTSTOP action which does the following:

    Gracefully shuts down the instance by sending a shutdown command to the operating system. After waiting 15 minutes for the OS to shut down, the instance is powered off. If the applications that run on the instance take more than 15 minutes to shut down, they could be improperly stopped, resulting in data corruption. To avoid this, manually shut down the instance using the commands available in the OS before you softstop the instance.

    Taken from – https://docs.oracle.com/en-us/iaas/tools/oci-cli/3.37.1/oci_cli_docs/cmdref/compute/instance/action.html

    Here is the script in action:

  • Automate OCI Bastion session creation

    I previously posted a guide on how to use OCI Bastion to connect to a Windows VM using RDP, I’ve also been playing around with connecting to Linux VMs via OCI Bastion using SSH.

    As Bastion sessions have a maximum session TTL of 3 hours this means that in a given day I’d need to go through the process of creating a new Bastion session multiple times if I needed continued access to the VM. As I’m lazy, I’ve put together a Python script that automates Bastion session creation for Managed SSH sessions which does the following:

    • Checks the active sessions on a given OCI Bastion πŸ”
    • If there isn’t an active session for the specified server, create a new managed SSH sessions and return the SSH command to connect (copies to the clipboard)
    • If there is an active session, simply return the SSH command to connect (copies to the clipboard)

    When the script has run, the SSH command to connect to the VM is in the clipboard so simply paste this into a terminal to connect.

    The script is a little rough around the edges but it get’s the job done, I’ll likely optimise it over time – including making it easier to connect to multiple servers via multiple Bastions.

    To run the script you’ll need the following information:

    • OCID of the Bastion to use βœ…
    • OCID of the server (VM) to connect to βœ…
    • The path to the private key used for Bastion and SSH authentication βœ…
    • The contents of the associated public key βœ…

    The script can be found below and is also available on GitHub.

    # This script queries the active sessions on a given OCI bastion (bastionocid), if it doesn't find a session for the specified server (serverocid)
    # it will create a new bastion session and returns the resultant SSH command to connect to the server and copies to the clipboard, simply paste this into a terminal to connect,
    # if their is an active session for the server, it returns the SSH command to connect to the server and copies to the clipboard, simply paste into a terminal to connect
    
    # pip install oci - if you don't have this installed
    import oci
    # pip install pyperclip - if you don't have this installed
    import pyperclip
    import json
    import time
    
    # OCID of the bastion to query
    bastionocid = "BASTIONOCID"
    # OCID of the server to connect to
    server = "SERVEROCID"
    # Private key
    privatekeypath = "D:\\OCI\\OCI.key" # Update to the correct location of the private key, this script was developed on Windows, hence the double slashes.
    # Public key used for auth to bastion (using the same key for the VM too, to make it simple)
    publickey = "PUBLICKEY" # Copy/paste the content of the public key file (.pub)
    
    # Read the config
    config = oci.config.from_file()
    # Create client with the default config file (\.oci\config)
    bastionclient = oci.bastion.BastionClient(config)
    # List the current sessions
    bastionsessions = bastionclient.list_sessions(bastion_id = bastionocid)
    sessionsJSON = json.loads(str((bastionsessions.data)))
    # See if there is an active session for the server, if there isn't create one
    for session in sessionsJSON:
        if session["lifecycle_state"] == "ACTIVE" and session["target_resource_details"]["target_resource_id"] == server:
            print("Active Session Found : " + session["display_name"])
            # Get the session and return the ssh command generated
            getsession = bastionclient.get_session(session_id = session["id"])
            sshcmd = getsession.data.ssh_metadata["command"]
            # Automate connecting - replace the placeholder for private key with the correct location
            sshcmd = sshcmd.replace("<privateKey>",privatekeypath)
            # Copy the SSH command to the clipboard so that it can be pasted into PowerShell
            pyperclip.copy(sshcmd)
            break
        else:
            print("No active session found - creating a session.....")
            create_session_response = bastionclient.create_session(
            create_session_details=oci.bastion.models.CreateSessionDetails(
            bastion_id=bastionocid,target_resource_details=oci.bastion.models.CreateManagedSshSessionTargetResourceDetails(
                session_type="MANAGED_SSH",target_resource_id=server,target_resource_operating_system_user_name="opc"),
                key_details=oci.bastion.models.PublicKeyDetails(public_key_content=publickey),session_ttl_in_seconds = 10800,
            ))
            # Get the session and return the ssh command generated
            time.sleep(120)
            session = bastionclient.get_session(session_id = create_session_response.data.id)
            sshcmd = session.data.ssh_metadata["command"]
            # Automate connecting - replace the placeholder for private key with the correct location
            sshcmd = sshcmd.replace("<privateKey>",privatekeypath)
            # Copy the SSH command to the clipboard so that it can be pasted into PowerShell
            pyperclip.copy(sshcmd)
            print("Session created, paste the resultant SSH command from the clipboard")
            break
    
  • Getting started with the OCI Python SDK πŸ

    I’ve been working with OCI recently and have just started to write some Python scripts that use the OCI SDK. I thought I’d document the process of getting everything setup – mainly because I’ll probably forget how I did this and have to re-learn at some point in the future πŸ˜‚.

    This guide was written for Windows 11, however with minor adaptions should work with any OS that supports the OCI SDK for Python.

    Step 1 – Install the OCI Python SDK

    Run the following command to install the OCI Python SDK.

    pip install oci
    

    Step 2 – Create an API Signing Key

    The process for this is fully documented within How to Generate an API Signing Key from the Console

    Step 3 – Connect to OCI with Python using the API Signing Key

    Now that the OCI SDK for Python is installed and an API Signing Key has been created, you can connect to OCI using the following:

    import oci
    
    # Reads the config created when the API Signing Key was generated, which should be stored within \.oci\config
    config = oci.config.from_file()
    

    Once you’ve done this, you can then use the Python SDK as you wish, in the example below I list all of the compute instances within my root compartment.

    # Create client with the default config file (\.oci\config)
    computeclient = oci.core.ComputeClient(config)
    
    # List all of the compute instances within the compartment
    list_instances_response = computeclient.list_instances(
        compartment_id="Replace with the OCID of the compartment to query")
    
    # List all of the compute instances
    print(list_instances_response.data)
    

    Here is the script in action, it lists (a lot of) data about each of the instances found within the compartment queried.