I stumbled across an interesting project on GitHub recently – Carbonyl is a Chromium based web browser that is built to run in a terminal!
It can be run either via npm or Docker. I opted to take Carbonyl for a spin using Docker (I run Docker Desktop on my Windows 11 machine). It was super-simple to run using the following command from a terminal.
docker run --rm -ti fathyb/carbonyl (URL to access)
I used the following command to access this blog:
docker run --rm -ti fathyb/carbonyl https://brendg.co.uk
Below, you can see a short video of this in action!
Once finished, hit CTRL+C, which will exit the container and remove it from Docker.
I have zero use-case for this; however, it is a lot of fun 😀.
The first time I used ChatGPT I was absolutely astounded by this powerful tool and the possibilities seemed endless. In typical fashion, once I found out that an API was available, I decided to have a poke around with it using Python 😀
I was pleasantly surprised as to the simplicity of calling the API and put together a sample that uses the recently released gpt-3.5-turbo model and provides the ability to fire a question off and see the response from OpenAI within a terminal.
I launched a terminal and ran the following to install the OpenAI Python module.
pip install openapi
Step 3 – It’s showtime!
Here is the script:
import openai
# Set the OpenAPI key, replace KEY with your actual key
openai.api_key = key = "KEY"
# Set the model to be used
engine = "gpt-3.5-turbo"
# Prompt for a question
question = input("What's your question?: ")
# Submit the question, using the default values for everything - https://platform.openai.com/docs/api-reference/completions
response = openai.ChatCompletion.create(
    model= engine,
    messages=[
        {"role": "user", "content": question},
    ],
)
print(response['choices'][0]['message']['content'])
Here is the script in action – I asked it to create a Python script for me to calculate the date 100 days from now and it didn’t let me down 😀.
Next up in my personal backlog (yes, I am that sad) was to play around with the document summarization capabilities included within Azure Cognitive Services for Language.
But what is this, you may ask?
Document summarization uses natural language processing techniques to generate a summary for documents. Extractive summarization extracts sentences that collectively represent the most important or relevant information within the original content. These features are designed to shorten content that could be considered too long to read – Taken from here.
I had a quick play around with document summarization (using this code sample for inspiration) and put together the Python script below and available here, which does the following:
Takes a string of text and determines how many sentences are in this.
Passes this to the document summarization endpoint to summarize. Requesting a summary that includes no more than half of the number of sentences in the original string provided.
For example if 6 sentences are passed to the endpoint for summarization, the summary should include no more than 3 sentences.
Prints the summarized output.
import requests
import json
import time

text = """The Sega Mega Drive, also known as the Sega Genesis in North America, was a popular video game console that was first released in Japan in 1988.
It was Sega's third home console and was designed to compete with Nintendo's popular NES and SNES consoles.
The Mega Drive was released in North America in 1989 and quickly gained a strong following among gamers thanks to its impressive graphics, sound quality, and large library of games.
Some of the most popular games for the console include Sonic the Hedgehog, Streets of Rage, and Phantasy Star.
The Mega Drive remained in production until 1997 and sold over 40 million units worldwide, cementing its place as one of the most beloved video game consoles of all time.""" # Text to be summarized

sentences = len(text.split(".")) / 2 # calculate how many sentences there are to be summarized (from the "text" variable), divide this by 2. Therefore if there are 6 setencnes to be summarised, the total number of sentences included in the summarization will be 3.

url = "https://ENDPOINT.cognitiveservices.azure.com/language/analyze-text/jobs?api-version=2022-10-01-preview" # Replace ENDPOINT with the relevant endpoint
key = "KEY" # Key for Azure Cognitive Services
headers = {"Ocp-Apim-Subscription-Key" : key}
payload = {
  "displayName": "Summarizer",
  "analysisInput": {
    "documents": [
      {
        "id": "1",
        "language": "en",
        "text": text
      }
    ]
  },
  "tasks": [
    {
      "kind": "ExtractiveSummarization",
      "taskName": "Summarizer",
      "parameters": {
        "sentenceCount": sentences
      }
    }
  ]
}

r = requests. Post(url,headers = headers,data = json.dumps(payload))
results = r.headers["operation-location"]
time.sleep(10) # Being super lazy here and putting in a sleep, rather than polling for the results to see when they are available!
r = requests.get(results,headers = headers)
for s in r.json()["tasks"]["items"][0]["results"]["documents"][0]["sentences"]:
    print(s["text"])
I used ChatGPT to generate the text I used for testing (on one of my favourite subjects I may add!):
Here is the summary that it provided – it didn’t do too bad a job, did it?
I may start using this to summarize some of the super-long work e-mails I receive 😎.
I’ve been creating a Power App and needed to add some conditional logic to a button, the app I’ve been working on allows users to browse a list of registered mentors, view their profiles and submit a request for a mentoring session with a mentor using a button.
Within the app, I wanted the button on the mentor profile page that is used to request a session to display “Request {mentor first name} as a mentor“, the challenge I had is that for mentors with longer first names (>9 characters) it was causing the text to wrap and it looked ugly. I decided to add some logic to change the message displayed based on the length of the mentors first name, basically:
If the mentors first name is <10 characters display “Request {first name} as mentor”, otherwise displays “Request as Mentor”.
The other small challenge I had is that the mentor’s full name is held in a variable imaginatively named MentorName, therefore I needed to first split their full name so that I could pull out their first name. I achieved this with the split function using space ” ” as a delimiter. It then returns the first item from the resultant table outputted by the Split function (which would be the first name), using the First function.
This is then wrapped in an If function which uses the Len function to check the number of characters in the first name, if this is less than 10, return the name otherwise return nothing.
Below you can see an example of this in action, along with the Power Fx code. In this case MentorName = “Harrison Griffin”
"Request " & (If(Len(First(Split(MentorName," ")).Result)<10,(First(Split(MentorName," ")).Result),""))&" as Mentor"
The second screenshot shows the behaviour with a first name that is greater than 9 characters, in this case MentorName = “Christopher Griffin”
I’m in the process of preparing for some Power Platform exams so have been getting hands-on with Power Apps recently.
I created this video which steps through the process of creating a simple Power App that uses the camera on the device to take a photo and then saves this to OneDrive.
I’m about to record some demo videos and needed to set the resolution of the apps I will be recording to 1920 x 1080, there isn’t a straightforward way to do this out of the box with Windows (that I know of 🤔). After much research I found the Python module PyGetWindow which can do this.
After installing the module using pip install PyGetWindow, I put together the following script which lists all of the current open apps and then sets the resolution of Notepad to 1920 x 1080 (using the name of the window, taken from the listing of open apps).
import pygetwindow

# Get all of the currently opened windows
windows = pygetwindow.getAllTitles()

# Print a list of the currently opened windows
for window in windows:
    print(window)

# Specify the name of the window to resize
notepad = pygetwindow.getWindowsWithTitle("Untitled - Notepad")[0]

#resize the window
notepad.resizeTo(1920, 1080)
One of my hobbies is collecting video games, specifically retro games from the 80s and 90s.
My collection has grown over the years and it’s difficult for me to track what I own. On more than one occasion I’ve bought a game, later to realise that I already owned it 🤦♂️. Over the holidays I had a brainwave……..why don’t I keep a list of the games that I have!
Rather than getting out a pen and paper to document my game collection (which would have been far simpler) I decided to use this as an excuse to play around with Azure Cognitive Services, specifically Computer Vision.
My plan was to take photos of my collection, pass these photos to Azure Cognitive Services to extract the text from the photos and then write this to a file, which I’ll then eventually put into a database or Excel (probably the latter 😀).
I took a photo of some of my games (PS3 so not exactly retro!) and then set about writing a Python script that used the REST API endpoint for the Computer Vision service to submit the photo and extract any detected text.
Below is the script in all its glory, it does the following:
Submits the photo to the REST API endpoint for Computer Vision.
Stores the results URL returned by the API.
Polls the results URL until the analysis has completed.
Prints out each piece of text detected.
Writes each piece of text to a text file, but only if the text returned is longer than 5 characters – this is to filter out other text detected, such as PS3 or the game ID, not exactly scientific but seems to do the trick! Hopefully, I don’t have any games with less than 5 characters in their title.
import requests
import time
from io import BytesIO
import json

# Sets the endpoint and key for Azure Cognitive Services
url = "https://RESOURCENAME.cognitiveservices.azure.com/vision/v3.2/read/analyze"
key = "KEY"

# Sets the location of the photo to analyze and opens the file
image_path = "D:/Games.png"
image_data = open(image_path, "rb").read()

# Submits the photo ("D:/Games.png") to the REST API endpoint for Computer Vision
headers = {"Ocp-Apim-Subscription-Key" : key,'Content-Type': 'application/octet-stream'}
r = requests.post(url,headers = headers, data=image_data)

# Retrieves the results URL from the response
operation_url = r.headers["Operation-Location"]

# The recognized text isn't immediately available, so poll the results URL and wait for completion.
analysis = {}
poll = True
while (poll):
    response_final = requests.get(r.headers["Operation-Location"], headers=headers)
    analysis = response_final.json()

    print(json.dumps(analysis, indent=4))

    time.sleep(1)
    if ("analyzeResult" in analysis):
        poll = False
    if ("status" in analysis and analysis['status'] == 'failed'):
        poll = False

# Store the returned text in a list "lines" also print out each line to the console
lines = []
for line in analysis["analyzeResult"]["readResults"][0]["lines"]:
    print(line["text"])
    lines.append(line["text"])

# Create a new text file "games.txt" and write the text to the file
gameslist = open("D:/games.txt", "a")
for line in lines:
    if len(line) > 5: # This is to filter out other text detected, such as PS3 or the game ID, not exactly scientific but seems to do the trick! Hopefully I don't have any games with less than 5 characters in their name
        print(line)
        gameslist.write(line + "\n" )
gameslist.close()
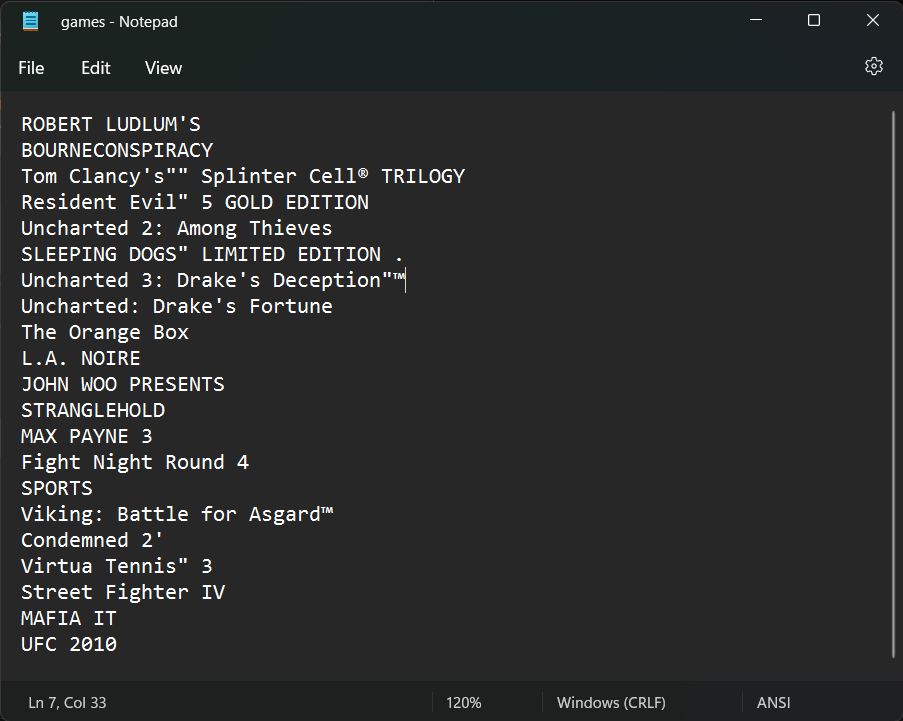
Here’s the text file that it produced, it’s not perfect as ROBERT LUDLUM’S and BOURNECONSPIRACY is actually one and the same rather than being separate games. It will be interesting see how the Azure Cognitive Services (and my script!) holds up to analyzing games from other systems. My earliest being an Amstrad CPC 6128 (my very first computer).
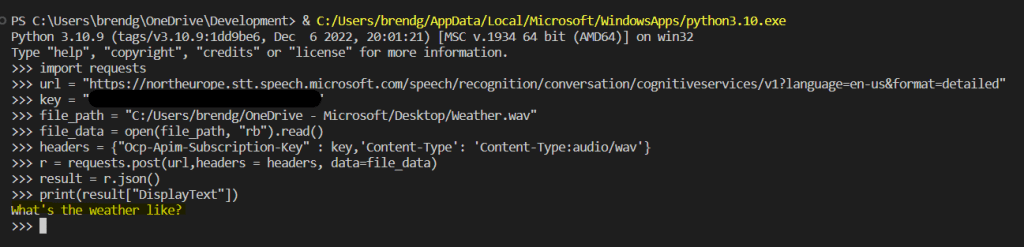
For my next personal project, I needed a way to convert speech to text (more on this in a future post), I decided to use Azure Cognitive Services to do this, specifically the Speech Service 🗣️.
There are code samples for a number of languages available here, I wanted to use the REST endpoint directly rather than the SDK that is available. The sample provided for REST uses Curl, however I prefer to use Python (specifically the Requests module).
I converted the REST sample to use Requests, this takes an audio file (in WAV format), sends this to the Speech Service for analysis and then returns the text identified from the audio file.
My updated script can be found below:
import requests

url = "https://REGION.stt.speech.microsoft.com/speech/recognition/conversation/cognitiveservices/v1?language=en-us&format=detailed" # update REGION with the appropriate region
key = "KEY" # cognitive services key
file_path = "C:/Users/brendg/OneDrive - Microsoft/Desktop/Weather.wav" # audio file to analyze
file_data = open(file_path, "rb").read()
headers = {"Ocp-Apim-Subscription-Key" : key,'Content-Type': 'Content-Type:audio/wav'}

r = requests.post(url,headers = headers, data=file_data)
result = r.json()
print(result["DisplayText"]) # print the analyzed text
I have a Python script that I need to run every two weeks on my Raspberry Pi, I thought it would be simple enough to use a Cron job to schedule the script. It turns out that configuring a job to run ever 2 weeks isn’t as simple as I initially thought. I found some solutions to this here and planned to use the second approach (which uses a test statement).
This got me thinking that I can probably incorporate some form of test within the Python script itself, my plan was to schedule the script to run weekly, but include some logic within the Python script that means that it will only run on even numbered weeks.
I came up with this solution:
import datetime
if isinstance((datetime.datetime.now().isocalendar().week / 2),int):
    DoStuff()
This does the following
Get the current week of the year (datetime.datetime.now().isocalendar().week)
Divides the week number returned by 2
Uses isinstance to check if the value returned is an integer (which would be an even week)
If the value is an integer execute the method DoStuff()– which is the main method within my script
If the value isn’t an integer – do nothing
Note: If you replace int with float this will cause the DoStuff() method to execute on odd numbered weeks.
I have a script that I run on my Raspberry Pi every two weeks using a Cron job. Because I’m lazy, I don’t want to have to manually verify that the script has run successfully. I had a brainwave over the weekend about using IFTTT to automatically notify me the status of the script, each time it executes.
What is IFTTT you may be asking 🤔?!?
IFTTT is short for If This Then That, and is the best way to integrate apps, devices, and services. We help devices, services, and apps work together in new and powerful ways.
IFTTT was founded on the belief that every thing works better together. Tech incompatibility has become challenging for anyone trying to build a smart home or create automatic routines in their life. IFTTT makes it easy.
One of the useful features of IFTTT is the ability to host a webhook which can do something when it is called. In this specific case I had the idea to create an applet in IFTTT that hosts a webhook that when called will send a notification to my iPhone (which has the IFTTT mobile app installed).
A Webhook allows you to integrate with services that are not already on IFTTT using simple web requests. These Webhooks are unique to you using your own unique URL key, which can be found in the Documentation section of the Webhooks service page. A Webhook can act as both a trigger and an action, so the web requests are extremely flexible and customizable.
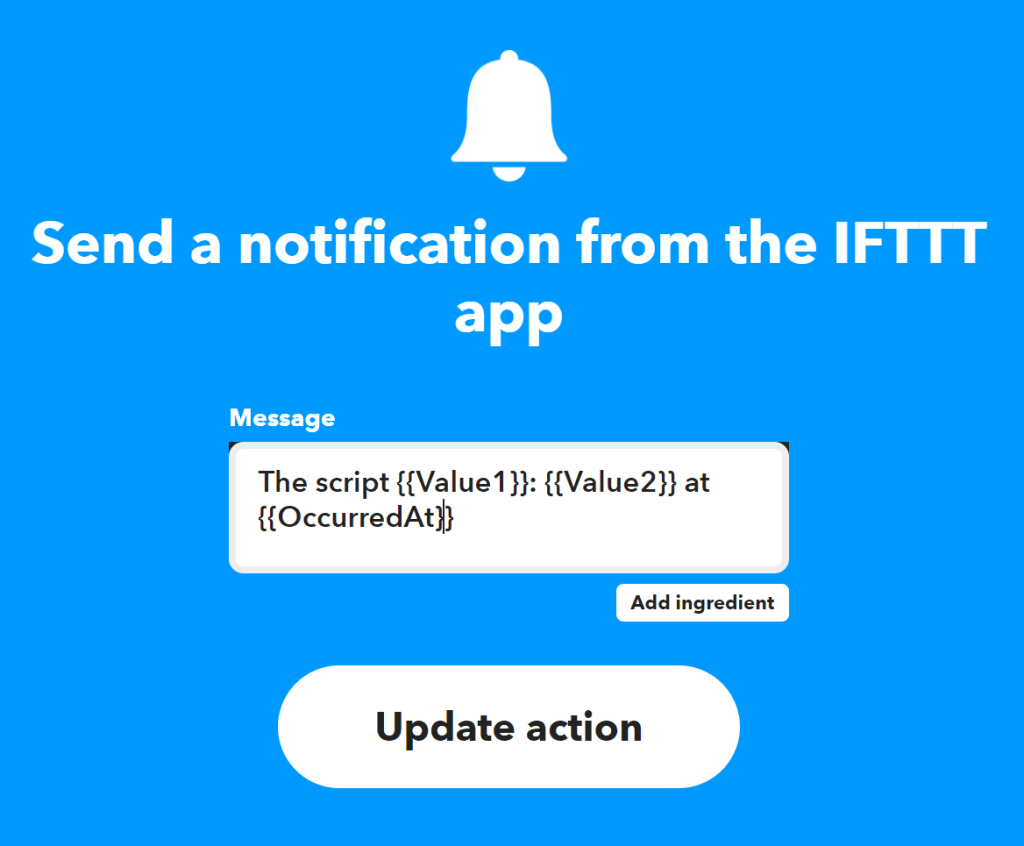
It’s possible to pass three values to a webhook via a query string (aptly named Value1, Value2 and Value3). My plan was to use these to send the name of the script (Value1) and the status of the script, such as “Successful” or “Failed” (Value2) – I won’t be using Value3. These values can then be used in the notification that IFTTT sends to my iPhone.
Here’s a short video that steps through the process of creating a webhook which sends a notification via the IFTTT mobile app.
For reference, below are the settings of the notification action. This notification will send a notification with the text below, replacing Value1 with the name of the script and Value2 with the status of the script. OccurredAt will be replaced with the time that the web hook was called.
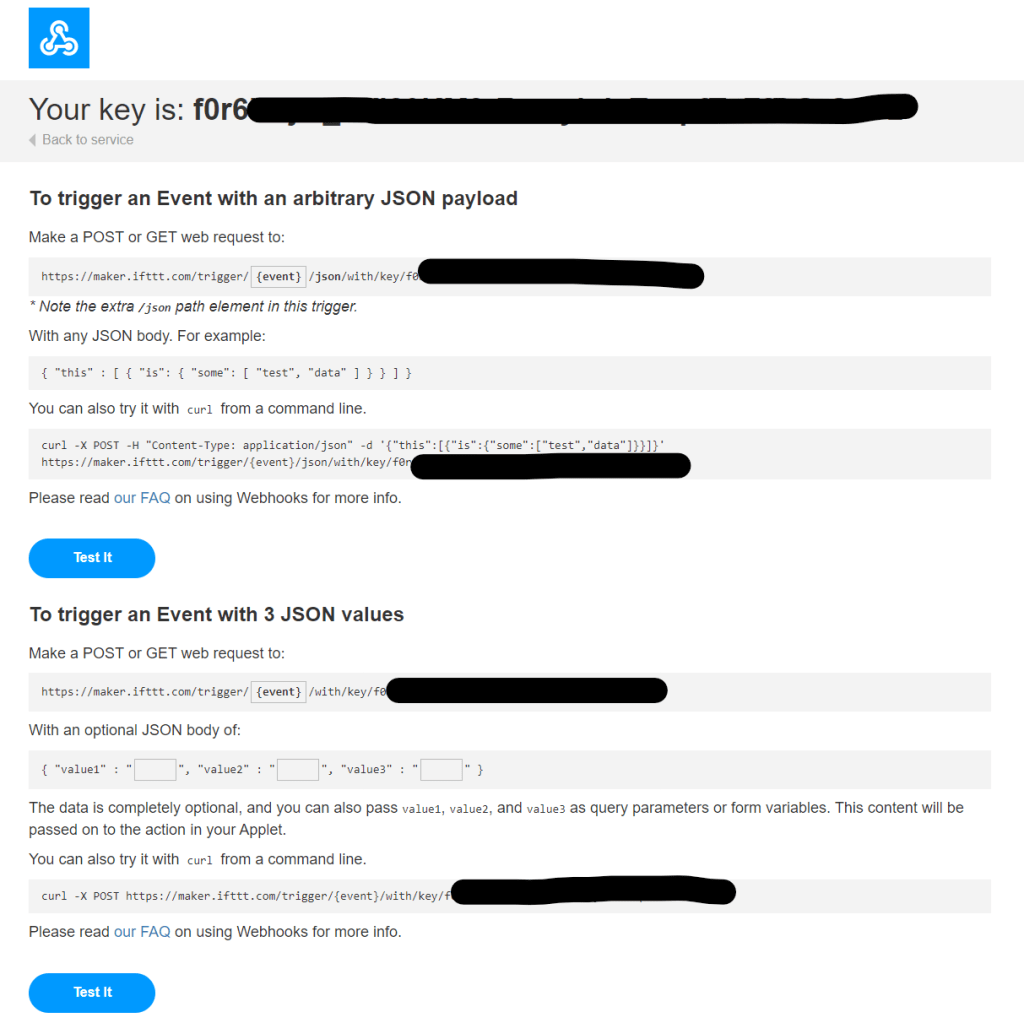
I was now ready to test this, but first I needed to obtain the URL and key for the webhook, I did this by browsing to https://ifttt.com/maker_webhooks and selecting Documentation. This presented my key and also some useful examples.
I did a quick test using Curl, a few points to note:
ScriptStatus is the Event Name configured within the “Receive a web request” trigger field (2nd screenshot below).
The key obtained in the previous steps needs to be referenced after /key/ (I blanked this out for obvious reasons 🙂).
I pass a query string containing Value1 and Value 2 (highlighted). Value1 is the name of the script (BinChecker) and Value2 is the script status (I used “failed” for testing)
curl -X POST "https://maker.ifttt.com/trigger/ScriptStatus/with/key/KEY?value1=BinChecker&value2=failed"
Here is the notification I received:
Lastly I incorporated this into my Python script using the following:
My Python script uses try/except/else blocks (documented here). The script calls a function AddEvent(), if this generates an exception, the except block is called, which calls the webhook passing the script name (BinChecker) and the status (failed). If it doesn’t generate an exception the else block is called which passes the script name (BinChecker) and the status (success).
My plan is to use this approach for all of the scheduled scripts that I have running on my Raspberry Pi.