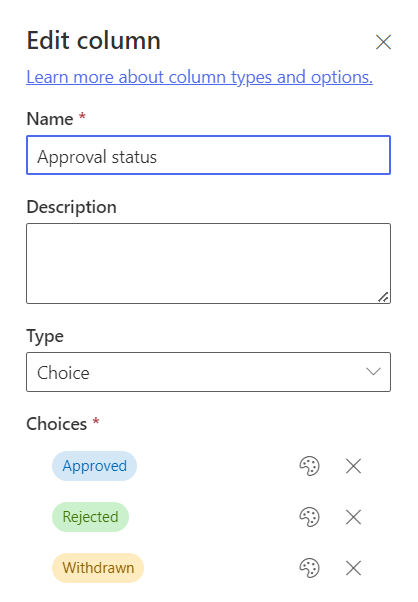
I needed to read the value of a SharePoint choice column within a Power Automate Flow and then do something dependant on the value, in this case I needed to send an e-mail if the Approval status column is changed to Approved for any of the items within the list.
Due to the way that choice fields are returned to Power Automate, I couldn’t use a simple condition that checks the value of the Approval status column and then sends an e-mail if this is equal to Approved.
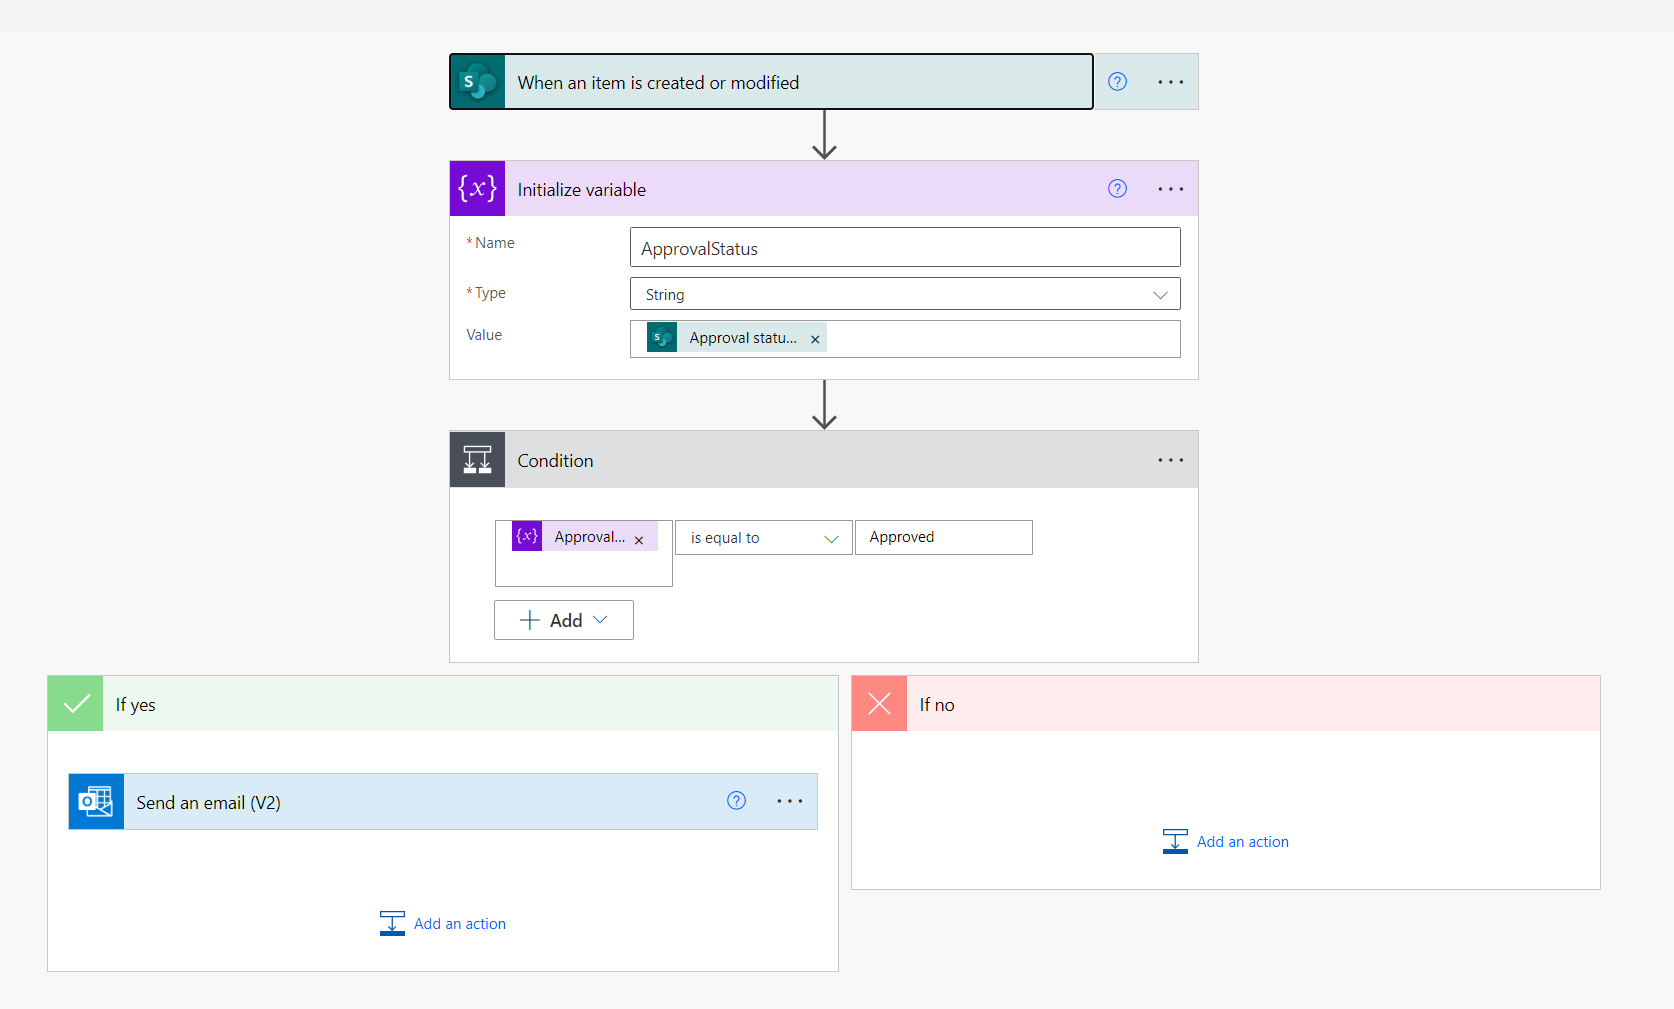
I first needed to initialise a variable that reads the value of the Approval status column and then use this variable (ApprovalStatus) within the condition….as below:
This Flow then sprang into life and started sending e-mails when an item was updated and the Approval status column was set to Approved.
I’ve previously used a Power Automate Flow to write responses from a Microsoft Forms survey directly to a SharePoint list – this makes it a little easier to analyse responses than using the native capabilities within Forms or exporting to an Excel file, particularly if you use Power BI as you can connect directly to the SharePoint list to analyse the data collected.
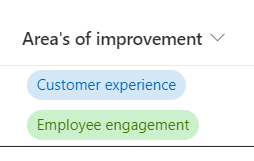
I recently had a situation where I had created a survey that had a question that permitted multiple answers, example below:
The SharePoint list that the responses were written to was configured with a field for this question which used a choice field (that covered each option within the question).
The problem I ran into, is that when multiple answers were passed to the SharePoint list using the Flow these were written as a string and didn’t use the choice field correctly – which looked ugly and made filtering the data difficult.
With some minor tweaks to the Flow I was able to correctly pass the answers to SharePoint and use the choice fields, here is how I did it:
Firstly, here’s the logical flow of the Flow (did you see what I did there 😂):
I needed to add three additional steps (actions) between Get response details and Create item:
1. Initialize Variable
This creates an array variable named AreaChoiceValue which we will populate later with the answers.
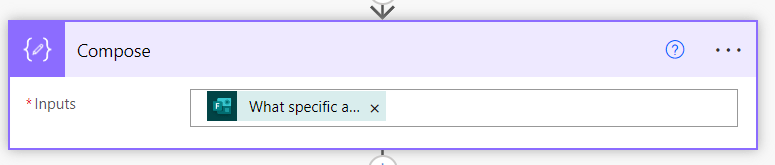
2. Compose
This takes the input from the question that allows multiple answers.
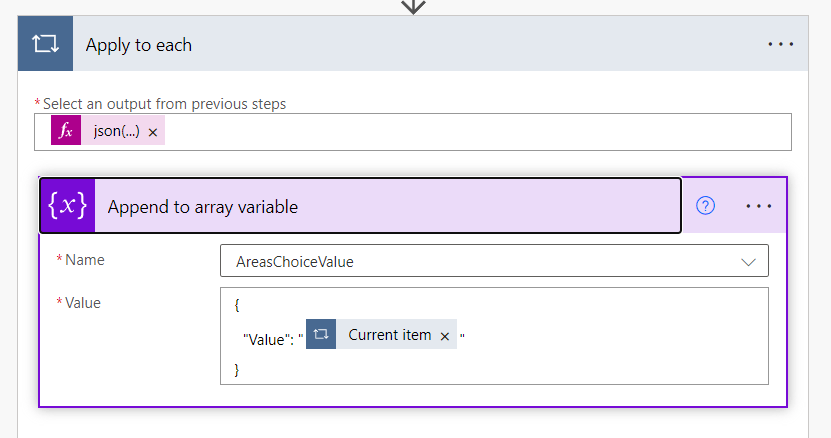
3.Apply to each
This uses the following JSON function to retrieve the output from the Compose step above – the answer(s) to the question.
Finally within this block we add Append to array variable using the following format/syntax and referencing the AreasChoiceValue variable created in Step 1:
This loops through each of the answers to the question and adds them to the AreaChoiceValue array. Which we can then reference in the SharePoint Create item action:
The choice value is then correctly populated in my SharePoint list:
If you have more than one question that permits multiple answers, you can repeat this within the same Flow (with different variables).
Hopefully this saves somebody some time and frustration.
I recently shared a script that I’d written that uses the Octopus Energy API to retrieve my electricity usage (in kWh) for the previous 7 days, this was useful however I wanted to take it a step further and get it to output the actual cost per day too 💷.
The one challenge I have is that I’m on the Octopus Go tariff, which provides cheaper electricity between the hours of 0:30-04:30 each day (perfect for charging my EV overnight 🚗). This means that it’s not quite as simple as multiplying usage in kWh by the price per kWh to calculate the daily cost as the rate varies depending on the time of the day – here are details of the tariff for additional context:
To add to this, the Octopus Energy app currently doesn’t support providing the daily cost for this tariff (which was the main reason for me writing this script):
I eventually figured out how to do this and include the Python script below (with comments).
You will need to update the peak and off-peak rates (offpeakrate and peakrate variables) as these can vary based on your location.
I haven’t included the daily standing charge in the calculation.
You can increase the number of days to report on by changing the numberofdays variable
import requests
from requests.auth import HTTPBasicAuth
import datetime

# Set the peak and off-peak rates for Octopus Go
offpeakrate = 9.50
peakrate = 38.58

# The number of previous days to report on
numberofdays = 7

# Set the API key, meter MPAN and serial
key = "API Key"
MPAN = "MPAN"
serial = "Serial Number"

# Get today's date
today = datetime.date.today()

# Loop through the previous x number of days to report on (set by the "numberofdays" variable)
while numberofdays > 0:
    peakusage = 0
    offpeakusage = 0
    fromdate = (today - datetime.timedelta(days=numberofdays)).isoformat() # Get the from date
    todate = (today - datetime.timedelta(days=(numberofdays - 1))).isoformat() # Get the to date
    # Call the Octopus API for the date range
    baseurl = "https://api.octopus.energy/v1/"
    url = baseurl + "electricity-meter-points/" + MPAN + "/meters/" + serial + "/consumption" + "?period_from=" + fromdate + "&period_to=" + todate
    request = requests.get(url,auth=HTTPBasicAuth(key,""))
    consumption = request.json()
    numberofdays -= 1 # Minus 1 from the number of days variable (the loop will stop when this hits 0)

    i = 0 # Used to index the results returned (48 results per day, one per 30 minutes)
    for result in consumption["results"]: # Loop through the results returned for the specified day, extract the peak and off-peak units consumed and calculate the cost
        if i in range(40,47): # These are the indexes of the off-peak hours (00:30-04:30)
            offpeakusage = offpeakusage + result["consumption"]
        else:
            peakusage = peakusage + result["consumption"]
        i += 1
    # Calculate the peak / off-peak and total cost for the day in £'s (rounded to 2 decimal places)
    peakcost = round((peakusage * peakrate / 100), 2)
    offpeakcost = round((offpeakusage * offpeakrate / 100), 2)
    totalcost = round((peakcost + offpeakcost), 2)

    # Print out the cost for the day
    print("Usage for " + fromdate)
    print("-Peak £" + (str(peakcost)))
    print("-Offpeak £" + (str(offpeakcost)))
    print("-Total cost for day £" + (str(totalcost)))
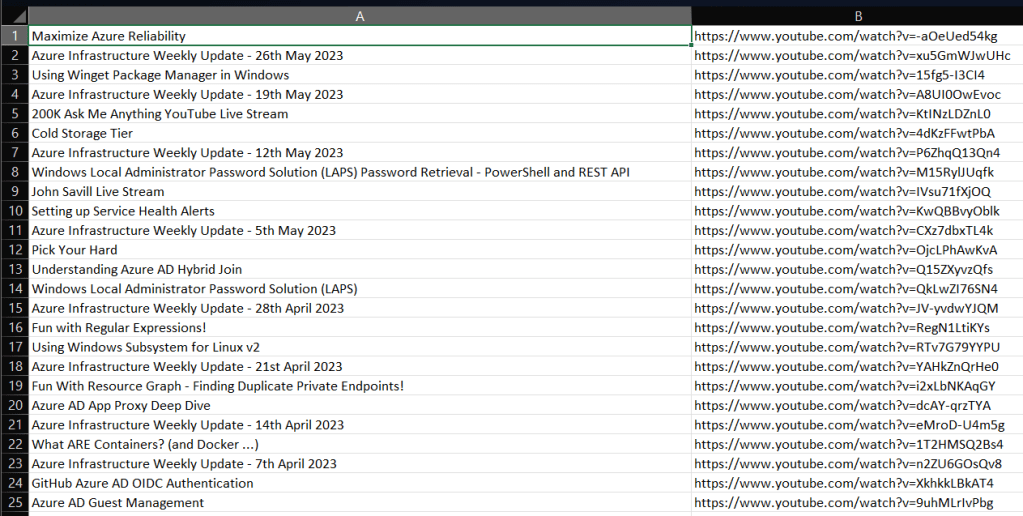
Here is an example of the output that the script provides:
I’m a stickler for keeping things nice and tidy (often to my detriment!). As with most people the downloads folder on my PC is a bit of a dumping ground and I was forever deleting the contents of it….the same goes for emptying my recycle bin. I’m always looking to automate things to save me some clicks so spent some time writing a script in PowerShell that does these very two things!
Deletes EVERYTHING in the Downloads folder within my user profile
If you are as equally sad as me and would like to use this, you’ll need to update the file path to point towards yourdownloads folder, which should be as simple as replacing “brendan” with your username.
I also created a batch file that I can run that then executes this PowerShell script for me (that way I can simply right-click the batch file to execute the PowerShell script). To use this update the file path to point it towards the location of the Clean.ps1 PowerShell script.
I watch a lot of content on YouTube (particularly John Savill’s amazing Azure channel) for channels that have been around for a while it’s difficult to navigate through the back catalogue to identify videos to watch 🔎.
I recently had the brainwave of writing a script, that can connect to a YouTube channel and write out a list of all videos and their URLs to a CSV file to help me out here…luckily for me YouTube has a rich API that I could use to do this.
You will need a key to access the YouTube API, here is a short video I put together that walks through the process of creating one:
Below is the Python script that I put together (with comments) that uses the Requests module to do just this! You will also need to update the key, channel and csv variables prior to running the script.
import requests

# Set the key used to query the YouTube API
key = "KEY"

# Specify the name of the channel to query - remember to drop the leading @ sign
channel = "NTFAQGuy" # the very reason that I wrote this script!

# Set the location of the CSV file to write to
csv = "C:\\videos.csv" # Windows path

try:
    # Retrieve the channel id from the username (channel variable) - which is required to query the videos contained within a channel
    url = "https://youtube.googleapis.com/youtube/v3/channels?forUsername=" + channel + "&key=" + key
    request = requests.get(url)
    channelid = request.json()["items"][0]["id"]

except:
    # if this fails, perform a channel search instead. Further documentation on this: https://developers.google.com/youtube/v3/guides/working_with_channel_ids
    url = "https://youtube.googleapis.com/youtube/v3/search?q=" + channel + "&type=channel" + "&key=" + key
    request = requests.get(url)
    channelid = request.json()["items"][0]["id"]["channelId"]

# Create the playlist id (which is based on the channel id) of the uploads playlist (which contains all videos within the channel) - uses the approach documented at https://stackoverflow.com/questions/55014224/how-can-i-list-the-uploads-from-a-youtube-channel
playlistid = list(channelid)
playlistid[1] = "U"
playlistid = "".join(playlistid)

# Query the uploads playlist (playlistid) for all videos and writes the video title and URL to a CSV file (file path held in CSV variable)
lastpage = "false"
nextPageToken = ""

while lastpage:
    videosUrl = "https://www.googleapis.com/youtube/v3/playlistItems?part=snippet%2CcontentDetails&playlistId=" + playlistid + "&pageToken=" + nextPageToken + "&maxResults=50" + "&fields=items(contentDetails(videoId%2CvideoPublishedAt)%2Csnippet(publishedAt%2Ctitle))%2CnextPageToken%2CpageInfo%2CprevPageToken%2CtokenPagination&key=" + key
    request = requests.get(videosUrl)
    videos = request.json()
    for video in videos["items"]:
        f = open(csv,"a")
        f.write(video["snippet"]["title"].replace(",","") + "," + "https://www.youtube.com/watch?v=" + video["contentDetails"]["videoId"] + "\n")
        f.close()
    try: # I'm sure there are far more elegant ways of identifying the last page of results!
        nextPageToken = videos["nextPageToken"]
    except:
        break
I’ve recently changed my energy supplier to Octopus……the main reason being their super-cheap overnight electricity rates, which will save me lots of money charging my EV car 💷.
I noticed that they had a developer API, ever the tinkerer I thought I’d take a closer look. Their documentation is really extensive, however their examples all used Curl and I wanted to have a play with Python (using the Requests module). I ran into a couple of issues so thought I’d document this to help others (although most likely my future self when I forgot all of this 😂)
Issue 1 – authenticating to the API using a key
The API uses HTTP basic auth (which uses a key that is available on the API access page), after much searching I found the equivalent for the -u parameter in Curl to enable me to successfully authenticate using the key. The trick was import HTTPBasicAuth using the following command:
from requests.auth import HTTPBasicAuth
Then when making the request to the API using the following syntax, which passes the API key (key variable) and the username, with a blank password (denoted by “”).
Issue 2 – formatting the date for period_from correctly
The API allows you to pass it a period_from parameter, this is useful to get your energy consumption from a specific date. In my specific use-case, I wanted to see my consumption from the previous 7 days. I achieved this using the following:
Pulling all of this together, I created the script below which connects to the developer API and retrieves my electricity consumption for the previous 7 days (grouped by day) and outputs this to the console – if you’d like to use this you’ll need to update the key, MPAN and serial variables – all of which are listed on this page (if you are a customer of course!)
import requests
from requests.auth import HTTPBasicAuth
import datetime
date7daysago = (datetime.datetime.now() - datetime.timedelta(days=7)).isoformat() # calculate the date 7 days ago
key = "KEY"
MPAN = "MPAN"
serial = "SERIAL"
baseurl = "https://api.octopus.energy/v1/"
url = baseurl + "electricity-meter-points/" + MPAN + "/meters/" + serial + "/consumption" + "?period_from=" + date7daysago + "&group_by=" + "day"
request = requests.get(url,auth=HTTPBasicAuth(key,""))
request.json()
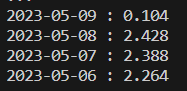
Here is the output of the script – you may notice that it doesn’t include 7 days worth of data, that is because I haven’t been a customer for that long.
To make it a little easier to read I added the following to the script, which prints out the date and consumption:
consumption = request.json()
for result in consumption["results"]:
    print(str(result["interval_start"].split("T")[0]) + " : " + str(result["consumption"]))
Based on my previous escapades with developer API’s for consumer services I’m sure that I’ll be writing an Alexa skill for this next 🤖.
I have a Raspberry Pi 400, which I run RetroPie on – if you are into retro gaming and have a Pi I cannot recommend this enough! I have this attached to a 4K TV using HDMI, I needed to change the resolution as I wanted to reduce this to 1920 x 1080 (as I had some issues with one of the emulators running at 4K). I’d usually change the resolution using raspi-config.
I ran into a issue with raspi-config, whereby the option to change resolution within Display Options > Resolution was acting weirdly – it was dropping me back to the main menu when selecting Resolution, as RetroPie doesn’t have the Raspberry Pi OS GUI I wasn’t sure what other options I had to change the resolution.
It turns out this wasn’t as difficult as I thought, I just needed to edit /boot/config.txt, I ran the following command to do this in a terminal (via SSH):
sudo nano /boot/config.txt
Within this file there was two lines I needed to un-comment to overwrite the current configuration:
hdmi_group and hdmi_mode. I configured hdmi_group to 1 (which means the device is connected to a TV) and hdmi_mode to 16, which equates to 1080p @ 60hz – a full reference for the various modes can be found here.
I gave the Pi a reboot and voila, I had glorious 1080p resolution 📺.
Azure continues to amaze me, I’ve been playing around with Azure Web Apps recently and was astounded at the simplicity of creating a new Web App and deploying code to it 😲.
Using the one-liner below I was able to create a new Azure Web App (with all of the necessary pre-req’s such as a resource group and App Service plan) AND deploy my code!
I used the Azure CLI to do this running on my Windows 11 machine, to install the Azure CLI I used the following winget command within PowerShell.
winget install -e --id Microsoft.AzureCLI
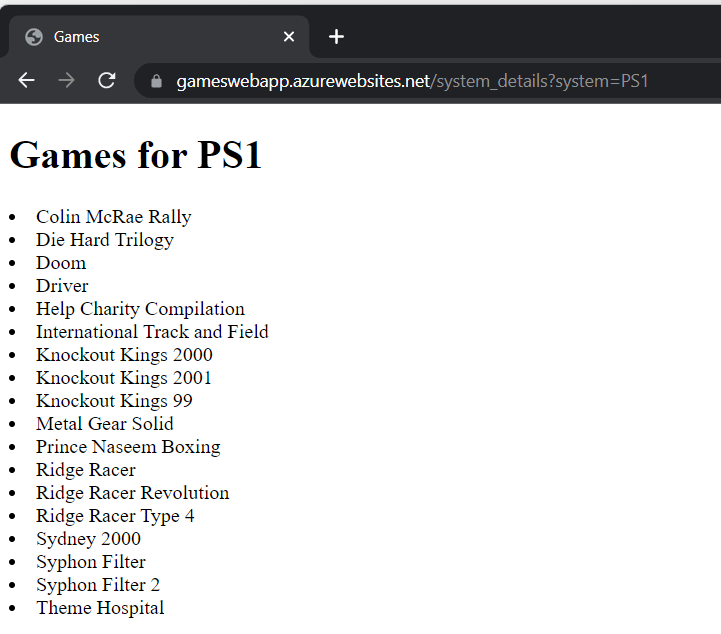
Once this had been installed, I used az login to login to my Azure subscription and then ran the command below to provision the Web App and deploy the code (which is a Python Flask application). This command was run directly from the folder that contained the code for my Web App (which displays the video games within my collection) and did the following:
Creates a Resource Group (with an auto-generated name)
Creates an App Service Plan (with an auto-generated name)
Create a Web App with the name specified by -n (GamesWebApp)
All of these resources were created within the UK South region, denoted by -l
Uses the free (F1) SKU for Azure App Service
az webapp up --sku F1 -n "GamesWebApp" -l uksouth
Once the command completed the following was output:
I recently catalogued my retro gaming collection and took the high tech approach of using Excel to do this. I then decided to over-engineer this further and store the data in Azure Table storage……however I didn’t want to manually re-key all of the games!
I took a look at options for how I could automate reading an Excel file using Python – my plan being to write a script that would extract the data from the Excel file and then write this to Azure Table storage.
My Excel file is pretty basic with a sheet for each of the systems I own, within each sheet is a list of the games for that system:
Here is how I eventually figured out how to read data from an Excel file using Python…..
Step 1 – Install the pre-req modules
For this I needed to install two modules – pandas and openpyxl. I ran the following commands in a terminal to do this:
pip install pandas
pip install openpyxl
Step 2 – Create the script!
I wrote the script below (which took me far longer than I’d like to admit!), which does the following:
Obtains the names of each sheet within the Excel file – remember I have a separate sheet for each games console.
Loops through each of the sheets, opening each sheet individually.
For each sheet, it Iterates through each row in the sheet and prints the row (game).
excelfilepath = 'C:\\Users\\brend\\OneDrive\\Documents\\Retro Games Collection.xlsx' # Define the path to the Excel file to read
excel = pd.ExcelFile(excelfilepath)
sheets = excel.sheet_names # Read the names of each of the sheets within the Excel file

for sheet in sheets: # Loop through each sheet
    print("")
    print(sheet)
    print("----------")
    excel = pd.read_excel(excelfilepath,header = None, sheet_name= sheet) # Open the Excel file and the specific sheet within the sheets list
    i = 0
    while i < len(excel[0]) - 1: # Read the number of rows within the sheet and minus 1 to get the maximum index number for the while loop
        print(excel[0][i]) # Print the row from the specific sheet using the index i
        i += 1
Here is what it looks like in action:
The next step for me is to update the while loop so that it writes each game to Azure Table storage. I’ve written about how to do that using Python here.
I’m in the process of writing a Python (Flask) web app that will list all of the games in my retro gaming collection (and also allow me to add/edit them too) 🕹️.
My list of games are stored within Azure Table storage (I really love to over-engineer things!), so I needed to figure out how to add/query data within Azure Table storage using Python 🐍.
Step 1 – Install the Python module for Azure Table storage
First things, first – I needed to install the Python module for Azure Table storage, I did this using the following command from a terminal:
pip install azure-data-tables
Step 2 – Connecting to the Storage Account
I then needed to connect to my Azure Storage account, I used the following to do this:
The key thing is to not specify the name of the table as part of the endpoint URL, when I did it would allow me to add entries to the table, but I was unable to query the table and received a cryptic error (which I wasted a lot of time figuring out).
To keep things simple I used an access key to connect to the storage account, I copied the key directly from the Azure Portal.
I also retrieved the endpoint URL from the portal.
Step 3 – Add an entry to the Azure table “games”
I firstly needed to connect to the table “games”, I did this with the following commands:
service = TableServiceClient(endpoint=endpoint, credential=credential)
gamestable = service.get_table_client("games")
I then defined the game (entity) to add to the table:
As this isn’t going to be a large table (<1000 rows), I opted to use a single PartitionKey, the RowKey is the name of the game and I defined a new field named System which is used to define the system that the game is for. In the example above this was Super Mario Land on the Nintendo Game Boy.
I could then add the game (entity) to the table using the following:
gamestable.create_entity(entity)
Step 4 – Verify that the game was added
I then wrote a query to return all games within the table to verify that the game had been successfully added to the table:
games = gamestable.query_entities(query_filter="PartitionKey eq '1'")
for game in games:
    print(game["RowKey"])
This outputs the RowKey (game name) for every game listed in Partition 1 – as I only have a single partition this would return everything:
Step 5 – Querying for all games from a specific system
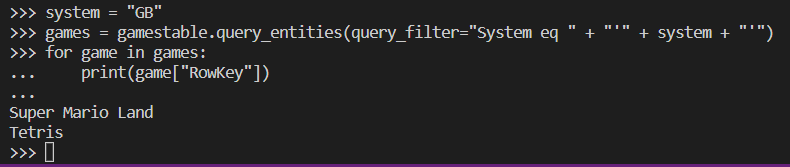
Here is an alternative query that lists all games from a specific system.
system = "GB"
games = gamestable.query_entities(query_filter="System eq " + "'" + system + "'")
for game in games:
    print(game["RowKey"])
The name of the system to query is held within the system variable.
Next step for me is to write a script that takes the Excel file that contains a list of all my games and automagically add them to the table.