Tag: technology

  • Transcribing speech to text using the OCI AI Speech service with Python πŸŽ€

    I’ve been playing around with the OCI AI Speech service recently, one thing I really struggled with was using the AI Speech API to create a transcription job to extract the text from an audio/video file (as I needed to automate the process).

    After much head scratching (…and some help from a colleague), I was able to assemble the following Python script, this provides a function named transcribe, which can be called to submit a transcription job. The following parameters are required:

    • inputfile – The name of the audio/video file to transcribe e.g. recording.mp3
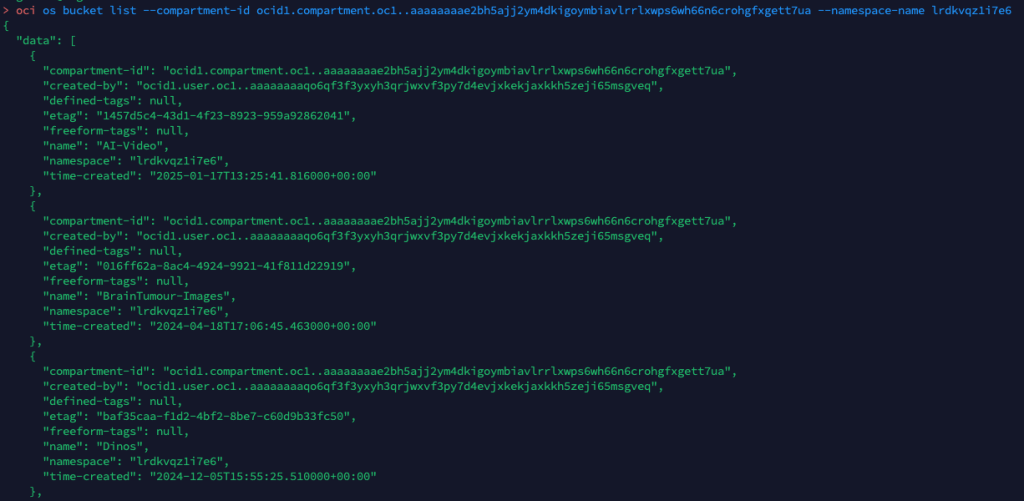
    • bucket – The name of the bucket that contains the inputfile to transcribe (this is also where the JSON output of the transcription job will be stored)
    • compartmentid – OCID of the compartment to run the transcription job in
    • namespace – The Object Storage namespace
    import oci
    
    config = oci.config.from_file()
    
    def transcribe(inputfile,compartmentid,bucket,namespace):
        ai_speech_client = oci.ai_speech.AIServiceSpeechClient(config)
        create_transcription_job_response = ai_speech_client.create_transcription_job(
                create_transcription_job_details=oci.ai_speech.models.CreateTranscriptionJobDetails(
                    compartment_id=compartmentid,
                    input_location=oci.ai_speech.models.ObjectListInlineInputLocation(
                        location_type="OBJECT_LIST_INLINE_INPUT_LOCATION",
                        object_locations=[oci.ai_speech.models.ObjectLocation(
                            namespace_name=namespace,
                            bucket_name=bucket,
                            object_names=[inputfile])]),
                    output_location=oci.ai_speech.models.OutputLocation(
                        namespace_name=namespace,
                        bucket_name=bucket)))
    
    transcribe(inputfile="Name of file to transcribe",compartmentid="OCID of the compartment to run the transcription job in",bucket="Bucket that contains the file to transcribe",namespace="Object storage namespace")
    

    For example:

    transcribe(inputfile=”recording.mp3“,compartmentid=”ocid1.compartment.oc1..aaaaaaaae“,bucket=”Transcription“,namespace=”lrdkvqz1i7f9“)

    When this has been executed, the transcription job can be viewed within the OCI Console.

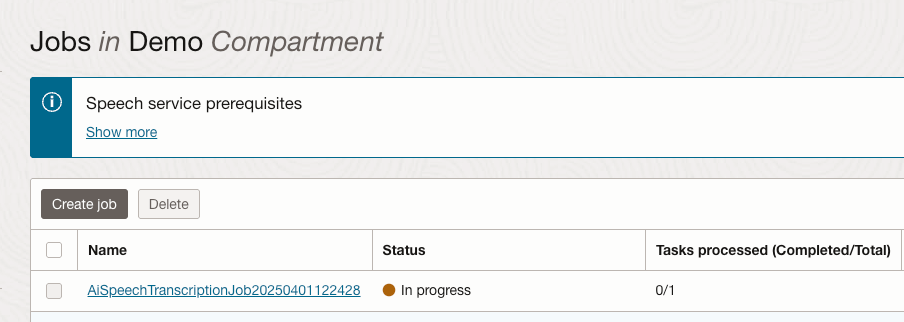
    Once the job completed, the transcription was available to view from within the job (clicking the filename within the Tasks section):

    Here is the transcript in all it’s glory.

    The sample can also be found on GitHub.

  • Unable to create a container instance in OCI

    I was working with a customer to deploy a Docker image that I’d added to their OCI Container Registry, however when provisioning a Container Instance using this image it was failing with the following error πŸ›‘:

    A container image provided is not compatible with the processor architecture of the shape selected for the container instance.

    This is a pretty descriptive error message, that you will receive when attempting to deploy a container on a host machine that has a different CPU architecture than that of the image you are attempting to deploy, for example trying to deploy a container that uses an x64 based image to a host machine that has an ARM CPU.

    In this specific case, I was attempting to deploy a container to a AMD x64 machine – something which I had done numerous times successfully with this very image – a real case of “it works on my machine!“. After much head scratching I figured out what I’d done wrong πŸ’‘.

    I had used the Cloud Shell to create the image and deploy to the Container Registry (I ❀️ the Cloud Shell!).

    It turns out that it’s possible to select the arcihtecture to use for the Cloud Shell, I had been using x64 in my tenant, however the admin at the customer had ARM configured for their Cloud Shell therefore when it was building the Docker image it was pulling the ARM version of the base image therefore failing when attempting to deploy this to an AMD x64 host.

    There are two options to fix this:

    1. Provision the Container Instance on an Ampere (ARM) host
    2. Re-create the image using a Cloud Shell with the desired CPU architcture, in this case x64

    I was lazy and opted for option 1, to however to change the CPU architecture for Cloud Shell:

    • Launch Cloud Shell
    • Select Actions > Architecture
    • Choose the desired architecture (this is a per-user setting, not tenant-wide)

    Hope this helps somebody in the future!

  • Sending raw requests using the OCI CLI πŸ’»

    The OCI CLI includes a raw-request option, as the name suggests this is a useful way to send manual requests to OCI services instad of using the native CLI commands πŸ’».

    For example to list the buckets within a specific compartment I can run the following OCI CLI command πŸͺ£:

    oci os bucket list --compartment-id (OCID) --namespace-name (NameSpace)
    

    Or alternatively I could run the following using the OCI CLI raw-request command.

    oci raw-request --http-method GET --target-uri https://objectstorage.uk-london-1.oraclecloud.com/n/lrdkvqz1i7e6/b?compartmentId=ocid1.compartment.oc1..aaaaaaaa5yxo6ynmcebpvqgcapt3vpmk72kdnl33iomjt3bk2bcraqprp6fq
    

    This is a fairly simple read request against object storage, to help me understand how to formulate the URL (target-uri) I added –debug to the initial oci os bucket list CLI command that I ran. This provides a wealth of information on what happens “under the hood” when running a CLI command and helped me to understand the –target-uri I needed to use for the raw-request command.

    For more complex scenarios, such as creating resources or using a service e.g. analysing an image with AI Vision, you can add –generate-param-json-input to a CLI command and it will generate a JSON file which can be populated with the desired parameters that you can then pass to raw-request using the –request-body parameter.

    In terms of real-world usage, the only real use-case for this is with new services that you need to interact with, where there isn’t a CLI command available, with that being said this would mean that you couldn’t use the –debug parameter to help understand how to send the request using raw-request, so you’d need to rely on documentation and/or trial and error – probably the latter!

  • Unauthorized to use OML application error when trying to obtain an OML token from an Oracle Autonomous database with a private endpoint βŒ

    Probably the longest title I’ve ever had for a post!

    I have an Oracle Autonomous Database that I created a private endpoint for and published via a public load balancer in OCI……my reason for this complexity – I wanted to use a custom vanity URL to access the database and this is the supported way to do this. If want to know more about setting this up, be sure to check out this step by step guide πŸ“–.

    Once I’d got this setup, everything worked as expected apart from one small issue – when trying to get a token via REST so that I could call an Oracle Machine Learning model within the database I received the following error ❌.

    b'{“error_message”:”\’DEMO1USER\’ unauthorized to \’use OML application\’”,”errorCode”:0,”request_id”:”OMLIDMREST-955f999622584d33a70″}’

    I was calling the REST API via Python, but other methods such as Curl returned the same error (further details on calling the REST API to get a token and authenticate can be found here). The user had the relevant permissions so it was definitely something else πŸ€”.

    The trick to fixing this is to update the URL that is called to obtain the token, rather than using this:

    https://oml-cloud-service-location-url/omlusers/api/oauth2/v1/token

    The URL needs to be updated to include the OCID of the OCI tenancy and the name of the database to connect to, like this:

    https://oml-cloud-service-location-url/omlusers/tenants/TenancyOCID/databases/DatabaseName/api/oauth2/v1/token

    For example, I was originally using this URL:

    https://adb.brendg.co.uk/omlusers/api/oauth2/v1/token

    I had to update this to:

    https://adb.brendg.co.uk/omlusers/tenants/ocid1.tenancy.oc1..aaaaaabbjdjwnd3krfpjw23erghw4dxnvadd9w6j2hwcirea22qrtfam24mq/databases/DemoDB/api/oauth2/v1/token

    The reason for this, is that when using a custom (vanity) URL to access the REST endpoint, it doesn’t know which tenancy and database you are trying to obtain an authentication token for, therefore you need to specify this in the REST endpoint.

    Once I’d done this, it worked like magic πŸͺ„

  • How to create a free SSL certificate with Let’s Encrypt…and as a bonus use this certificate with Oracle Analytics Cloud πŸ”

    I needed an SSL certificate recently as wanted to make an instance of Oracle Analytics Cloud available publicly with a nice vanity URL, rather than https://demo1analyticscloud-lrmvtbrwx-ld.analytics.ocp.oraclecloud.com, something a little more memorable, such as https://oac.oci-demo.co.uk.

    To do this I needed an SSL certificate and decided to use Let’s Encrypt as they provide free SSL certificates (with a validity period of 90 days).

    It was relatively straightforward to create a certificate using the Certbot client for macOS, to do this I did the following:

    Step 1 – Installed Certbot using the following command

    brew install certbot
    

    Step 2 – Created a directory to store the generated certificates

    mkdir certs
    cd certs
    

    Step 3 – Create the certificate request using Certbot

    This uses the DNS challenge type, which is ideal when you need to create a certificate for use on a system that doesn’t provide native integration with Certbot (such as Oracle Analytics Cloud). Replace “e-mail address” with a valid address to use for renewal reminders.

    cd certs
    certbot certonly --manual --preferred-challenges=dns --config-dir config --work-dir workdir --logs-dir logs --agree-tos -m e-mail address --key-type rsa
    

    When this command has been run, it will ask for the hostname to create the SSL certificate for. In my case I requested a certificate for demo1oac.oci-demo.co.uk.

    After hitting enter, it then provides a DNS record that needs to be created to validate domain ownership.

    I host my DNS within OCI, so this was as simple as creating a DNS TXT record using the OCI Console (the process will vary depending on your DNS provider).

    I then used the link within the instructions to validate the presence of the DNS TXT records that I had just created.

    Once I’d verified that the DNS record was available publicly, I hit enter and the SSL certificates were created for me!

    Step 4 – Configure OAC to use a custom hostname with SSL (example)

    I then navigated to Oracle Analytics Cloud within the OCI Console and within Vanity URL selected Create.

    I entered the hostname for the vanity URL – demo1oac.oci-demo.co.uk. I then uploaded the certificates that had just been generated.

    The mapping between certificate types and the .pem files created is as follows:

    • Certificate = cert1.pem
    • Private Key = privkey1.pem
    • Certificate Authority chain file = chain1.pem

    I then hit Create to apply the configuration. A final step was for me to create a DNS entry to point demo1oac.oci-demo.co.uk to the public IP address of the OAC instance.

    I then waited a few minutes for the DNS record to come to life and then browsed to https://demo1oac.oci-demo.co.uk and it worked!