Tag: oracle

  • Creating a front end for the OCI Generative AI Service using Streamlit 🎨

    I recently shared an example of how to create a basic front-end for an OCI Generative AI Agent using Streamlit, in this post I’m going to share how to do this for the OCI Generative AI Service, this is useful for demo’s when you need to incorporate a specific look and feel, something that’s a little more snazzy than the playground within the OCI Console! 💻

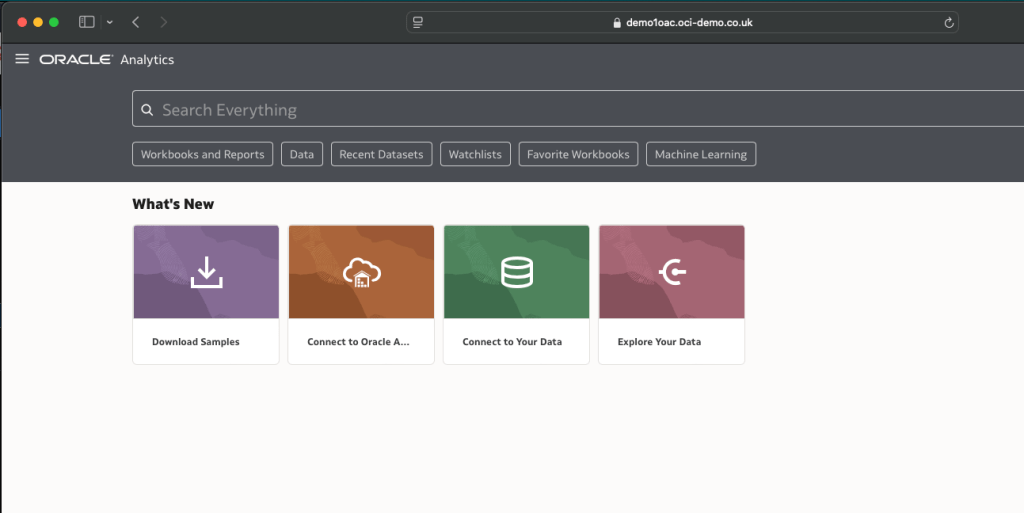
    Here’s what the basic front-end I created looks like:

    Installing Streamlit is a breeze using the single command below.

    pip install streamlit
    

    Once I’d done this, I put together the following Python script to create the web app, this can also be downloaded from GitHub.

    Disclaimer: I’m no developer and this code is a little hacky, but it gets the job done!

    The following variables need to be updated before running the script:

    • st.title – Set’s the title of the page
    • st.set_page_config – Set’s the name and icon to use for the page
    • st.sidebar.image – Configures the image to use in the sidebar
    • config – Set’s the OCI SDK profile to use, further info on this can be found here – https://docs.oracle.com/en-us/iaas/Content/API/Concepts/sdkconfig.htm
    • compartment_id – The compartment to make the request against, a the Generative AI Service doesn’t need to be provisioned, this can be useful for cost tracking and budgeting purposes (as spend is against a specific compartment).
    • endpoint – The endpoint for the region to pass the request to, a full list of the current endpoints can be found here, in my example I’m connecting to the Frankfurt endpoint.
    • model_id The OCID of the model to call, the eaisest way to obtain this is via the OCI Console: Analytics & AI > Generative AI > Chat > View model details. This will provide a list of the models that are available, simply copy the OCID of the model you’d like to use. Further details on the difference between each of the models can be found here.

    import oci
    import streamlit as st
    
    st.set_page_config(page_title="OCI GenAI Demo Front-End",page_icon="🤖")
    st.title("OCI GenAI Demo Front-End 🤖")
    st.sidebar.image("https://brendg.co.uk/wp-content/uploads/2021/05/myavatar.png")
    
    # GenAI Settings
    compartment_id = "Compartment OCID"
    config = oci.config.from_file(profile_name="DEFAULT")
    endpoint = "https://inference.generativeai.eu-frankfurt-1.oci.oraclecloud.com"
    model_id = "Model OCID"
    
    def chat(question):
        generative_ai_inference_client = oci.generative_ai_inference.GenerativeAiInferenceClient(config=config, service_endpoint=endpoint, retry_strategy=oci.retry.NoneRetryStrategy(), timeout=(10,240))
        chat_detail = oci.generative_ai_inference.models.ChatDetails()
        chat_request = oci.generative_ai_inference.models.CohereChatRequest()
        chat_request.message = question 
        chat_request.max_tokens = 1000
        chat_request.temperature = 0
        chat_request.frequency_penalty = 0
        chat_request.top_p = 0.75
        chat_request.top_k = 0
        chat_request.seed = None
        chat_detail.serving_mode = oci.generative_ai_inference.models.OnDemandServingMode(model_id=model_id)
        chat_detail.chat_request = chat_request
        chat_detail.compartment_id = compartment_id
        chat_response = generative_ai_inference_client.chat(chat_detail)
        return chat_response.data.chat_response.text
    
    # Initialize chat history
    if "messages" not in st.session_state:
        st.session_state.messages = []
    
    # Display chat messages from history on app rerun
    for message in st.session_state.messages:
        with st.chat_message(message["role"]):
            st.markdown(message["content"])
    
    # Accept user input
    if prompt := st.chat_input("What do you need assistance with?"):
        # Add user message to chat history
        st.session_state.messages.append({"role": "user", "content": prompt})
        # Display user message in chat message container
        with st.chat_message("user"):
            st.markdown(prompt)
    
        # Display assistant response in chat message container
        with st.chat_message("assistant"):
            response = chat(prompt)
            write_response = st.write(response)
        # Add assistant response to chat history
        st.session_state.messages.append({"role": "assistant", "content": response})
    

    You may also want to tweak the chat_request settings for your specific use-case for Generative AI, my example is tuned for summarisation. Details for what each of the settings does for the Cohere model (which I used), can be found here.

    Once this file has been saved, it’s simple to run with a single command:

    streamlit run OCI-GenAI-Streamlit.py
    

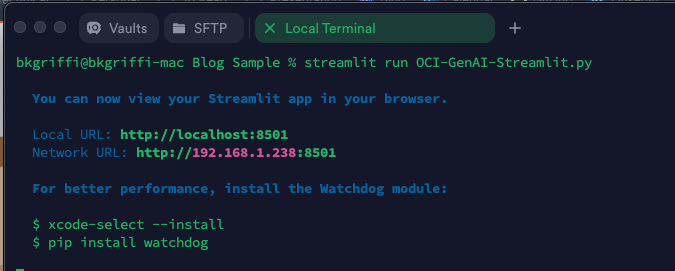
    It will then automatically launch a browser and show the web app in action 🖥️

    This basic example can easily be updated to meet your requirements, the Streamlit documentation is very comprehensive and easy to follow with some useful examples – https://docs.streamlit.io/.

  • Using Resource Principal authentication with OCI 🔐

    When connecting to OCI services in using the SDKs there are four options for authentication 🔐:

    • API Key
    • Session Token
    • Instance Principal
    • Resoure Principal

    Each of these is covered in detail within the OCI SDK Authentication Methods documentation 📕.

    I had a situation recently where I wanted to use Resource Principal authentication to authenticate a Container Instance to an OCI Generative AI Agent, the container was running a Python-based front end for an agent that I had created, however rather than using an API Key to authenticate as a specific user account to the Generative AI Agent service, I wanted to authenticate as the actual Container Instance itself.

    Doing this meant that I didn’t need to store a private key and config file (of the user account) on the Container Instance, which could be viewed as a security risk.

    There are three steps required to configure Resource Principal authentication which I have explained below, one thing to note is that this approach can be adapted for authenticating to other OCI services.

    Step 1 – Create a Dynamic Group that includes the Container Instance 🫙

    This defines the resource that will be connecting from (the Container Instance) to the Generative AI Agent. To create the Dynamic Group, I did the following within the OCI Console – I navigated to:

    Identity & Security > Domains > (My Domain) > Dynamic groups > Create dynamic group.

    I then created a group named Container-Instances with the following rule:

    ALL {resource.type=’computecontainerinstance’}

    This Dynamic Group contains every Container Instance within my tenant, I could have been more granular and specified an individual Container Instance.

    For further details on how to create Dynamic Groups be sure to check out the official documentation.

    Step 2 – Create a Policy that provides members of the Dynamic Group with access to the Generative AI Agents service 📄

    The policy grants permissions to the Dynamic Group created above so that members of this group are able to connect to the Generative AI Agent service, to create the policy I did the following within the OCI Console:

    Navigated to – Identity & Security > Domains > Policies > Create Policy

    I then created a policy with the following statement:

    Allow dynamic-group Container-Instances to manage genai-agent-family in tenancy

    This provides the Dynamic Group named Container-Instances (created in Step 1) the desired access to the Generative AI Agent service – each OCI service has specific resource types that can be used within policies, the full policy reference for the Generative AI Agent service can be found here.

    Step 3 – Update the Python code to authenticate to the Generative AI Agent service using the identify of the Container Instance (Resource Principal) 🐍

    To update the Python script that connects to the Generative AI Agent so that it uses Resource Principal rather than API Key authentication, I updated the following lines of code from this:

    config = oci.config.from_file("config")
    service_ep = "https://agent-runtime.generativeai.uk-london-1.oci.oraclecloud.com"
    agent_ep_id = "OCID"
    
    generative_ai_agent_runtime_client = oci.generative_ai_agent_runtime.GenerativeAiAgentRuntimeClient(config,service_endpoint=service_ep)
    

    To this:

    rps = oci.auth.signers.get_resource_principals_signer() 
    service_ep = "https://agent-runtime.generativeai.uk-london-1.oci.oraclecloud.com"
    agent_ep_id = "OCID"
    
    generative_ai_agent_runtime_client = oci.generative_ai_agent_runtime.GenerativeAiAgentRuntimeClient(config={},signer=rps,service_endpoint=service_ep)


    The two major changes are:

    • Using “oci.auth.signers.get_resource_principals_signer()” rather than loading a config file with “config = oci.config.from_file(“config”)”
    • When connecting to the service, using config={},signer=rps,service_endpoint=service_ep” (key bits in bold) rather than “config,service_endpoint=service_ep

    As mentioned earlier the approach that I’ve covered above an be adapted to work with other OCI services.

  • Sending raw requests using the OCI CLI 💻

    The OCI CLI includes a raw-request option, as the name suggests this is a useful way to send manual requests to OCI services instad of using the native CLI commands 💻.

    For example to list the buckets within a specific compartment I can run the following OCI CLI command 🪣:

    oci os bucket list --compartment-id (OCID) --namespace-name (NameSpace)
    

    Or alternatively I could run the following using the OCI CLI raw-request command.

    oci raw-request --http-method GET --target-uri https://objectstorage.uk-london-1.oraclecloud.com/n/lrdkvqz1i7e6/b?compartmentId=ocid1.compartment.oc1..aaaaaaaa5yxo6ynmcebpvqgcapt3vpmk72kdnl33iomjt3bk2bcraqprp6fq
    

    This is a fairly simple read request against object storage, to help me understand how to formulate the URL (target-uri) I added –debug to the initial oci os bucket list CLI command that I ran. This provides a wealth of information on what happens “under the hood” when running a CLI command and helped me to understand the –target-uri I needed to use for the raw-request command.

    For more complex scenarios, such as creating resources or using a service e.g. analysing an image with AI Vision, you can add –generate-param-json-input to a CLI command and it will generate a JSON file which can be populated with the desired parameters that you can then pass to raw-request using the –request-body parameter.

    In terms of real-world usage, the only real use-case for this is with new services that you need to interact with, where there isn’t a CLI command available, with that being said this would mean that you couldn’t use the –debug parameter to help understand how to send the request using raw-request, so you’d need to rely on documentation and/or trial and error – probably the latter!

  • How to create a free SSL certificate with Let’s Encrypt…and as a bonus use this certificate with Oracle Analytics Cloud 🔐

    I needed an SSL certificate recently as wanted to make an instance of Oracle Analytics Cloud available publicly with a nice vanity URL, rather than https://demo1analyticscloud-lrmvtbrwx-ld.analytics.ocp.oraclecloud.com, something a little more memorable, such as https://oac.oci-demo.co.uk.

    To do this I needed an SSL certificate and decided to use Let’s Encrypt as they provide free SSL certificates (with a validity period of 90 days).

    It was relatively straightforward to create a certificate using the Certbot client for macOS, to do this I did the following:

    Step 1 – Installed Certbot using the following command

    brew install certbot
    

    Step 2 – Created a directory to store the generated certificates

    mkdir certs
    cd certs
    

    Step 3 – Create the certificate request using Certbot

    This uses the DNS challenge type, which is ideal when you need to create a certificate for use on a system that doesn’t provide native integration with Certbot (such as Oracle Analytics Cloud). Replace “e-mail address” with a valid address to use for renewal reminders.

    cd certs
    certbot certonly --manual --preferred-challenges=dns --config-dir config --work-dir workdir --logs-dir logs --agree-tos -m e-mail address --key-type rsa
    

    When this command has been run, it will ask for the hostname to create the SSL certificate for. In my case I requested a certificate for demo1oac.oci-demo.co.uk.

    After hitting enter, it then provides a DNS record that needs to be created to validate domain ownership.

    I host my DNS within OCI, so this was as simple as creating a DNS TXT record using the OCI Console (the process will vary depending on your DNS provider).

    I then used the link within the instructions to validate the presence of the DNS TXT records that I had just created.

    Once I’d verified that the DNS record was available publicly, I hit enter and the SSL certificates were created for me!

    Step 4 – Configure OAC to use a custom hostname with SSL (example)

    I then navigated to Oracle Analytics Cloud within the OCI Console and within Vanity URL selected Create.

    I entered the hostname for the vanity URL – demo1oac.oci-demo.co.uk. I then uploaded the certificates that had just been generated.

    The mapping between certificate types and the .pem files created is as follows:

    • Certificate = cert1.pem
    • Private Key = privkey1.pem
    • Certificate Authority chain file = chain1.pem

    I then hit Create to apply the configuration. A final step was for me to create a DNS entry to point demo1oac.oci-demo.co.uk to the public IP address of the OAC instance.

    I then waited a few minutes for the DNS record to come to life and then browsed to https://demo1oac.oci-demo.co.uk and it worked!