Tag: oci

  • Fun and games with OCI DRGs, RPCs and VPNs – attempting to connect from On-Prem to a peered tenant 🔌

    This is probably my most niche-ist post ever – however if it helps at least one person then it was worth writing up!

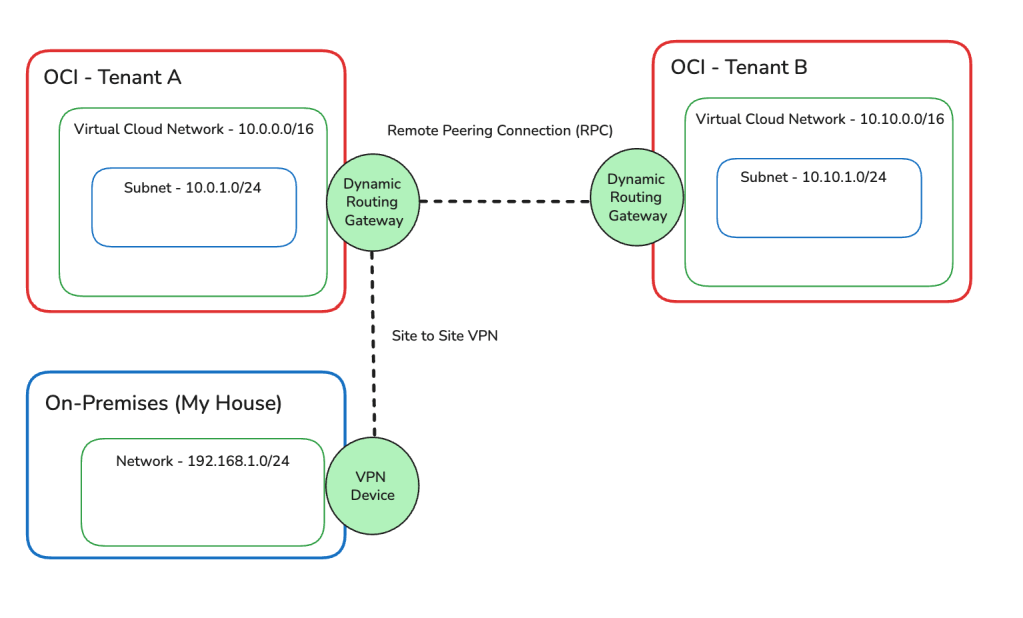
    I have an OCI Tenant (Tenant A), which has a Site-to-Site VPN connection configured between my On-Premises network (my house 🏠) and Tenant A, this enables me to connect to resources within my tenant using their private IP addresses rather than using a Bastion/Jump Server – for example I can SSH directly into VM instances.

    This has worked perfectly well for the last couple of years, recently I provisioned a second OCI Tenant (Tenant B) and I wanted to configure connectivity between Tenant A and B, after some research I selected the option of connecting the networks in Tenant A and Tenant B using a Remote Peering Connection (RPC) between the Dynamic Routing Gateways (DRGs) in each tenancy.

    There are two other options to achieve this, however as I like a challenge, I picked the most difficult of the three options – this is also because the customer I’m working with, will likely choose the RPC option too.

    To set this up, I used the step-by-step guide available here, which is excellent – I found it far better than the official documentation.

    Once I had this all setup, I had the following architecture.

    Based on my initial testing I could now do the following:

    • Connect from my On-Premises network to resources in Tenant A ✅
    • Connect from Tenant A to resources in Tenant B ✅
    • Connect from Tenant B to resources in Tenant A ✅

    I couldn’t however connect from On-Premises to resources in Tenant B ❌.

    In the real-world (outside of my lab), it would be essential (in most cases) to have the ability to connect from On-Premises to all OCI tenancies – in particular when they are connected like this.

    After much head-scratching and reading documentation – which is always a last resort! I figure out the problem(s) and managed to resolve the issue with my On-Premises network being unable to connect to Tenant B.

    This was resolved by doing the following in Tenant A (no changes were required for Tenant B).

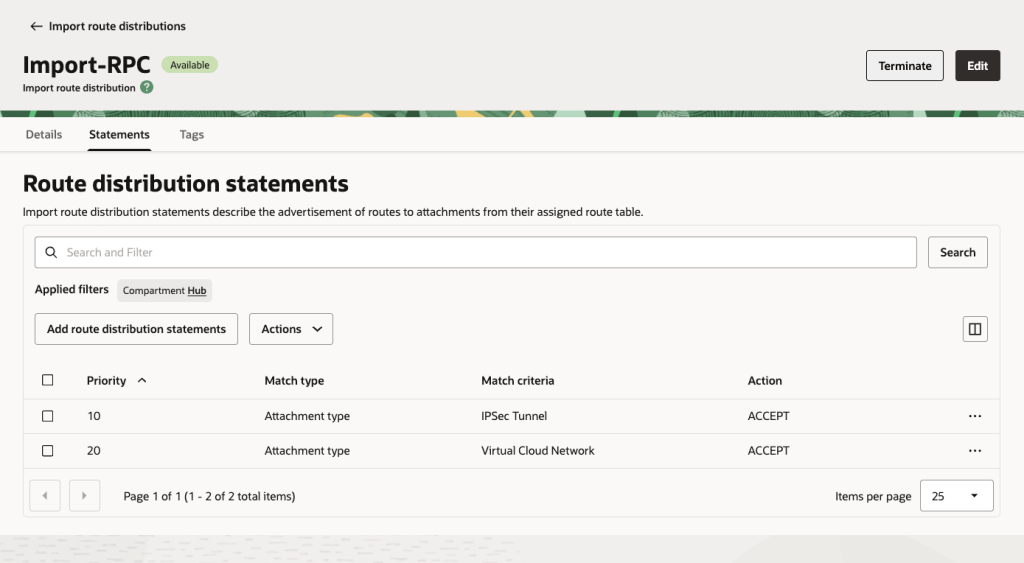
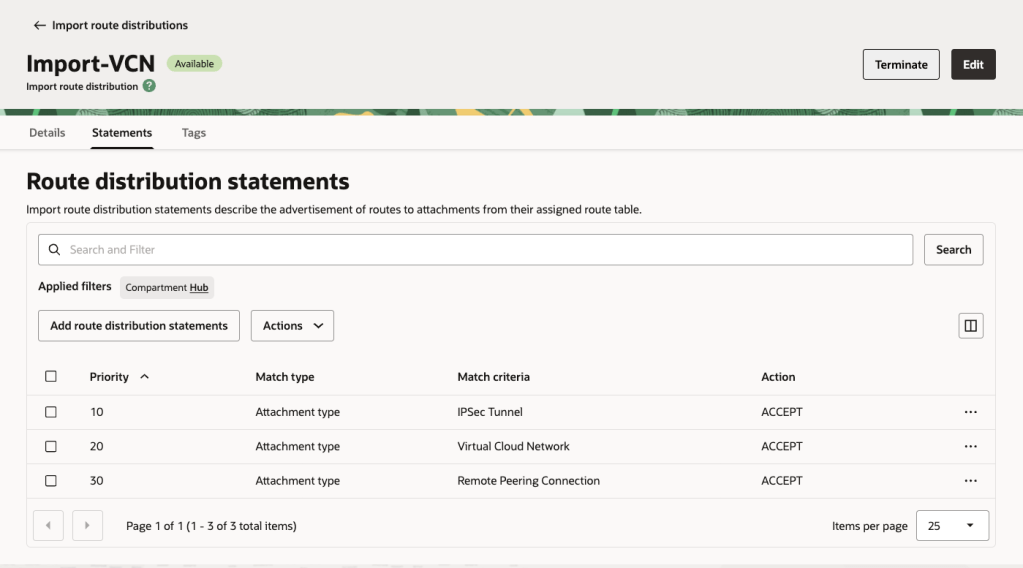
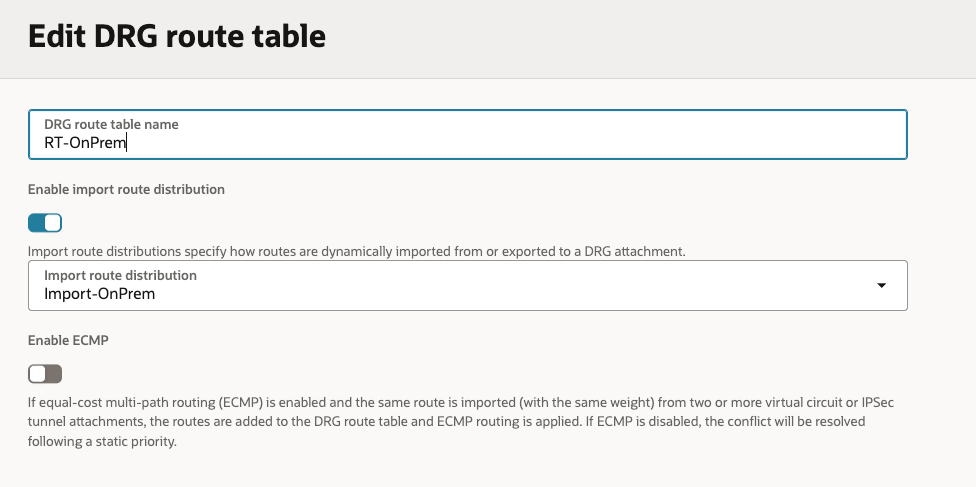
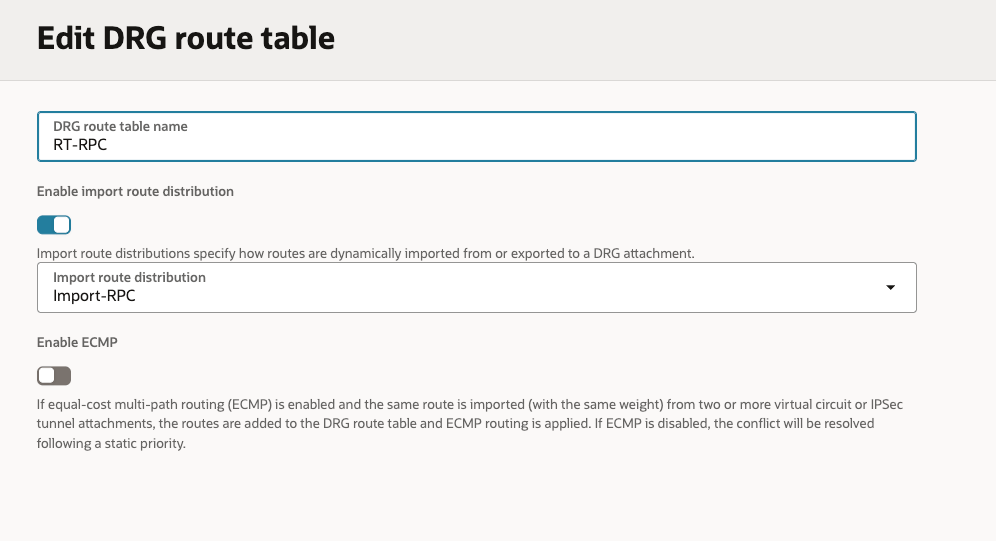
    • Created 3 x Import Rule Distributions (On-Prem/RPC/VCN).
    • Created 3 x Route Tables (On-Prem/RPC/VCN), associating each of these new Route Tables with the respective new Import Rule Distributions.
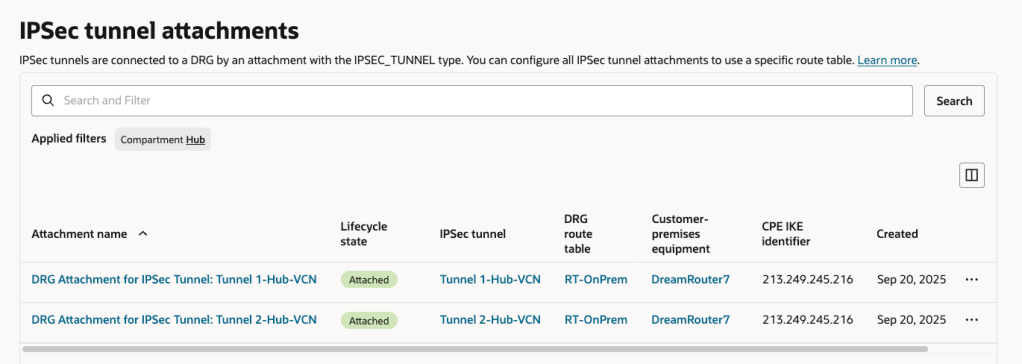
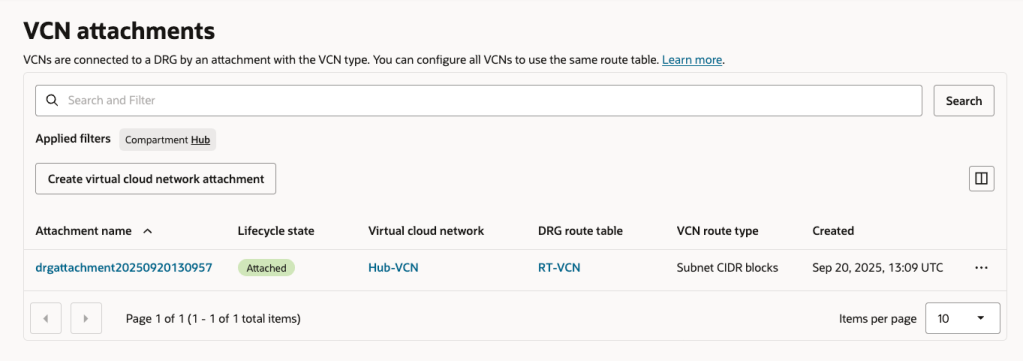
    • Associated each Route Table with the respective Attachments (replacing the OOTB configuration).
      • On-Prem > IPSec Tunnel Attachment
      • RPC > Remote Peering Connection Attachment
      • VCN > VCN Attachments

    Here are the Import Route Distributions that I needed to create:

    On-Prem Import Routes: This will enable On-Prem to see all of the routes from the VCNs and Remote Peering Connection.

    Remote Peering Connection Import Routes: This will enable the RPC to see all of the VCNs and IPSec tunnel (which is the Site to Site VPN).

    VCN Import Routes: This enables all VCNs to see all of the VCNs, RPCs and IPSec Tunnel.

    Here are the Route Tables with the mapping to the Import Rule Distributions On-Prem/RPC/VCN:

    Here are the Attachments with the association to the respective Route Tables.

    As a side note, if you are using a FastConnect rather than a Site-to-Site VPN for On-Premises to OCI connectivity the tweaks you’ll need to make to the configuration are:

    • Replace IPSec Tunnel with Virtual Circuit in the Import Rules
    • The On-Prem Route Table should be associated with the Virtual Circuit Attachment rather than IPSec Tunnel Attachment.

  • Transcribing speech to text using the OCI AI Speech service with Python 🎤

    I’ve been playing around with the OCI AI Speech service recently, one thing I really struggled with was using the AI Speech API to create a transcription job to extract the text from an audio/video file (as I needed to automate the process).

    After much head scratching (…and some help from a colleague), I was able to assemble the following Python script, this provides a function named transcribe, which can be called to submit a transcription job. The following parameters are required:

    • inputfile – The name of the audio/video file to transcribe e.g. recording.mp3
    • bucket – The name of the bucket that contains the inputfile to transcribe (this is also where the JSON output of the transcription job will be stored)
    • compartmentid – OCID of the compartment to run the transcription job in
    • namespace – The Object Storage namespace
    import oci
    
    config = oci.config.from_file()
    
    def transcribe(inputfile,compartmentid,bucket,namespace):
        ai_speech_client = oci.ai_speech.AIServiceSpeechClient(config)
        create_transcription_job_response = ai_speech_client.create_transcription_job(
                create_transcription_job_details=oci.ai_speech.models.CreateTranscriptionJobDetails(
                    compartment_id=compartmentid,
                    input_location=oci.ai_speech.models.ObjectListInlineInputLocation(
                        location_type="OBJECT_LIST_INLINE_INPUT_LOCATION",
                        object_locations=[oci.ai_speech.models.ObjectLocation(
                            namespace_name=namespace,
                            bucket_name=bucket,
                            object_names=[inputfile])]),
                    output_location=oci.ai_speech.models.OutputLocation(
                        namespace_name=namespace,
                        bucket_name=bucket)))
    
    transcribe(inputfile="Name of file to transcribe",compartmentid="OCID of the compartment to run the transcription job in",bucket="Bucket that contains the file to transcribe",namespace="Object storage namespace")
    

    For example:

    transcribe(inputfile=”recording.mp3“,compartmentid=”ocid1.compartment.oc1..aaaaaaaae“,bucket=”Transcription“,namespace=”lrdkvqz1i7f9“)

    When this has been executed, the transcription job can be viewed within the OCI Console.

    Once the job completed, the transcription was available to view from within the job (clicking the filename within the Tasks section):

    Here is the transcript in all it’s glory.

    The sample can also be found on GitHub.

  • Using Resource Principal authentication with OCI 🔐

    When connecting to OCI services in using the SDKs there are four options for authentication 🔐:

    • API Key
    • Session Token
    • Instance Principal
    • Resoure Principal

    Each of these is covered in detail within the OCI SDK Authentication Methods documentation 📕.

    I had a situation recently where I wanted to use Resource Principal authentication to authenticate a Container Instance to an OCI Generative AI Agent, the container was running a Python-based front end for an agent that I had created, however rather than using an API Key to authenticate as a specific user account to the Generative AI Agent service, I wanted to authenticate as the actual Container Instance itself.

    Doing this meant that I didn’t need to store a private key and config file (of the user account) on the Container Instance, which could be viewed as a security risk.

    There are three steps required to configure Resource Principal authentication which I have explained below, one thing to note is that this approach can be adapted for authenticating to other OCI services.

    Step 1 – Create a Dynamic Group that includes the Container Instance 🫙

    This defines the resource that will be connecting from (the Container Instance) to the Generative AI Agent. To create the Dynamic Group, I did the following within the OCI Console – I navigated to:

    Identity & Security > Domains > (My Domain) > Dynamic groups > Create dynamic group.

    I then created a group named Container-Instances with the following rule:

    ALL {resource.type=’computecontainerinstance’}

    This Dynamic Group contains every Container Instance within my tenant, I could have been more granular and specified an individual Container Instance.

    For further details on how to create Dynamic Groups be sure to check out the official documentation.

    Step 2 – Create a Policy that provides members of the Dynamic Group with access to the Generative AI Agents service 📄

    The policy grants permissions to the Dynamic Group created above so that members of this group are able to connect to the Generative AI Agent service, to create the policy I did the following within the OCI Console:

    Navigated to – Identity & Security > Domains > Policies > Create Policy

    I then created a policy with the following statement:

    Allow dynamic-group Container-Instances to manage genai-agent-family in tenancy

    This provides the Dynamic Group named Container-Instances (created in Step 1) the desired access to the Generative AI Agent service – each OCI service has specific resource types that can be used within policies, the full policy reference for the Generative AI Agent service can be found here.

    Step 3 – Update the Python code to authenticate to the Generative AI Agent service using the identify of the Container Instance (Resource Principal) 🐍

    To update the Python script that connects to the Generative AI Agent so that it uses Resource Principal rather than API Key authentication, I updated the following lines of code from this:

    config = oci.config.from_file("config")
    service_ep = "https://agent-runtime.generativeai.uk-london-1.oci.oraclecloud.com"
    agent_ep_id = "OCID"
    
    generative_ai_agent_runtime_client = oci.generative_ai_agent_runtime.GenerativeAiAgentRuntimeClient(config,service_endpoint=service_ep)
    

    To this:

    rps = oci.auth.signers.get_resource_principals_signer() 
    service_ep = "https://agent-runtime.generativeai.uk-london-1.oci.oraclecloud.com"
    agent_ep_id = "OCID"
    
    generative_ai_agent_runtime_client = oci.generative_ai_agent_runtime.GenerativeAiAgentRuntimeClient(config={},signer=rps,service_endpoint=service_ep)


    The two major changes are:

    • Using “oci.auth.signers.get_resource_principals_signer()” rather than loading a config file with “config = oci.config.from_file(“config”)”
    • When connecting to the service, using config={},signer=rps,service_endpoint=service_ep” (key bits in bold) rather than “config,service_endpoint=service_ep

    As mentioned earlier the approach that I’ve covered above an be adapted to work with other OCI services.

  • Sending raw requests using the OCI CLI 💻

    The OCI CLI includes a raw-request option, as the name suggests this is a useful way to send manual requests to OCI services instad of using the native CLI commands 💻.

    For example to list the buckets within a specific compartment I can run the following OCI CLI command 🪣:

    oci os bucket list --compartment-id (OCID) --namespace-name (NameSpace)
    

    Or alternatively I could run the following using the OCI CLI raw-request command.

    oci raw-request --http-method GET --target-uri https://objectstorage.uk-london-1.oraclecloud.com/n/lrdkvqz1i7e6/b?compartmentId=ocid1.compartment.oc1..aaaaaaaa5yxo6ynmcebpvqgcapt3vpmk72kdnl33iomjt3bk2bcraqprp6fq
    

    This is a fairly simple read request against object storage, to help me understand how to formulate the URL (target-uri) I added –debug to the initial oci os bucket list CLI command that I ran. This provides a wealth of information on what happens “under the hood” when running a CLI command and helped me to understand the –target-uri I needed to use for the raw-request command.

    For more complex scenarios, such as creating resources or using a service e.g. analysing an image with AI Vision, you can add –generate-param-json-input to a CLI command and it will generate a JSON file which can be populated with the desired parameters that you can then pass to raw-request using the –request-body parameter.

    In terms of real-world usage, the only real use-case for this is with new services that you need to interact with, where there isn’t a CLI command available, with that being said this would mean that you couldn’t use the –debug parameter to help understand how to send the request using raw-request, so you’d need to rely on documentation and/or trial and error – probably the latter!

  • Creating a front end for an OCI Generative AI Agent using Streamlit 🎨

    I stumbled upon an amazing tool recently called Streamlit. Streamlit makes it super-simple to create web apps using Python without any front-end dev experience (which was music to my ears!).

    I had one use-case which was perfect for Streamlit – creating a front end for OCI Generative AI Agents. I’ve built a number of PoCs recently and have used the OCI Console to demonstrate an OCI Generative AI Agent in action, whilst this is functional, it’s not particularly pretty 😀.

    If you want to know more about OCI Generative AI Agents, be sure to check out this short video that I created that walks through the end-to-end process of creating an agent in less than 10 minutes ⏱️.

    Anyway……back to the main topic. The advantage of using Streamlit is that it enables custom web apps to be created in minutes, which are highly customizable and therefore perfect for PoCs to demonstrate the art of the possible .

    Before I jump into sharing the code, this is how the end result looked (running locally on my Mac, will also work on Windows too) – using an agent that I developed to help understand UK immigration policy 📄. Here I am asking about the rules for an entrepreneur.

    Installing Streamlit is a breeze using the single command below.

    pip install streamlit
    

    Once I’d done this, I put together the following Python script to create the web app, this can also be downloaded from GitHub.

    Disclaimer: I’m no developer and this code is a little hacky, but it gets the job done!

    The following variables need to be updated before running the script – further info can be found in the code comments:

    • st.title – Set’s the title of the page
    • st.sidebar.image – Configures the image to use in the sidebar
    • config – Set’s the OCI SDK profile to use, further info on this can be found here – https://docs.oracle.com/en-us/iaas/Content/API/Concepts/sdkconfig.htm
    • service_ep – Defines the Generative AI Agent service endpoint to connect to (this varies by region)
    • agent_ep_id – Sets the OCID of the agent to connect to
    import streamlit as st
    import time
    import oci
    
    # Page Title
    st.title("OCI Generative AI Agents Demo 🧠") # Update this with your own title
    
    # Sidebar Image
    st.sidebar.image("https://brendg.co.uk/wp-content/uploads/2021/05/myavatar.png") # Update this with your own image
    
    # OCI GenAI settings
    config = oci.config.from_file(profile_name="DEFAULT") # Update this with your own profile name
    service_ep = "https://agent-runtime.generativeai.us-chicago-1.oci.oraclecloud.com" # Update this with the appropriate endpoint for your region, a list of valid endpoints can be found here - https://docs.oracle.com/en-us/iaas/api/#/en/generative-ai-agents-client/20240531/
    agent_ep_id = "ocid1.genaiagentendpoint.oc1.us-chicago-1.amaaaaaaayvpzvaa7z2imflumr7bbxeguh6y7bpnw2yie4lca2usxrct" # Update this with your own agent endpoint OCID, this can be found within Generative AI Agents > Agents > (Your Agent) > Endpoints > (Your Endpoint) > OCID
    
    # Response Generator
    def response_generator(textinput):
        # Initialize service client with default config file
        generative_ai_agent_runtime_client = oci.generative_ai_agent_runtime.GenerativeAiAgentRuntimeClient(config,service_endpoint=service_ep)
    
        # Create Session
        create_session_response = generative_ai_agent_runtime_client.create_session(
            create_session_details=oci.generative_ai_agent_runtime.models.CreateSessionDetails(
                display_name="USER_Session",
                description="User Session"),
            agent_endpoint_id=agent_ep_id)
    
        sess_id = create_session_response.data.id
    
        response = generative_ai_agent_runtime_client.chat(
            agent_endpoint_id=agent_ep_id,
            chat_details=oci.generative_ai_agent_runtime.models.ChatDetails(
                user_message=textinput,
                session_id=sess_id))
    
        #print(str(response.data))
        response = response.data.message.content.text
        return response
    
    # Initialize chat history
    if "messages" not in st.session_state:
        st.session_state.messages = []
    
    # Display chat messages from history on app rerun
    for message in st.session_state.messages:
        with st.chat_message(message["role"]):
            st.markdown(message["content"])
    
    # Accept user input
    if prompt := st.chat_input("How can I help?"):
        # Add user message to chat history
        st.session_state.messages.append({"role": "user", "content": prompt})
        # Display user message in chat message container
        with st.chat_message("user"):
            st.markdown(prompt)
    
        # Display assistant response in chat message container
        with st.chat_message("assistant"):
            response = response_generator(prompt)
            write_response = st.write(response)
        # Add assistant response to chat history
        st.session_state.messages.append({"role": "assistant", "content": response})
    

    Once this file has been saved, it’s simple to run with a single command:

    streamlit run OCI-GenAI-Agents-Streamlit.py
    

    It will then automatically launch a browser and show the web app in action 🖥️

    This basic example can easily be updated to meet your requirements, the Streamlit documentation is very comprehensive and easy to follow with some useful examples – https://docs.streamlit.io/.

  • Unauthorized to use OML application error when trying to obtain an OML token from an Oracle Autonomous database with a private endpoint ❌

    Probably the longest title I’ve ever had for a post!

    I have an Oracle Autonomous Database that I created a private endpoint for and published via a public load balancer in OCI……my reason for this complexity – I wanted to use a custom vanity URL to access the database and this is the supported way to do this. If want to know more about setting this up, be sure to check out this step by step guide 📖.

    Once I’d got this setup, everything worked as expected apart from one small issue – when trying to get a token via REST so that I could call an Oracle Machine Learning model within the database I received the following error ❌.

    b'{“error_message”:”\’DEMO1USER\’ unauthorized to \’use OML application\’”,”errorCode”:0,”request_id”:”OMLIDMREST-955f999622584d33a70″}’

    I was calling the REST API via Python, but other methods such as Curl returned the same error (further details on calling the REST API to get a token and authenticate can be found here). The user had the relevant permissions so it was definitely something else 🤔.

    The trick to fixing this is to update the URL that is called to obtain the token, rather than using this:

    https://oml-cloud-service-location-url/omlusers/api/oauth2/v1/token

    The URL needs to be updated to include the OCID of the OCI tenancy and the name of the database to connect to, like this:

    https://oml-cloud-service-location-url/omlusers/tenants/TenancyOCID/databases/DatabaseName/api/oauth2/v1/token

    For example, I was originally using this URL:

    https://adb.brendg.co.uk/omlusers/api/oauth2/v1/token

    I had to update this to:

    https://adb.brendg.co.uk/omlusers/tenants/ocid1.tenancy.oc1..aaaaaabbjdjwnd3krfpjw23erghw4dxnvadd9w6j2hwcirea22qrtfam24mq/databases/DemoDB/api/oauth2/v1/token

    The reason for this, is that when using a custom (vanity) URL to access the REST endpoint, it doesn’t know which tenancy and database you are trying to obtain an authentication token for, therefore you need to specify this in the REST endpoint.

    Once I’d done this, it worked like magic 🪄

  • How to create a free SSL certificate with Let’s Encrypt…and as a bonus use this certificate with Oracle Analytics Cloud 🔐

    I needed an SSL certificate recently as wanted to make an instance of Oracle Analytics Cloud available publicly with a nice vanity URL, rather than https://demo1analyticscloud-lrmvtbrwx-ld.analytics.ocp.oraclecloud.com, something a little more memorable, such as https://oac.oci-demo.co.uk.

    To do this I needed an SSL certificate and decided to use Let’s Encrypt as they provide free SSL certificates (with a validity period of 90 days).

    It was relatively straightforward to create a certificate using the Certbot client for macOS, to do this I did the following:

    Step 1 – Installed Certbot using the following command

    brew install certbot
    

    Step 2 – Created a directory to store the generated certificates

    mkdir certs
    cd certs
    

    Step 3 – Create the certificate request using Certbot

    This uses the DNS challenge type, which is ideal when you need to create a certificate for use on a system that doesn’t provide native integration with Certbot (such as Oracle Analytics Cloud). Replace “e-mail address” with a valid address to use for renewal reminders.

    cd certs
    certbot certonly --manual --preferred-challenges=dns --config-dir config --work-dir workdir --logs-dir logs --agree-tos -m e-mail address --key-type rsa
    

    When this command has been run, it will ask for the hostname to create the SSL certificate for. In my case I requested a certificate for demo1oac.oci-demo.co.uk.

    After hitting enter, it then provides a DNS record that needs to be created to validate domain ownership.

    I host my DNS within OCI, so this was as simple as creating a DNS TXT record using the OCI Console (the process will vary depending on your DNS provider).

    I then used the link within the instructions to validate the presence of the DNS TXT records that I had just created.

    Once I’d verified that the DNS record was available publicly, I hit enter and the SSL certificates were created for me!

    Step 4 – Configure OAC to use a custom hostname with SSL (example)

    I then navigated to Oracle Analytics Cloud within the OCI Console and within Vanity URL selected Create.

    I entered the hostname for the vanity URL – demo1oac.oci-demo.co.uk. I then uploaded the certificates that had just been generated.

    The mapping between certificate types and the .pem files created is as follows:

    • Certificate = cert1.pem
    • Private Key = privkey1.pem
    • Certificate Authority chain file = chain1.pem

    I then hit Create to apply the configuration. A final step was for me to create a DNS entry to point demo1oac.oci-demo.co.uk to the public IP address of the OAC instance.

    I then waited a few minutes for the DNS record to come to life and then browsed to https://demo1oac.oci-demo.co.uk and it worked!

  • Unable to connect to a Kubernetes cluster in OCI using kubectl 🔌

    The time finally came for me to get hands on with Kubernetes on OCI (or OKE as it’s affectionately know).

    Spinning up a Kubernetes cluster was an absolute breeze, however when I started to work through the Quick Start….or not so Quick Start for me – I stumbled up an error when attempting to deploy the sample app to my cluster.

    When I ran the command in Step 3 I received the following error:

    error: error validating “https://k8s.io/examples/application/deployment.yaml”: error validating data: failed to download openapi: the server has asked for the client to provide credentials; if you choose to ignore these errors, turn validation off with –validate=false

    Looked like some form of authentication issue, after much head scratching and experimentation I figured out what the problem was (it took me far too long ⏱️).

    I have multiple profiles specified within my OCI CLI configuration file, example below (with the juicy bits removed!):

    The OKE cluster I needed to connect to is within the tenancy I have named PubSec, if I take a look at the Kubernetes config file (located in “.kube” within my user profile), I could see that this uses the OCI CLI to connect to the cluster – however as it doesn’t specify a profile within the OCI CLI config this will use the DEFAULT profile, in my specific case I needed to override this to uses the PubSec profile.

    I resolved this by adding the highlighted lines (below) to the Kubernetes config file within “.kube”. This tells the OCI CLI to connect to the cluster using the PubSec profile rather than DEFAULT.

    Once I’d updated this, saved and re-sarted the terminal, I ran the command again and it worked like magic 🪄