I’ve been working with a customer to setup an OCI Site-to-Site VPN between their On-Premises environment and OCI tenancy.
One thing we wanted to do was test the actual speed of the VPN to ensure that it was sufficient for the customers needs. I found the easiest way to do this was using the splendid tool iperf3 🏎️.
I had a play with this in my home lab, where I have an OCI Site-to-Site VPN configured between a Dream Router 7 and my test OCI tenancy – this provides private access to a number of VM instances that I have hosted within my OCI tenancy.
To get started I needed to install iperf3 on a server within my tenancy (this will be the endpoint for the speed test). To install iperf3 on Ubuntu, the following command can be used:
sudo apt install iperf3
To install on Oracle Linux run the following command:
sudo yum install iperf3
Once iperf3 had been installed on the server within OCI, I then needed to install it on my client machine that sits On-Premises (my house!), iperf3 supports Windows and macOS. I installed on my mac using the instructions found here – https://iperf.fr/iperf-download.php.
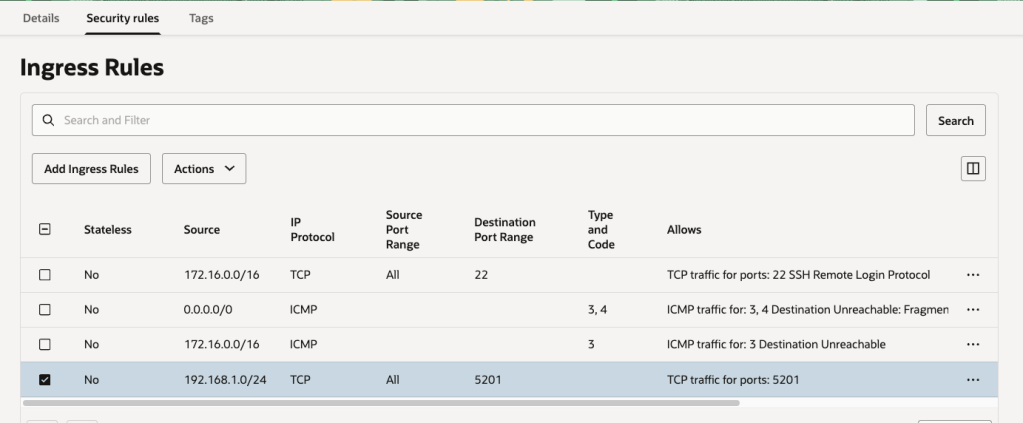
Now that I have iperf3 installed on the client and server, the next thing I needed to do was open the ports used by the iperf3 (TCP 5201 by default) on both the Linux server itself and the Security List/NSG within OCI 🔐.
Here are instructions for opening a local port on Ubuntu. To open the port on Oracle Linux, use these commands:
sudo firewall-cmd --add-port=5201/tcpsudo firewall-cmd --runtime-to-permanent
Use these instructions to open a port in a Security List. To open a port in an NSG use these instructions.
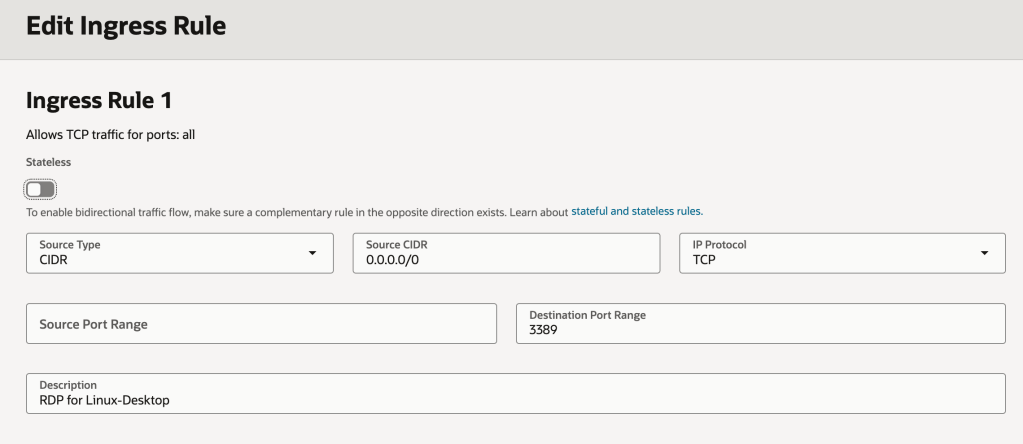
In my case I’m only using Security Lists to secure access so have the configuration below, which permits traffic on TCP port 5201 from my home network (192.168.1.0) to the subnet containing my VM instance within OCI (172.16.1.0/24):
Now that the ports have been opened on the Linux server AND either the Security List or NSG (depending on what you use).
The next thing to do is to start iperf3 on the Linux server in listening mode, to do this I ran the following command.
iperf3 -s

I can now start the test from the client machine (macOS in my case) by running the following command, which connects to the IP address of my Linux VM instance – note, it’s using the private IP address so will route over the VPN tunnel:
sudo iperf3 -c 172.16.1.21

It will then run some speed tests and output the results:
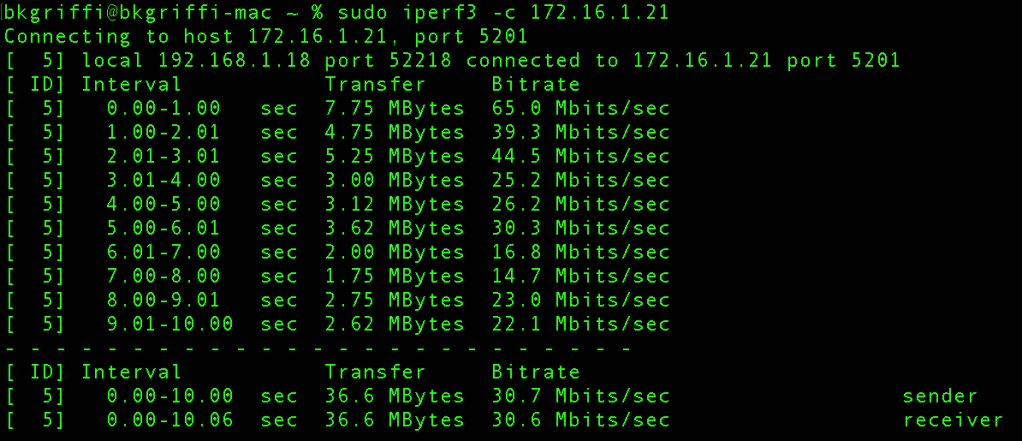
From this I can see the transfer speed in MBit/s and MBytes/s for each of the 10 intervals and also the average send/receive speed.
In the example above, I was seeing ~30 Mbits/sec throughput.
This was super-helpful for me, hopefully you find it useful too.
Whilst I used it to benchmark VPN speeds, it can be used in other scenarios too, to understand the network throughput between two devices on the same or different networks.