
In my test lab I wanted to setup a Site-to-Site VPN between a Raspberry Pi on my home network and OCI, the main reason for this was to enable me to quickly access resources in OCI (such as my VMs) without having to use a Bastion (as I’m lazy and impatient) 🔐.
I’d recently bought a shiny new Raspberry Pi 5 so this was a perfect excuse to have a play with it! Fortunately for me, Johannes Michler created a fantastic guide on how to setup a Raspberry Pi to connect to an OCI IPSec VPN – https://promatis.com/at/en/using-a-raspberry-pi-to-connect-to-oracle-oci-ipsec-vpn/.
I followed this guide and was able to get this working eventually (which was definitely a case of me not RTFM’ing). I thought I’d share some additional info which others may find helpful 💡.
1 – Error: No connection named “connection name” ❌
When running sudo journalctl | grep pluto to check the status of the VPN tunnels to OCI I could see the tunnels were not connecting and the following error was being repeated – “no connection named “oracle-tunnel-1” and “no connection named “oracle-tunnel-2“

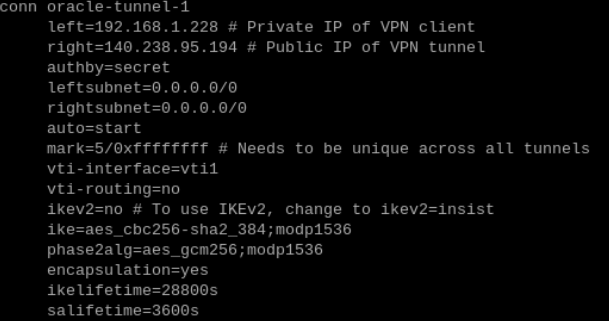
These are the names of the two tunnels that I had defined within /etc/ipsec.d/oci-ipsec.conf and are the default names provided by Oracle (you can call them whatever you like).
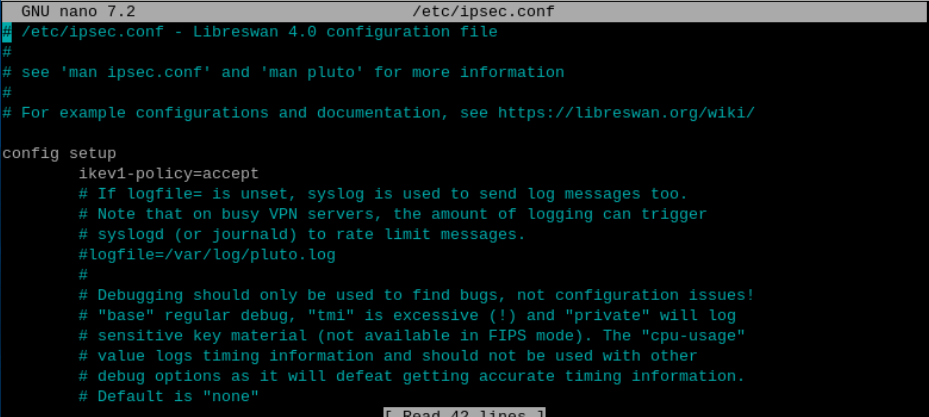
The reason for this error, is that the two tunnels were ignored as they are configured to use IKEv1 (the default when you use the Site-to-Site VPN wizard in OCI). By default Libreswan doesn’t permit IKEv1, to enable this I had to add the ikev1-policy=accept to the file /etc/ipsec.conf within the config section.
Once I’d done this and restarted the IPSec service using sudo systemctl restart ipsec, it came to life and the two IPSec tunnels connected to OCI 🎉.
Output from sudo journalctl | grep pluto

Obviously in a production environment you wouldn’t use IKEv1 as IKEv2 is far more secure, I was happy using this my for basic lab environment though.
2 – Starting the VPN tunnels automatically on reboot
To ensure that the VPN tunnels persist between reboots of the Raspberry Pi I needed to configure the IPSec service to start automatically, which I did using the following command:
sudo systemctl enable ipsec
3 – Creating a static route on the Raspberry Pi 🛣️
I added a route to the Raspberry Pi to route all of the traffic destined to my OCI VCN (10.2.0.0./16) via the VPN using the following command:
sudo ip route add 10.2.0.0/16 nexthop dev vti1
The device vti1 is what I defined for the first tunnel within the file /etc/ipsec.d/oci-ipsec.conf
Once I’d added the static route, I was able to SSH directly from my Pi to one of the VMs within my VCN! The challenge is that this route doesn’t persist between reboots, so I needed some way to make this static.
There is a myriad of different ways to do this on Linux, however I opted for the low-tech approach and added the following line to /home/pi/.bashrc.
sudo ip route add 10.2.0.0/16 nexthop dev vti1 > /dev/null 2>&1

This script runs each time the Pi user logs in and as Raspberry Pi OS logs the Pi user in automatically by default, this means that the command will execute each time the Pi boots up – defintely not a production solution, but fine for a lab environment 🥼.
4 – Creating a route on client devices within my network
I didn’t want to use my Pi directly to connect to resources within OCI, the idea is that the Pi simply spins up the VPN tunnels, I can then route traffic from my network to the Pi for the 10.2.0.0./16 IP address range, which will send traffic down the VPN tunnel(s) to OCI – result being I can connect to my OCI resources from other devices within my network (such as my Mac and Windows PC).
I ran the following command to add a route to my Mac:
sudo route -n add 10.2.0.0/16 192.168.1.228
This tell the Mac to route all requests for the IP range 10.2.0.0./16 (my VCN in OCI) via the Raspberry Pi (which has an IP address of 192.168.1.228).
The equivalent on Windows would be – route add 10.2.0.0 mask 255.255.0.0 192.168.1.228
NOTE: Neither of these commands makes the routes persistent (they’ll disappear after a reboot), although this is easy enough to do by adding /p to the command for Windows and using one of the options described here for macOS.
Hopefully this is of use to somebody 😀.

Leave a comment