
Microsoft recently released (in beta form) the ability to add external content to Viva Learning using the Microsoft Graph API, I was really excited to see this as I know that a lot of customers have been asking for this capability, in this post I’m going to do a walkthrough of adding content to Viva Learning from my YouTube channel (the process I’m going to demonstrate could be adapted to pull in content from any source).
For those of you who aren’t familiar with Viva Learning, here’s the sales pitch:
Viva Learning is a centralized learning hub in Microsoft Teams that lets you seamlessly integrate learning and building skills into your day. In Viva Learning, your team can discover, share, recommend, and learn from content libraries provided by both your organization and partners. They can do all of this without leaving Microsoft Teams.
Taken from: https://learn.microsoft.com/en-us/viva/learning/overview-viva-learning
When Viva Learning launched, it included the ability to integrate with several Learning Management Systems (LMS’s) and content providers out of the box, including – Cornerstone OnDemand, SAP SuccessFactors and Skillsoft. For customer that were using an LMS/content provider not supported OOTB there wasn’t a way integrate – until now!
An employee learning API has been made available through the Microsoft Graph API (Beta endpoint), the documentation for this can be found here. Here’s the standard disclaimer for using the Beta endpoint (you have been warned 😀).

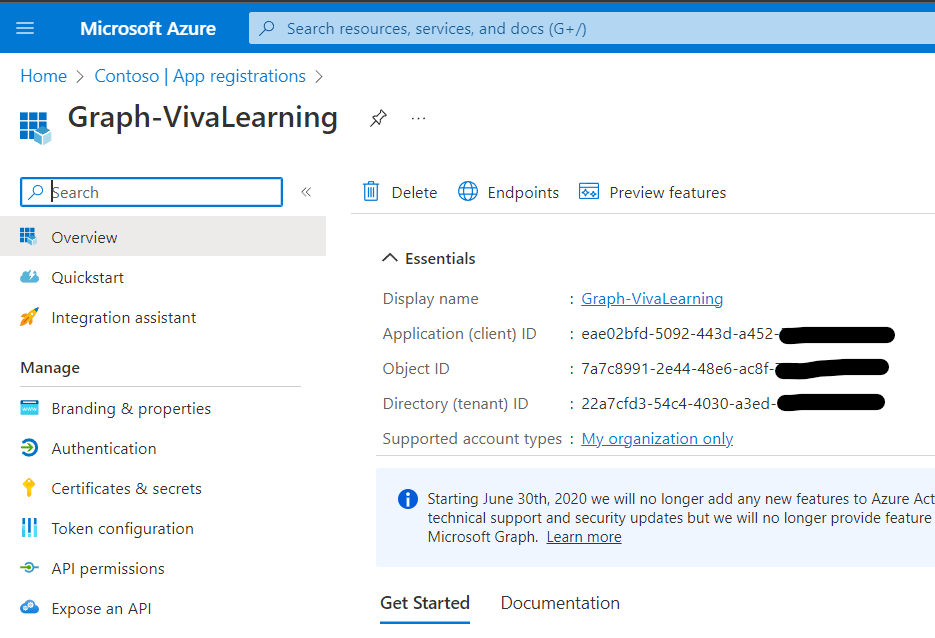
Step 1 – Register an App in Azure AD
I followed the steps in the Register the app in the portal tutorial to register an app in Azure AD named Graph-VivaLearning, this app is required for the PowerShell script to authenticate to Azure AD and obtain the necessary permissions.
Creating an app isn’t strictly necessary as the Microsoft Graph PowerShell SDK can create this automatically, however using a separate app provides greater control over permissions scopes and avoids permissions creep!
I didn’t grant any permissions to this app as I will be using dynamic consent, which is easier for a demo like this.
Step 2 – Connecting to the Microsoft Graph
As I’m using the Microsoft Graph PowerShell SDK, the first thing I needed to do was install this using the following command (I’m using PowerShell Core):
Install-Module Microsoft.Graph -Scope CurrentUser
Once this has been installed, I could then connect to the Microsoft Graph:
# Authenticate to the Microsoft Graph
$ClientId = "Client ID" # This is obtained from the app registration (screenshot above)
$AuthTenant = "Directory ID" # This is obtained from the app registration (screenshot above)
$GraphScopes = "LearningProvider.ReadWrite","LearningContent.ReadWrite.All"
Connect-MgGraph -ClientId $clientId -TenantId $authTenant -Scopes $graphScopes -UseDeviceAuthentication
The script above specifies the Client ID and Tenant ID (which are obtained from the app registration – screenshot above). I also specify the scopes (permissions that I require in $GraphScopes). For full access to read/write Learning Providers and Learning Content as per Create learningProvider and Update learningContent I requested the LearningProvider.ReadWrite and LearningContent.ReadWrite.All permission scopes.
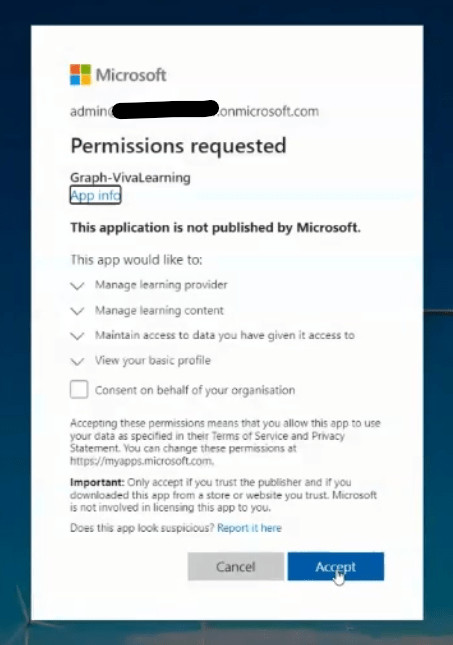
The script then uses Connect-MgGraph to connect to the Microsoft Graph using the $ClientID and $AuthTenant requesting the scopes in $GraphScopes, it uses the device code flow for authentication, which means you need to fire up a browser and enter the code requested to authenticate:

I then needed to accept the scopes (permissions) that I had requested (as a tenant admin I was able to do this directly):
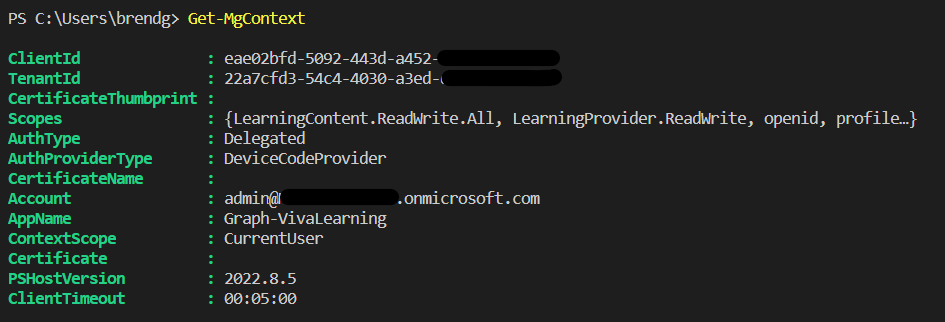
Once this has been successful completed, I saw the following:

Step 3 – Adding a Learning Provider
This is where the fun begins! I can now add my Learning Provider, for this walkthrough I’m going to add a provider called Brendan’s Tech Rambling (the name of this blog and my YouTube channel).
To do this I ran the following:
# Add a Learning Provider
$params = @{
        "displayName" = "Brendan's Tech Ramblings"
        "squareLogoWebUrlForDarkTheme" = "https://brendg.co.uk/wp-content/uploads/2021/05/cropped-myavatar.png"
        "longLogoWebUrlForDarkTheme" = "https://brendg.co.uk/wp-content/uploads/2021/05/cropped-myavatar.png"
        "squareLogoWebUrlForLightTheme" = "https://brendg.co.uk/wp-content/uploads/2021/05/cropped-myavatar.png"
        "longLogoWebUrlForLightTheme" = "https://brendg.co.uk/wp-content/uploads/2021/05/cropped-myavatar.png"
        "isEnabled" = $true
        "loginWebUrl" = ""
}

$uri = "https://graph.microsoft.com/beta/employeeExperience/learningProviders"
Invoke-MgGraphRequest -Method POST -uri $uri -Body $params
This specifies the settings ($params) for the Learning Provider. I’ve included a display name, logo – which needs to be publicly accessible, sets it to enabled. I haven’t specified a login URL – as login isn’t required to access the content I will be adding (it’s all hosted on YouTube).
I then use Invoke-MgGraphRequest (as there isn’t a native Cmdlet for Viva Learning yet) to send a POST request to the endpoint for adding Learning Providers. Once this completes, I run the following to return all custom Learning Providers:
$uri = "https://graph.microsoft.com/beta/employeeExperience/learningProviders"
$lps = Invoke-MgGraphRequest -Method GET -uri $uri
$lps.value

Step 4 – Adding Content
Now I have my Learning Provider registered with Viva Learning (Brendan’s Tech Ramblings) I need to add some actual content. For this I decided to add a couple of YouTube videos from my channel. I used the following to do this:
$params = @{
        "title" = "Burger Tax - using an Azure Function to Stay Healthy!"
        "description" = "Find out how I used the Starling Bank developer API and an Azure Function to tax myself whenever I buy junk food!"
        "contentWebUrl" = "https://youtu.be/z909tjuDKlY" # YouTube video URL
        "thumbnailWebUrl" = "https://brendg.co.uk/wp-content/uploads/2022/09/maxresdefault-1.jpg" # Publicly accessible URL of the content thumbnail
        "languageTag" = "en-us"
        "numberOfPages" = "1"
        "format" = "Video"
        "createdDateTime" = "2022-07-16"
}
Firstly, I specify the details of the content that I’d like to add ($params), there are additional values that can be included, I’ve used the bare minimum here.
The one thing that was a little tricky was generating the thumbnail (thumbnailWebUrl) – I ended up downloading this from YouTube and uploading to my blog. As you’ll see later it looks so much nicer with a thumbnail included.
I then needed to obtain the ID of the Learning Provider that I registered and store this within $lpid (this ID is required when we make the request to add content).
$uri = "https://graph.microsoft.com/beta/employeeExperience/learningProviders"
$lps = Invoke-MgGraphRequest -Method GET -uri $uri # Retrieve the custom Learning Provider
$lpid = $lps.value.id # Get the ID of the custom Learning Provider
Finally, I can make the request to add the content:
$uri = "https://graph.microsoft.com/beta/employeeExperience/learningProviders/" + $lpid + "/learningContents(externalId='BurgerTax')"
Invoke-MgGraphRequest -Method PATCH -uri $uri -Body $params
The one thing I needed to manually specify in this is an ID for the content (externalID), I gave this the ID “BurgerTax”. This ID is used for such things as delete operations.
Now if I browse to Viva Learning (after waiting a few hours!), I can see my Learning Provider (Brendan’s Tech Ramblings) amongst the other providers. I can also see the content that I added to this provider – including an extra video that I added, which I omitted from this walkthrough. Notice you can see my avatar (which was specified as the logo when adding the content provider) and thumbnails for each video (which was specified as thumbnailWebUrl when adding the content).

If I select the Burger Tax video the opens a new page where the video can be watched and details of other content from my Learning Provider are presented.

The code I used in this walkthrough (and some additional goodness) can be found here.

Leave a comment